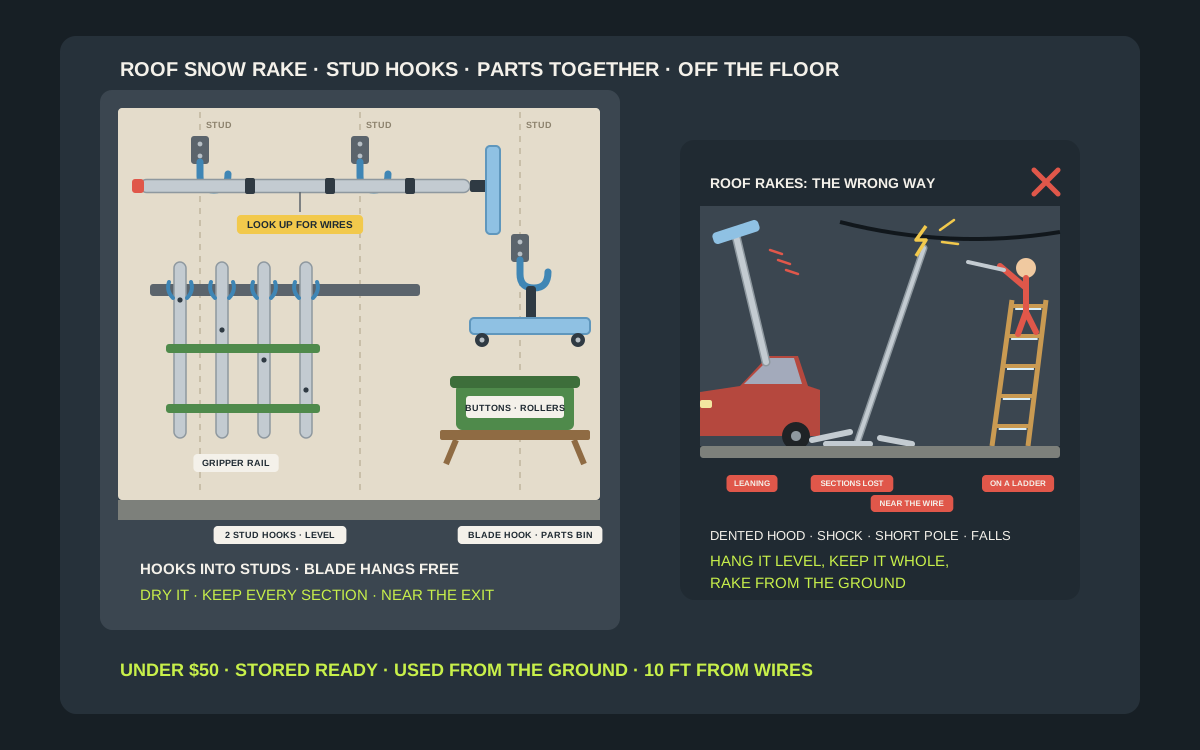
A roof snow rake is the longest tool most people own and the one they use least. For eleven months it is a 16 to 21 foot problem: too long to lean anywhere safely, made of pole sections that wander off, with a plastic blade that cracks if something heavy lands on it. Then a storm drops a foot of wet snow on the roof, the gutters start growing icicles, and you need the rake now, in the dark, with every piece present. That is when a rake that was propped behind the lawn mower turns into a twenty minute search for the last extension tube. The fix costs very little. A pair of stud-mounted hooks, a gripper rail or a simple strap and a small parts bin keep the whole rake together, off the floor and near the door you will walk out of. This guide explains how roof rakes are built, which wall setups suit telescoping and snap-together poles, where to hang the rake in season and out of season, how to dry and check it before it goes back on the wall, and the safety basics that matter the moment it comes down: power lines, sliding snow and staying on the ground.
Shop heavy-duty garage hooks for long-handle tools on Amazon
Who this is for
- Homeowners in snow country with a telescoping or sectional roof rake that has no real home
- Anyone whose rake leans in a corner and slides over every time the garage door rattles
- Owners who have lost a snap-together extension tube, a roller or the grip between winters
- Anyone buying a first roof rake who wants a place to keep it before the first storm
Quick answer
For most garages, the best under-$50 setup is two heavy-duty hooks screwed into neighboring studs, with the collapsed or broken-down rake lying level across them at head height or above, close to the door you use to get outside. If your rake comes apart into sections, strap the sections together and stand them in a long-handle gripper rail, with the blade on its own hook so nothing crushes it, and keep the snap buttons, rollers and grip in a small labeled bin on the same wall. Dry the rake before you hang it, check the rollers and locks every autumn, and keep it in a spot where nothing heavy can fall on the blade. Check the hook rating, the hook depth and the current price on the listing before you buy.
Quick comparison
| Setup | Best for | How it holds | Trade-off |
|---|---|---|---|
| Two stud hooks, pole horizontal | Telescoping rakes, collapsed | Pole lies level across two deep hooks in two studs | Needs a little over 6 feet of clear wall |
| Long-handle gripper rail | Sectional poles stood upright | Spring clips grip the tubes on a rail across studs | Head needs its own hook |
| Ladder hooks with a lip | Long rakes with an extension kit | Wide, deep hooks that cradle the full pole | Bulkier than plain J-hooks |
| Ceiling joist hooks | Off-season storage up high | Screw-in hooks or a pair of slings in the joists | Harder to reach in a storm |
| Maker storage bracket | Slide-type rakes such as the Avalanche | Bracket made for that rake, screwed to the wall | Fits one brand only |
| Utility hook and strap bundle | Sections kept together as one bundle | Hook-and-loop straps around the sections, hung by a loop | Must strap it every time |
| Corner caddy or tall bin | Garages with no free wall | Sections stand in a tall bin in a corner | Uses floor space and can tip |
| Small parts bin on the same wall | Snap buttons, rollers, grip and hardware | Labeled bin on a shelf or pegboard | Only works if you put parts back |
Heavy-duty ladder and J-hooksLong-handle tool gripper racksRoof snow rakes
What to look for
It fits the stored length, not the working length
Nobody stores a roof rake at full reach. A telescoping rake such as Snow Joe’s RJ204M runs from 6.2 feet collapsed to 21 feet extended, so the wall needs a bit more than 6 feet of clear width if it hangs level. Sectional rakes break down into pieces about 4 feet long, which suits a vertical rail or a pair of hooks a short span apart. Measure the rake the way you will actually store it, then pick hooks spaced for that length.
It holds a round pole without letting it roll
Roof rake poles are smooth aluminum or fiberglass tubes, and they roll. A deep J-hook, a ladder hook with a lip, or a padded utility hook keeps the pole seated. A shallow hook or a nail lets it roll off the first time the garage door slams. Gripper clips work for single sections stood upright because the spring jaws grip the tube.
It protects the blade
The head is the fragile part. Snow Joe’s blade is polycarbonate, Garelick’s shingle-saving rakes carry plastic rollers that keep the blade off the roof, and slide-type rakes such as the Avalanche have a long plastic sheet. A blade that hangs under a shelf of paint cans or gets pinned behind a mower cracks or bends. Give the head its own hook or let it hang at the end of the pole in open air.
It keeps every part together
Sectional rakes depend on small parts. Garelick’s assembly sheet lists four extension tubes, four snap buttons and two rollers, and the Avalanche handle snaps together from four sections. Lose one piece and the rake comes up short on storm day. The storage setup should hold the pole, the head and a small bin or bag for the spares in one place.
It mounts into framing
The rakes in this guide weigh roughly 5 to 10 pounds, which sounds light, but it is long, it gets bumped and it gets yanked down in a hurry with cold hands. Screw hooks or a rail into studs, not into drywall alone. If the rake lies across two hooks, put each hook in its own stud so the load is shared and the pole sits level.
It is easy to reach in a storm
The rake only matters when the weather is bad. Store it on the wall nearest the door you will use, above head height so nobody walks into it, but low enough that you can lift it down without a step stool. Off-season it can move higher, to the ceiling or the back wall, as long as it comes back to the door wall before the first snow.
Know what you are storing
Telescoping rakes collapse to one long tube
Telescoping rakes slide one tube inside another and lock with a twist or a clamp. Snow Joe’s RJ204M manual describes a Twist-N-Lock aluminum pole that runs from 6.2 to 21 feet, a 25 inch by 6 inch polycarbonate blade, an overhead reach of 27 feet and a net weight of 4.8 pounds. That makes storage simple: one tube a little over 6 feet long, with the blade on the end. The manual also tells you to remove the shipping cap from the top of the pole and keep it for storage, which is a small detail worth following. A cap like that is easy to lose, so it belongs in the parts bin or back on the pole, not in a drawer.
Sectional rakes come apart into pieces
Snap-together rakes are built from short tubes joined by spring buttons. Garelick’s 21 foot aluminum roof rake uses four snap-together extension tubes and a 24 inch blade with shingle-saver rollers, and its assembly sheet says the poly grip slides on more easily if you warm it in warm water first. The Home Depot listing gives the rake’s weight as 5.75 pounds. Stored broken down, it becomes a bundle of tubes about the length of a broom, which suits a gripper rail or a strapped bundle on a hook.
Slide rakes add a sheet of plastic
Slide-type rakes cut under the snow and let it slide down a plastic sheet instead of pulling it toward you. Marshalltown’s spec sheet for the Avalanche Original 500 lists a 17 inch wide frame with a 12 foot plastic slide, 1.5 inch wheels for asphalt shingles and a fiberglass handle in four sections of about 46 1/2 inches each, for roughly 16 feet of reach. It snaps together with no tools, weighs about 10 pounds, comes with a winder to roll up the slide for storage, and has a storage bracket and an 8 foot handle extension kit sold separately. The bigger Avalanche 750 uses 3 inch wheels for shake, tile and metal roofs.
Fiberglass and aluminum behave differently
Aluminum poles are light and stiff, and they conduct electricity. Fiberglass handles, like the Avalanche’s, are non-conductive when clean and dry, but they are heavier for the same length. Storage does not change much between the two, but the material matters when you take the rake outside, which is why the safety section below spends so much time on wires. A small tag on the pole that says what it is made of is a useful reminder for anyone else in the house who grabs it.
Where each setup earns its place
Two stud hooks: best for telescoping rakes
A collapsed telescoping rake is one rigid tube, so the simplest home is two deep hooks screwed into neighboring studs, with the pole lying level across them. Studs are usually 16 inches apart, so two hooks one or two studs apart give a stable cradle for a 6 foot tube. Let the blade hang just past the last hook in open air, facing the wall so nobody walks into its edge. Above head height on the wall next to the garage side door is the sweet spot.
Gripper rail: best for sectional poles
A rail with spring gripper clips, screwed across two or more studs, holds the sections upright and side by side. Clip all four or five tubes next to each other so you can see at a glance that the set is complete, then hang the blade from a hook at the end of the rail. The same rail can carry the snow shovel and the push broom, which keeps the winter tools in one spot. Check that the clip size matches the pole diameter; a clip meant for a thick wooden broom handle will not grip a slim aluminum tube.
Ladder hooks: best for long rakes and extension kits
If your rake stays partly assembled, or you added an extension kit, a pair of wide ladder hooks gives a deeper cradle than ordinary J-hooks. They also suit a rake that shares the wall with an extension ladder in the off-season. Keep the rake on its own pair of hooks rather than stacking it on top of the ladder, where it slides off when you lift the ladder down.
Ceiling hooks: best for summer
From spring to late autumn the rake can live overhead, on two screw-in hooks or a pair of slings fixed into the ceiling joists, well clear of the garage door track and the opener. That frees the door wall for summer tools. The catch is that it has to come back down before the first storm. Put a note on the calendar for the same weekend you check the snow blower or swap the car mats.
Maker bracket: best for slide rakes
A slide rake is awkward on generic hooks because the wound-up slide and the frame want to twist. Avalanche sells a storage bracket made for its rakes, separately from the rake. If you own one of those, the matching bracket is usually the neatest answer. For other brands, a wide hook for the frame and a strap around the wound slide does the same job.
Strap bundle: best for small garages
Two or three hook-and-loop straps around the pole sections turn them into one bundle you can hang from a single utility hook by a loop of cord or webbing. It is the cheapest setup on this list and the easiest to fit on a crowded wall. The blade hangs on the same hook or the next one. The only discipline needed is to strap the bundle every time the rake comes back in.
Where to put the rake in the garage
Near the exit you will use in a storm
On storm day you will carry a long pole outside, often to the side of the house where the main roof meets the garage. Store the rake on the wall nearest the side door or the garage door you open first, so you are not threading a 6 foot tube past the cars and the workbench. If the rake lives on the far wall, every trip outside means a slow walk past mirrors and windshields with a pole on your shoulder.
Above head height, below a step stool
A rake head at eye level is a hazard, especially a polycarbonate blade with a hard edge. Hang it high enough that the lowest part clears your head as you walk past, and low enough that you can lift it down standing on the floor. For most people that means the bottom of the rake sits somewhere around the top of the garage door opening.
Away from the car hood and the door track
A rake that slides off its hooks should fall onto the floor, not onto the hood of the car. Avoid the wall directly in front of the parking spot, and keep the rake out of the path of the garage door, its track and the opener chain. Overhead storage needs the same check: the door should open fully without touching anything on the ceiling.
With the rest of the winter kit
The rake works best as part of a winter wall: shovels, ice scrapers, the ice melt bucket and the rake together, near the same door. That way one trip to the wall gets you everything for a storm. Our guides to snow shovel and ice scraper holders and ice melt shelves cover the rest of that wall.
Before it goes back on the wall
Knock off snow and let it dry
Bring the rake in, tap the snow off the blade and the pole, and let it dry on the hooks before you collapse or break it down. Water left inside a telescoping tube can freeze around the lock on the next cold night, and a wet slide wound up tight stays damp for days. If the garage is very cold, leave the rake extended or apart overnight and pack it the next day.
Collapse it or take it apart the same way every time
Twist-lock poles should be unlocked and slid fully closed, then locked again so the sections do not creep open while the pole hangs. Sectional poles go back into their clips or straps in the same order every time, with the head separate. Put the shipping cap back on the top of a telescoping pole if your rake came with one.
Wind slide rakes loosely and evenly
Avalanche’s instructions describe a slide winder for rolling up the plastic slide, or a 1/4 inch hex bit on a low-speed drill. Wind the slide evenly so it does not crease, and make sure it is dry first. A slide balled up wet and stuffed in a corner comes out creased and stuck to itself.
Check the moving parts every autumn
Before the first snow, take the rake down and look it over. Rollers should spin freely, snap buttons should pop fully through their holes, twist locks should hold under a firm pull, and the blade should have no cracks or split edges. Garelick’s parts list makes it easy to see what should be there: four extension tubes, four snap buttons and two rollers. Replace any missing piece now rather than in the middle of a storm.
Using the rake safely once it is down
Look up before you lift the pole
This is the part that matters most. OSHA’s electrical guidance says to stay at least 10 feet away from overhead power lines and to assume they are energized. National Grid’s winter safety reminders tell customers to keep ladders, shovels, roof rakes and other tools well clear of any line running from the street to the house, regardless of the material, because in very wet conditions even wood can conduct electricity. National Grid also suggests starting at the end of the roof opposite the point where the service wire comes in. Before you extend the pole, find the service drop and plan your path away from it.
Stay on the ground and out of the slide zone
Roof rakes exist so you do not have to climb. Massachusetts public safety officials advise against using a ladder for snow removal because ice builds up on both the rungs and the soles of your boots, and against standing on the roof unless a registered professional engineer approves it. FEMA’s snow load safety guide warns that snow on a roof can slide off at any moment, so stay outside the area where it would land, away from the eave. Have someone outside with you, and wear a hard hat or helmet and eye protection, as the Massachusetts guidance suggests.
Shave the snow down, do not scrape the roof
The goal is to reduce the load, not to clean the shingles. FEMA advises leaving at least 2 inches of snow on the roof to protect the covering, and the Massachusetts guidance suggests shaving it down to 2 or 3 inches. Pull small amounts at a time, start from the edge and work up the roof. Marshalltown’s Avalanche instructions say that if you feel resistance, stop and adjust rather than forcing the rake, which is a good rule for any brand.
Choose plastic, not metal, on the roof
FEMA’s guide says a non-metallic snow rake used from the ground reduces risk, and that metal rakes can damage roofing and pose an electrocution risk. Its other rules are worth remembering: no picks or sharp tools to chip ice, no stockpiling the snow you pulled off on another part of the roof, and keep the snow you pull down away from exits, downspouts and vents. National Grid adds that falling snow and ice should be kept away from gas and electric meters, and that you should never try to remove ice from utility wires or meters yourself; call the utility.
Ice dams and roof loads, briefly
Why the eave matters
Ice dams form when heat from the house melts snow higher on the roof and the water refreezes at the colder eave. The University of Minnesota Extension explains that the long-term fix is air sealing and insulation in the attic, while raking snow off the lower roof is a short-term measure. Marshalltown’s Avalanche manual says that keeping 5 feet of the roof edge clear of snow will typically prevent ice dams, and states plainly that the rake does not remove ice dams. Travelers, the insurer, suggests raking the first 3 to 4 feet from the edge.
Snow weighs more than it looks
FEMA’s guide puts 1 foot of fresh snow at about 3 pounds per square foot when it is light and dry, and up to about 21 pounds per square foot when it is wet and heavy. An inch of ice weighs a little under 5 pounds per square foot, and a foot of ice about 57. Ice dams also make the load uneven at the eave and push water under the shingles. That is why a rake that is ready to go matters more after a wet storm than after a powdery one.
Know when to stop and call someone
FEMA and the Massachusetts guidance list warning signs of an overloaded roof: sagging ceilings or roofs, popping or cracking sounds, doors and windows that suddenly stick, new cracks in walls, and severe leaks. If you see them, get everyone out and call your building department or a structural engineer. If the roof is steep, high or close to the power lines, a licensed and insured contractor is the safer choice, and National Grid notes that many roofing companies offer snow removal as a service.
Special cases
Finished or insulated garage walls
If the garage wall is covered in drywall or panels, the studs are still there behind it. Find them with a stud finder, confirm with a small test screw, and drive the hooks through the covering into the wood. A rail screwed across several studs spreads the load and gives you more freedom to place clips and hooks where you want them, which helps when the studs do not line up with the spot you would like the rake to sit.
Masonry and block walls
Concrete block or poured walls need masonry anchors rated for the job, or a wooden board fixed to the wall first so you can screw ordinary hooks into the board. The board is often the tidier answer, because you can add or move hooks later without drilling the masonry again. Follow the anchor maker’s instructions for drill size and depth.
Renters and shared garages
If you cannot drill, a freestanding long-handle tool rack or a tall bin in a corner holds sectional poles upright without touching the wall. Strap the sections together so they do not fan out, keep the blade on top where nothing presses on it, and put the parts bag inside the bin. Adhesive hooks are not a good match for a long metal pole that gets pulled down in a hurry in a cold garage.
Sharing the wall with the ladder
Many garages keep the extension ladder and the roof rake on the same long wall, because both need length. Give each its own pair of hooks, with the rake above or beside the ladder rather than resting on it. When you lift the ladder down in summer, the rake should stay put. Our ladder hook guides cover spacing and capacity for the ladder side of that wall.
Three sample garages
Two-car garage with a side door
A 21 foot telescoping rake collapses to just over 6 feet. Two deep J-hooks go into neighboring studs on the wall beside the side door, about 7 feet up, and the rake lies across them with the blade at the door end. Below it, a short gripper rail holds the snow shovel and the push broom, and the ice melt bucket sits on a shelf nearby. One wall, one trip, every storm.
One-car garage that is already full
A sectional rake comes apart into tubes about 4 feet long. Three hook-and-loop straps turn them into a single bundle that hangs from one heavy utility hook high on the back wall, with the blade on a second hook beside it. A small zip bag on the same hook holds the spare snap buttons and the grip. In summer, the bundle moves to two ceiling hooks over the hood of the car, clear of the door track.
Detached garage with a slide rake
An Avalanche-style rake with an extension kit stays in sections, with the slide wound on its winder. The maker’s storage bracket holds the frame on the wall, a short rail grips the handle sections and the extension pieces, and a labeled bin underneath holds the winder and the spare parts. A tag on the handle reads LOOK UP FOR WIRES, because the service drop runs right over the side of the house where the rake gets used.
How to set it up in an afternoon
- Measure the rake as you will store it: collapsed length for a telescoping pole, section length for a snap-together pole, plus the blade.
- Pick the wall nearest the door you use in a storm, away from the car hood and the garage door track.
- Find the studs with a stud finder and mark them; for a level pole, choose two studs one or two bays apart.
- Screw in two deep hooks or a gripper rail at a height where the lowest part of the rake clears your head.
- Add a separate hook for the blade or head if your rake comes apart, so nothing rests on the plastic.
- Put a small labeled bin or bag on the same wall for snap buttons, rollers, the grip, the shipping cap and any winder.
- Hang the dry rake, give it a tug to check that the hooks are solid and the pole does not roll.
- Tag the pole with its material and a reminder to look up for power lines before extending it.
Mistakes to avoid
- Leaning the rake against the wall, where it slides onto the car or across the walkway.
- Hanging the pole from one hook in the middle, so it seesaws and drops when bumped.
- Storing the blade under a shelf or behind the mower, where something heavy cracks it.
- Letting extension tubes, snap buttons or the grip wander off into other bins.
- Collapsing or winding the rake while it is still wet, then leaving it to freeze.
- Screwing hooks into drywall alone instead of into studs.
- Keeping the rake on a far wall, so storm day starts with a pole carried past the cars.
- Extending an aluminum pole near the service wire, or using the rake from a ladder or the roof.
Related guides
Browse the hub: Garage wall storage under $50 - all guides
- Best Snow Shovel & Ice Scraper Wall Holders Under $50
- Best Ice Melt and Rock Salt Storage Shelves Under $50 for Garage Walls
- Best Winter Tire & Seasonal Gear Wall Storage Under $50
- Best Ladder Wall Hooks Under $50 for Garage
- How to Hang a Ladder on a Garage Wall Safely with Under-$50 Hooks
- How to Hang Brooms and Garden Tools on a Garage Wall Under $50
- Best Ice Skate & Sled Wall Hangers Under $50 for Garage
- How to Do a Fall Garage Cleanout with Wall Racks Under $50
FAQ
How do you store a roof snow rake in a garage?
Collapse a telescoping rake or break down a sectional one, dry it, and hang it level across two deep hooks screwed into neighboring studs, or strap the sections and stand them in a gripper rail. Give the blade its own hook so nothing presses on it, keep the small parts in a labeled bin on the same wall, and store it near the door you use in a storm.
What hooks hold a roof rake best?
Deep J-hooks, ladder hooks with a lip or padded utility hooks, screwed into studs, because they stop a round aluminum or fiberglass pole from rolling off. For sectional poles stood upright, a rail with spring gripper clips sized for the tube works well. Check the hook rating, depth and clip size on the listing.
How long is a roof rake when it is stored?
It depends on the design. Snow Joe’s RJ204M telescoping rake collapses to 6.2 feet from a 21 foot reach. Sectional rakes such as Garelick’s and the Avalanche come apart into tubes; the Avalanche handle sections are about 46 1/2 inches each. Measure your own rake before you buy hooks.
Can I hang a roof rake from the ceiling?
Yes, for the off-season. Two screw-in hooks or slings fixed into the ceiling joists keep it out of the way in summer, as long as they are clear of the garage door, its track and the opener. Move it back to the wall by the door before the first snow so you can reach it quickly.
Is an aluminum roof rake dangerous near power lines?
Yes. OSHA advises staying at least 10 feet from overhead lines and assuming they are energized, and National Grid says to keep roof rakes well clear of the line to the house whatever they are made of, since even wood can conduct when very wet. Find the service wire before you extend the pole and start at the opposite end of the roof.
How much snow should I leave on the roof?
FEMA’s snow load safety guide advises leaving at least 2 inches, and Massachusetts officials suggest shaving the snow down to 2 or 3 inches instead of scraping the roof clean, which can damage shingles. Work from the ground, take small amounts at a time and stay out of the area where snow can slide off.
Bottom line
The best roof snow rake storage is simple: the rake collapsed or broken down, dried, and hung level across two deep hooks in the studs or strapped in a gripper rail, with the blade on its own hook and the small parts in a labeled bin, on the wall by the door you use in a storm. Move it overhead for summer if you need the space, but bring it back before the first snow, check the rollers and locks, and look up for the power lines every time you extend the pole. Measure the rake as you store it, then check the hook rating, depth and current price on the listing before you buy.
Shop heavy-duty garage hooks for long-handle tools on Amazon