Fall is the best time of year to clean out a garage. The weather is usually dry and mild enough to work with the door open, the summer gear is finished, and you have a few weeks before snow shovels, ice melt and winter boots need a clear path to the car. It is also the last chance to deal with things a cold garage ruins: latex paint that freezes, cordless tool batteries that hate freezing nights, and a garden hose left full of water. This guide is a one-weekend plan for the whole job: sort everything on the driveway, get rid of what you do not need the right way, winterize the yard tools, then put the keepers back on the walls by season with a few under-$50 racks. It is not a shopping list for a remodel. Most garages need one good rail, a pack of utility hooks and one shelf more than they need a cabinet system.
Shop garage wall rails and hooks on Amazon
Who this is for
- Homeowners whose garage floor filled up over the summer with coolers, pool gear, bikes, bags of potting soil and half-finished projects
- Anyone who wants to park inside this winter and needs a clear lane and a dry spot by the door for shovels, salt and boots
- Renters and owners who want an honest under-$50 plan: what to buy first, where it goes, and what should not stay in a cold garage at all
Quick answer
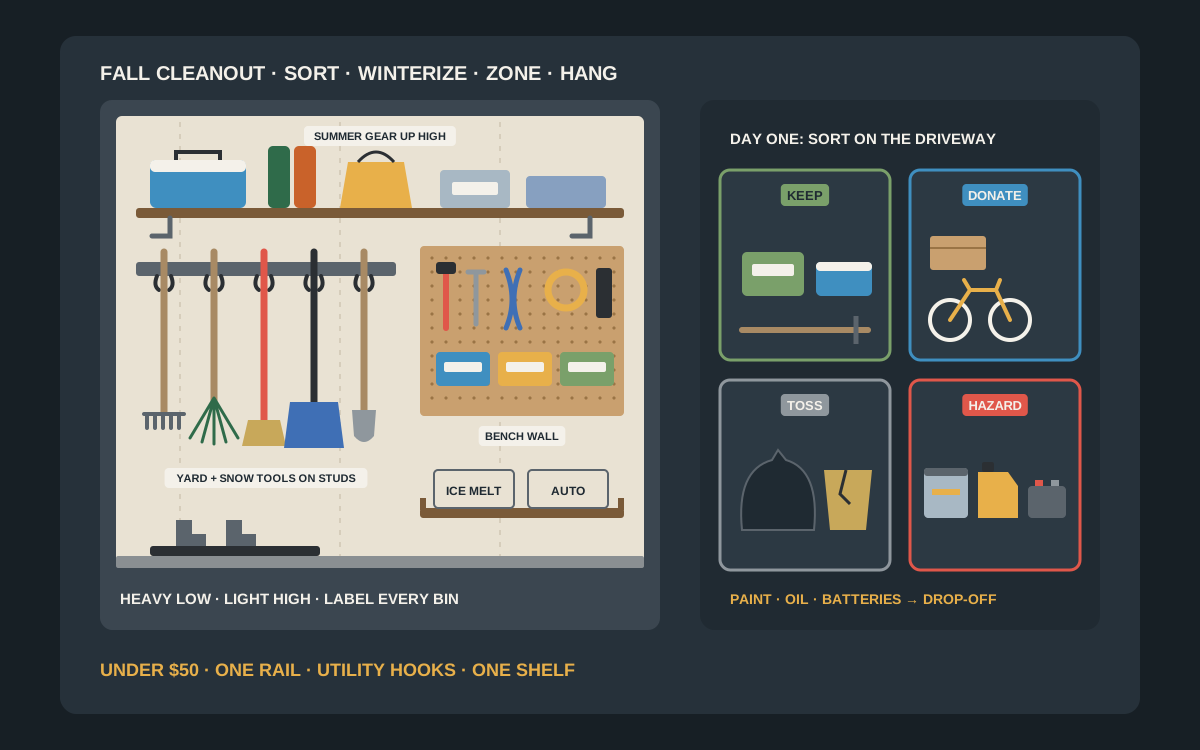
Pick one dry weekend. On day one, empty the garage onto the driveway one wall at a time and sort everything into four piles: keep, donate or sell, trash and recycling, and household hazardous waste. Sweep, check the walls and slab for leaks or pests, and winterize the yard tools before they go back. On day two, map the walls by season: winter gear by the door at mid-height, yard tools on a stud-mounted rail along the side wall, summer gear high and out of the way, and the bench wall for hand tools and small parts. For most two-car garages, one gripper rail, a set of heavy-duty utility hooks and one shelf on proper brackets cover the loudest clutter; each is typically an under-$50 buy, but prices move, so check the current listing. Screw everything into studs or rated masonry anchors, keep heavy items low, and bring paint, batteries and anything that hates freezing inside the house.
Quick comparison
| Zone | What lives there | Under-$50 wall fix | Watch out for |
|---|---|---|---|
| Winter front line, by the house door | Snow shovels, ice scrapers, ice melt, winter boots, a car brush | Short gripper rail plus one low stud shelf or boot tray | Keep salt sealed and off bare concrete; it corrodes tools and stains the slab |
| Yard and garden, side wall | Rakes, leaf rake, shovels, string trimmer, leaf blower, hoses | Long gripper rail or hook rail screwed into studs, plus a hose hanger | Drain fuel and water first; hang rake tines toward the wall |
| Summer gear, up high | Coolers, camp chairs, beach and pool gear, sprinklers, patio cushions in bags | Utility hooks high on studs or a shelf above the hood line | Only light, bulky items overhead; nothing heavy above head height |
| Bench wall, hand tools and small parts | Hand tools, tape, fasteners, chargers, car-care bottles | Pegboard panel or a hook rail with clip-on bins over the bench | Bring lithium tool batteries inside before deep cold |
| Paint, chemicals and fuel, one shelf | Touch-up paint, oil, washer fluid, fertilizer, a gas can | One lipped shelf on stud brackets, away from heaters and the car | Latex paint indoors before freezing; grill propane tanks stay outside |
Garage tool gripper railsHeavy-duty utility hooksHeavy-duty shelf bracketsStud finders
Before you start
Pick the right weekend, not the first free one
You need a dry day, ideally two in a row, because everything you own will spend a few hours on the driveway. Check the forecast, and aim for mid to late fall after the last mow but before the first hard frost, when hoses still drain and paint still pours. Check the drop-off days for your local household hazardous waste site and any donation pickup before the weekend, not after old paint cans are sitting in the rain.
Gather the supplies before you move a box
A cleanout stalls when you stop halfway to find tape. Have ready: a few heavy contractor bags, a tarp or two for the driveway, a box of sturdy bins or the bins you already own emptied out, painter’s tape and a marker for labels, a broom, a shop vac if you have one, work gloves, a stud finder, a drill and driver, a level and the fasteners for your wall type. If you plan to buy wall racks, measure first and buy after day one, once you know what you are actually keeping.
Decide what the garage is for this winter
Write down the two or three jobs the garage has to do from November to March. For most people that is parking one or two cars, a clear walk from the car to the house door, and quick access to snow and car-care gear. Everything you keep has to fit around those jobs. Nothing should sit in the lane between the car door and the steps.
Measure the wall space you actually have
Walk each wall with a tape measure and note where the studs are, where outlets, the electrical panel, the water heater and the garage door opener rail sit, and how far the car doors swing. Mark the no-go zones with painter’s tape: the swing of each car door, the space in front of the panel, the clearance around a water heater or furnace, and the path of the overhead door. What is left is your real budget of wall, and it is usually less than it looks.
Day one: empty, sort and clear out
1. Work one wall at a time
Do not empty the whole garage at once unless you have help and two clear days. Start with the wall that annoys you most, usually the one beside the car door, and pull everything off the floor and shelves onto the driveway. Work left to right so you always know what is done. When that wall is empty and sorted, move to the next one.
2. Sort into four piles and nothing else
Lay out four tarps or four marked areas: keep, donate or sell, trash and recycling, and hazardous drop-off. Every item goes to one of them, and no item goes into a maybe pile. If you have not used something in two summers and it is not seasonal, it is a donate-or-toss item. Broken tools, cracked buckets, dried-up caulk, mystery cables and garden pots you never planted are the usual winners for the trash pile. Bikes the kids outgrew, duplicate tools and spare furniture belong in donate or sell.
3. Pull out the hazardous items carefully
Old paint, stain, solvents, motor oil, antifreeze, pool chemicals, pesticides, fluorescent tubes and old batteries do not go in the household trash. Keep them in their original containers, upright, lids tight, and put them in a sturdy box or bin for your local household hazardous waste drop-off. Many auto parts stores accept used motor oil and some take car batteries; many hardware stores collect rechargeable batteries. Check your local program for the exact list, because what is accepted varies by area.
4. Sweep, vacuum and inspect the empty wall
An empty wall is the only time you can see what is behind the clutter. Sweep the floor, vacuum cobwebs and dust off the wall and the bottom plate, and look for water stains, damp drywall, gaps at the slab where mice get in, and any cracked outlets or loose wiring. Fix small issues now with caulk, a new cover plate or a call to an electrician if something looks wrong. Racks go up on a clean, dry wall, not over a leak you will discover in March.
5. Measure what you are keeping
Before you buy anything, look at the keep pile for that wall and group it: long-handle tools, round bulky gear, small parts, liquids. Count the long-handle tools; a gripper rail is sized by how many handles it holds. Note anything heavy, like a bag of ice melt, a tool chest or a full gas can, because heavy items need a low shelf or the floor, not a hook. That is your shopping list, and it is usually shorter than expected.
Winterize before it goes back on the wall
Mowers, trimmers and leaf blowers
Follow the owner’s manual for each gas tool: most makers recommend either adding fuel stabilizer and running the engine so treated fuel reaches the carburetor, or running the tank dry before storage. Clean grass off the deck and housing, and check the blade, line or air filter while you are at it. A cordless trimmer or blower can hang on a stud-mounted hook by its handle; a gas tool should hang empty or sit on a shelf, away from the water heater or any pilot light.
Garden hoses and sprinklers
Disconnect hoses from the outdoor spigot before the first hard freeze, drain them fully by walking the hose out downhill, and coil them loosely on a wall hose hanger or reel. A hose left on the spigot can trap water in the faucet and the pipe behind it. Shake out sprinklers and nozzles, let them dry, and put the small pieces in one labeled bin so spring setup takes five minutes instead of a search.
Batteries, paint and anything that freezes
Cold is hard on lithium tool batteries. Tool makers generally recommend storing packs in a dry, temperature-stable place rather than a garage that drops below freezing, so pull them off the tools and keep them indoors, ideally at a partial charge if the maker suggests it. Latex and water-based paints can be ruined by freezing, and glues, caulk and some liquid lawn products also suffer. Move them to a utility room, basement or closet, or at least into an insulated bin off the cold slab against an interior wall.
Fuel and propane
Gasoline belongs in an approved, clearly labeled fuel can with a tight cap, kept away from heat and ignition sources and out of reach of kids, and only in the small amount you actually need. Full-size grill propane cylinders should be stored outdoors, upright and away from doors and windows, not inside an attached garage; fire codes limit indoor storage to small camping-size cylinders. Check your local fire code if you are unsure.
Day two: zone the walls and mount the racks
Zone by season and by how often you reach
Put what you will grab weekly this winter at mid-height near the house door: the snow shovel, ice scraper, car brush and a small bucket of ice melt. Put the off-season gear where it is hardest to reach: summer coolers, camp chairs and pool gear go high, above the hood line or over the garage door if you have a rated overhead rack. Yard tools are in-between gear in most climates, so they get the long side wall. The bench wall is for hand tools and small parts all year.
Heavy low, light high, long tools in the middle
Weight decides height. Bags of salt, a tool chest, paint and fluids sit low on a shelf or the floor, where a dropped item does not hurt anyone. Long-handle tools hang on a rail at roughly waist to shoulder height so the heads stay off the floor and the handles are easy to grab. Only light, bulky items go above head height: empty coolers, folded chairs, a bag of beach toys. Nothing heavy should hang where you have to lift it overhead to get it down.
Mount into studs or masonry, not bare drywall
Find studs with a stud finder and confirm them with a small pilot hole the rack will cover. Screw rails, hooks and shelf brackets into the studs with the screws the maker specifies or longer wood screws of the same head size. On concrete block or poured concrete, use masonry screws in pre-drilled holes, or screw a plywood backer to the wall first so you can move hooks later without drilling concrete again. Hollow-wall anchors are only for light, rated loads; a rail full of shovels and rakes is not one of them.
Adhesive hooks and cold garages do not mix
Many adhesive strips and hooks list a minimum application temperature on the package, and an unheated garage in November is often below it. Cold, dusty, painted concrete and drywall are poor surfaces for adhesive in any case. If you are renting and cannot drill, use freestanding shelving, a leaning tool rack or over-door hooks on the house door instead, and save adhesive for very light items in a heated space.
Leave room to grow, then label
Leave one or two empty hooks on every rail and a third of each shelf free; next spring’s purchases need somewhere to go. Label bins on the short end facing out, label shelf edges with painter’s tape and marker until you are sure the layout works, and take a photo of each finished wall. The photo is your map when you swap seasons again in spring.
Spending the first $50 wisely
Start with one rail for long-handle tools
If you buy only one thing, buy a stud-mounted gripper rail or hook rail long enough for every rake, shovel and broom you kept. Long tools leaning in a corner cause most of the falling-handle chaos in a garage, and one rail fixes it in an afternoon. Pick a rail with screw holes that can reach two or more studs.
Add heavy-duty utility hooks for the bulky stuff
A pack of coated heavy-duty utility hooks handles camp chairs, coolers by their handles, extension cords, a folded wagon or a bike by the wheel. Screw each hook into a stud and check the rating on the listing; deeper hooks hold bulky items more securely than shallow ones.
One shelf on real brackets for liquids and bins
A single board on heavy-duty steel brackets, screwed into studs, gives paint, oil, car-care bottles and labeled bins a home off the floor. A lip on the front edge, even a strip of trim, stops bottles from walking off. Check that the brackets and the board are rated for the load together.
Mistakes to avoid
- Emptying the whole garage at once and running out of daylight with everything on the driveway.
- Keeping a maybe pile that quietly moves back onto the floor.
- Putting old paint, oil, solvents or batteries in the household trash instead of a hazardous waste drop-off.
- Hanging a gas trimmer or blower with fuel still in it next to the water heater.
- Leaving the garden hose on the outdoor spigot through the first freeze.
- Storing latex paint and lithium tool batteries in a garage that drops below freezing.
- Hanging heavy items above head height or screwing a loaded rail into bare drywall.
- Using adhesive hooks on cold, dusty garage walls and finding them on the floor in January.
- Buying racks before the sort, then owning storage for things you just donated.
- Filling the lane between the car door and the house steps with winter overflow.
Related guides
Browse the hub: Garage wall storage under $50 - all guides
- Best Winter Tire & Seasonal Gear Wall Storage Under $50
- Best Snow Shovel & Ice Scraper Wall Holders Under $50
- How to Hang Brooms and Garden Tools on a Garage Wall Under $50
- Best Holiday Light & Decorations Garage Storage Under $50
- Best Garden Hose Reel Wall Mounts Under $50 for Garages
- Best Spring Cleaning Supply Wall Organizers Under $50 for Garage
- Best Halloween Decoration Wall Hangers Under $50 for Garage Storage
- Best Under-$50 Wall Storage Gifts for Garage Organizers (Holiday 2026)
- Best Ice Melt and Rock Salt Storage Shelves Under $50 for Garage Walls
- Best Grill & Patio Furniture Cover Wall Hooks Under $50 for Garage (Winter Off-Season)
FAQ
When is the best time to do a fall garage cleanout?
Mid to late fall, on a dry weekend after the last mow and before the first hard freeze. Hoses still drain, paint can still move indoors before it freezes, and you have time to set up the winter gear by the door before you need it.
How long does a fall garage cleanout take?
For a typical one- or two-car garage, plan a full weekend: day one to empty, sort, clean and winterize, and day two to mount racks and put things back by zone. Working one wall at a time lets you stop at any point without leaving everything on the driveway.
What should not be stored in a garage over winter?
In an unheated garage that drops below freezing, bring latex paint, glues and caulk, lithium tool batteries and some liquid lawn products indoors. Full-size grill propane cylinders belong outdoors, not in an attached garage. Keep fuel in an approved can, away from heat and ignition sources.
What wall racks should I buy first for a fall cleanout?
Start with one stud-mounted gripper or hook rail for long-handle yard and snow tools, then a pack of heavy-duty utility hooks for bulky gear, and one shelf on heavy-duty brackets for liquids and bins. Buy after the sort, once you know what you are keeping, and check current prices and ratings on the listing.
What do I do with old paint, oil and batteries I find?
Keep them in their original containers, upright and sealed, and take them to your local household hazardous waste drop-off. Many auto parts stores take used motor oil and car batteries, and many hardware stores collect rechargeable batteries; check your local program for what it accepts.
Can I use adhesive hooks in a cold garage?
Usually not reliably. Many adhesive products list a minimum application temperature, and cold, dusty garage walls are poor surfaces. Screw racks into studs or masonry, or use freestanding shelving if you cannot drill, and keep adhesive for very light items in a heated space.
Bottom line
A fall garage cleanout with wall racks under $50 comes down to order: sort everything on the driveway into keep, donate, trash and hazardous drop-off, winterize the yard tools, bring paint and batteries inside, then put the keepers back by season. Winter gear goes by the door at mid-height, yard tools on a stud-mounted rail, summer gear high, and liquids on one low shelf. Screw every rack into studs or masonry, keep heavy things low, leave room to grow, and check current prices and ratings on the listing before you buy.