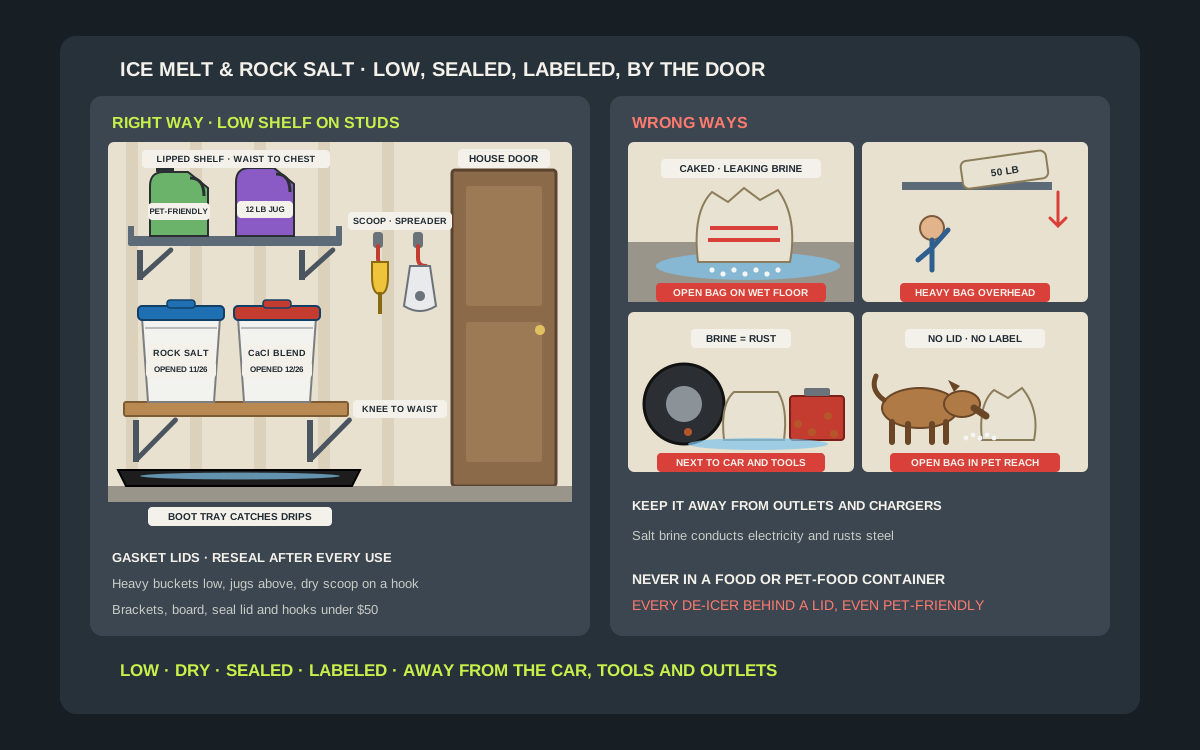
Every snow-belt garage has the same sad corner by February: a torn bag of rock salt slumped on the floor, a puddle of brine creeping out from under it, a hard lump where the bottom half used to be, and a rusty ring on whatever sat next to it. Ice melt is one of the few things in a garage that fights back when you store it badly. It pulls water out of the air, it leaks salty brine that eats steel and stains concrete, the big bags are heavy enough to hurt your back, and it is not something a dog or a toddler should get into. A small, well-placed wall shelf fixes nearly all of that for less than the price of a few bags. This guide covers which shelves and containers hold de-icer best, how high to mount them, how to keep bags and jugs dry until spring, and where they should never go, using the storage and safety advice that ice melt makers, calcium chloride producers and pet poison experts publish themselves. Everything here fits under $50 in hardware.
Shop heavy-duty garage wall shelves on Amazon
Who this is for
- Homeowners in snow country who buy 25 or 50 lb bags of rock salt and are tired of finding them caked, torn or sitting in brine
- Anyone keeping two or three kinds of de-icer, such as rock salt for the driveway, a fast blend for the steps and a pet-friendly jug for the dog’s path
- Garages shared with kids, dogs or cats, where de-icer needs to be up, sealed and out of reach without being dangerously high
Quick answer
For most garages, the best setup is one heavy-duty shelf on steel brackets screwed into studs, mounted low, about knee to waist height, close to the door you go out through when it snows. Keep opened bags inside 5-gallon buckets or bins with tight, gasketed lids, because ice melt absorbs moisture from the air and turns to hard clumps or brine when a bag is left open. Put smaller jugs and a pet-friendly product on a lipped shelf just above, hang the scoop and a hand spreader on hooks beside them, and set a boot tray underneath to catch drips. Keep the whole spot away from the car, your tools and any outlet, since salty brine speeds up rust and conducts electricity. Label every container with what is inside and the date you opened it. A pair of brackets, a board, a bucket with a seal lid and a few hooks stay under $50; check bracket ratings and current prices on the listing.
Quick comparison
| Option | Best for | How it holds | Trade-off |
|---|---|---|---|
| Steel bracket shelf (pair + board) | Buckets and bags of rock salt, mounted low | Two or three brackets screwed into studs carry a 12 in board | Must hit studs; bare steel rusts if brine sits on it |
| Lipped wall utility shelf | Jugs and shaker bottles near the door | Welded or molded shelf with a raised front edge | Shallower; not for full 50 lb bags |
| Gasket-lid buckets or bins | Opened bags and loose de-icer | Product sits sealed inside a container on the shelf | Heavy when full; keep the original label with it |
| Track rail shelf or basket | Garages that already have a rail system | Shelf or basket hangs on the existing track | Check the per-accessory rating; keep it to jugs |
| Utility hooks for scoop and spreader | Hand spreaders, scoops and gloves | Coated hooks beside the shelf, into the same studs | Tools must be dry before they go back |
| Boot tray or shelf liner | Catching brine and spilled pellets | Sits on the floor below or lines the shelf | Needs emptying; not a holder on its own |
5-gallon buckets with gasket lidsLipped steel wall shelvesHandheld ice melt spreaders
What to look for
A rated load that matches real bags
Rock salt is heavy. Morton sells its Safe-T-Salt rock salt in 10, 25 and 50 lb bags, and a 5-gallon bucket filled to the top with salt can weigh 40 pounds or more. Add up what will really sit on the shelf, then pick brackets whose rated load, usually listed per pair, is comfortably above that number. A shelf that sags in December will fail in February.
A surface that will not rust or rot
Spills happen every time you scoop. OxyChem’s safety data for its Peladow calcium chloride ice melter warns that chlorides, in the presence of water and oxygen, speed up corrosion of common metals such as steel, copper and brass. Choose powder-coated or plastic shelves and brackets, or a sealed or painted wood board, and keep the de-icer itself in sealed plastic containers so the shelf stays dry.
A lip or rail at the front
Jugs and buckets get pulled forward every time you reach for them. A raised front lip or a simple wood batten along the front edge stops a jug from sliding off when you grab the one behind it. On a plain board, a strip of 1x2 screwed along the front does the same job.
Depth for the containers you own
A 5-gallon bucket is roughly 12 inches across, and the Safe-T-Salt product sheet lists a 50 lb bag at about 13.5 by 25 by 3.5 inches. A 12 inch deep shelf holds buckets and jugs well. A flat 50 lb bag needs a deeper shelf or the floor, which is one more reason to decant opened bags into a bucket.
Mounting you can trust
This is a heavy, frequently used shelf, so it needs screws into studs on a framed wall or masonry anchors on concrete and block. Check that the bracket holes match the screws you plan to use. Adhesive hooks and plastic drywall anchors have no place under a load like this.
Why ice melt needs its own shelf
It pulls water out of the air
Most ice melters are built to attract moisture, because that is how they start melting before the sun comes out. Compass Minerals explains on its Safe Step FAQ that its ice melters contain hygroscopic ingredients, which means they absorb moisture, and that over time this moisture builds up in the package and makes the product harden into clumps. OxyChem goes further for calcium chloride: it is both hygroscopic and deliquescent, able to absorb enough moisture from the air to turn into liquid brine. An open bag on a damp garage floor is exactly where that happens fastest.
Leaks damage what they touch
Every major label carries the same storage line. Safe Step’s back panel and Morton’s Safe-T-Salt product sheet both say to store unused product in a dry area, seal the container tightly, and not store it where leaking contents could cause damage. That damage is real: salty brine can stain concrete, rusts steel shelving and tool chests, and leaves white crust on anything it dries on. A shelf with sealed containers and a tray below keeps the leak contained.
The bags are heavy
A 50 lb bag is about as much as most people should lift from the floor, and a shelf that puts it above shoulder height turns an awkward lift into a dangerous one. Storing heavy de-icer low, and only the light jugs higher, is the single biggest safety decision in this whole setup.
Kids and pets
Every ice melt label tells you to keep it out of reach of children and pets. Pet Poison Helpline warns that ice melt products containing salts can cause electrolyte imbalances and neurological signs if a pet eats them, and advises keeping them locked up. A sealed bucket on a shelf is far harder for a curious dog to get into than a torn bag on the floor.
Know what you are storing
Rock salt
Plain sodium chloride is the cheapest de-icer and comes in the biggest bags. Morton lists Safe-T-Salt as melting down to 5°F and sells it in 10, 25 and 50 lb bags. Because you buy it in bulk, rock salt is the product most likely to end up on the floor, so it deserves the lowest, strongest shelf and a bucket with a good lid.
Calcium and magnesium chloride blends
Faster, colder-working blends cost more and are more aggressive about soaking up moisture. Morton’s Action Melt Elite, a blend of calcium chloride, magnesium chloride and salt, is listed as working down to -15°F and comes in a 12 lb jug with a flip-top cap and handle made for carrying, pouring and storing. Keep the cap closed between uses; these blends cake quickly in an open container.
Pet-friendly formulas
Pet-marketed ice melters usually use something other than sodium chloride. Morton’s Safe-T-Pet, for example, is described as salt and chloride free, melts down to 10°F and comes in an 8 lb jug. The ASPCA points out that there are no specific requirements for labeling a de-icer as pet safe, and Pet Poison Helpline notes that complications are still possible with large ingestions, so these products still belong on a shelf and behind a closed lid.
Sand, grit and traction aids
Sand and grit do not melt anything, but they live in the same corner and they are heavy. They do not attract moisture the way chloride products do, so an open-top bucket with a loose lid is fine, as long as it sits low and dry.
Keep products separate
Different de-icers do different jobs, and some are meant for specific surfaces. Keep each product in its own container with its original label, and never pour leftovers from two products into one bucket. If you keep a pet-friendly product for the dog’s path, give it its own spot so nobody grabs the rock salt by mistake.
The six options, in detail
Steel bracket shelf: the workhorse
Two or three heavy-duty shelf brackets screwed into studs, with a 12 inch deep board on top, is the strongest under-$50 shelf for de-icer. Brackets let you set the height exactly, span two or three studs and carry several buckets at once. Pick powder-coated brackets, seal or paint the board, and mount it low. If your brackets are bare steel, wipe up spills promptly so salt does not sit on them.
Lipped wall shelf: the grab-and-go spot
A welded steel or molded plastic utility shelf with a raised front edge is ideal for 8 to 12 lb jugs and shaker bottles. Mount it just above the main shelf, near the door, so you can grab the jug for the steps on your way out without lifting anything heavy. The lip keeps jugs from sliding off when you pull one forward.
Gasket-lid buckets and bins: the real storage
The shelf holds the weight, but the container is what keeps the product usable. A 5-gallon bucket with a screw-on gasket lid, or a sturdy bin with a lid that seals, keeps humid air away from an opened bag. Gunther Salt recommends an airtight container with a tight cover for any opened bag of ice melt. Either pour the product in, or drop the whole opened bag inside so the label comes with it.
Track rail shelf or basket
If your garage already has a track rail system, a shelf or basket accessory on the rail puts jugs right where you need them without new holes. Rail accessories carry less than a bracket shelf screwed into studs, so check the rating for each accessory, keep heavy buckets off it and use the rail for jugs, the scoop and the spreader.
Utility hooks: scoop, spreader and gloves
A hand spreader, a plastic scoop and a pair of winter gloves belong on coated hooks right beside the shelf. Scoops left inside a bucket carry moisture back in, so hang them up dry instead. Labels such as Safe Step’s advise handling with care, avoiding contact with eyes and skin and washing thoroughly afterward, so keeping gloves at the station makes that easy.
Boot tray or shelf liner
A rubber boot tray under the shelf catches drips, spilled pellets and the brine that tracks in on boots. A cheap plastic liner on the shelf itself protects the board and makes cleanup a matter of tipping it into a bucket. Neither holds anything up, but both protect your floor and your shelf all winter.
How high to mount it
Heavy products low
Mount the main shelf so its surface sits roughly between knee and waist height, often around 18 to 30 inches off the floor. That keeps 25 and 50 lb loads in your strongest lifting zone and keeps them off the cold, wet slab. Gunther Salt recommends storing ice melt inside and off the ground, and a low shelf does both.
Jugs at grab height
The lighter jugs, the ones you use most, go on a second shelf at about waist to chest height. You can grab them without bending and put them back without lifting over your head.
Never overhead
Do not store bags of salt on a high shelf, over a door or above a workbench. A full bag that slips from overhead can injure someone, and a leaking bag up high drips brine onto everything below it. If the only space left is high on the wall, use it for empty buckets and spare lids.
Keeping it out of reach
There is a tension between storing heavy things low and keeping chemicals away from kids and pets. The answer is the container, not the height. A screw-on gasket lid or a latching bin is hard for a toddler or a dog to open, and a lockable cabinet on the same wall is the step up if you need it. Pet Poison Helpline’s advice for garages is to keep ice melt locked up.
Where the shelf should go
By the door you leave through
Put the shelf next to the door you use when it snows, usually the house door into the garage or the side door. You want to scoop and go without crossing the garage, and you want wet boots and the spreader to come back to the tray, not across the floor.
Away from the car
Do not store de-icer where it will be splashed against wheels, brake lines or the underside of the car, and do not let a leaking bag sit next to a tire. Brine is corrosive to steel, and the car already gets plenty of salt from the road.
Away from tools and metal shelving
Keep the salt station away from the tool chest, the workbench and bare-steel shelving units. The chloride corrosion warning on OxyChem’s safety data applies to anything steel, copper or brass nearby, which includes hand tools, fasteners and battery terminals.
Clear of outlets and appliances
OxyChem notes that calcium chloride brines conduct electricity. Do not mount the shelf above an outlet, a power strip, a battery charger or a freezer, and keep it away from the water heater and furnace. A small leak should drip into a tray, not into anything electrical.
Not where water already collects
Avoid the low corner where meltwater from the car pools, and any wall that sweats or leaks. A dry, inside wall near the house door is usually the best spot in the garage.
Installing the shelf
Find the studs
On a framed wall, use a stud finder and mark two or three studs. Garage studs are usually 16 inches apart, so a 24 to 36 inch board spans two or three. Screw every bracket into a stud, using the screws the bracket maker specifies or sturdy wood screws long enough to bite well into the framing.
Concrete and block walls
On concrete or block, use masonry anchors sized for the bracket holes, drilled with a masonry bit. Check the anchor’s rating and use the number of fasteners the bracket calls for. Block walls are hollow in places, so place anchors in solid sections where possible.
Use coated or stainless screws
Salt and brine will reach the fasteners, especially near the scoop. Coated exterior screws or stainless screws will last. Plain zinc screws rust quickly here and leave orange streaks down the wall.
Level, lip and liner
Set the first bracket, level across to the next, then fix the board to the brackets from below. Screw a 1x2 batten along the front edge if the shelf has no lip, and lay a plastic liner or tray on top. Load the heaviest container last and press down hard on the front edge to check it before you walk away.
Seal the board
Raw wood soaks up brine and swells. A coat of exterior paint or sealer on all sides of the board, including the cut ends, keeps it flat and easy to wipe clean.
Keeping ice melt dry all winter
Reseal after every use
Every label says the same thing: seal the container tightly. Squeeze out the air, roll or fold the top of an opened bag and clip it, then drop it into its bucket and close the lid. OxyChem advises tightly resealing opened packages after each use to prevent caking and the liquid brine that forms in humid air.
Store valve bags flat
Some bags have a valve-style closure rather than a sewn top. Calcium chloride makers such as Cal-Chlor note that valve closure bags do not seal well standing on end and should be stored lying flat. If you buy that kind, lay it flat on the shelf or decant it into a bucket.
Use a dry scoop
A wet scoop pushed back into the bucket adds water every time. Shake the scoop off, let it dry on its hook and only then put it back. The same goes for gloves; damp gloves dropped on top of the bucket lid wick moisture in.
Label and date everything
Write the product name and the date you opened it on a strip of tape on each bucket. Gunther Salt suggests labeling containers by purchase date so you use the oldest product first. It also stops anyone grabbing the wrong de-icer for new concrete or the dog’s path.
If it clumps anyway
OxyChem says lightly caked calcium chloride can often be broken up by knocking the closed package against a hard surface, much like a bag of ice. It warns against hammering hard lumps, because flying chips are a hazard, especially to the eyes. Product that will not break up should be disposed of following the label.
Inspect after thaws
A warm, damp spell in midwinter is when bags start to sweat. After a thaw, lift the lids, look for clumps and brine at the bottom of the bucket, and wipe the shelf and tray.
Protecting your floor, your car and your family
Concrete and de-icer
The Safe Step 4300 label warns that all deicers can speed up surface damage to concrete because they increase the number of freeze-thaw cycles, and says not to use the product on concrete less than one year old. That is a reason to keep spills off the garage slab and sweep up pellets that track in. A tray under the station and a quick sweep after storms protect the floor.
Rinse what you track in
Brine from boots, the spreader and the shovel ends up on the floor near the door. Rinse the boot tray on a mild day and empty it outside onto gravel, away from plants and lawn.
Gloves and hands
Labels advise wearing gloves, avoiding contact with eyes and skin, and washing thoroughly after handling. Keep a pair of winter work gloves on a hook at the station, and wash up when you come back inside.
Pets and paws
Store pet-friendly products behind a lid too. If you think your dog or cat has eaten ice melt, call your veterinarian, Pet Poison Helpline at 855-764-7661 or the ASPCA Animal Poison Control Center at 888-426-4435. For paws, a boot and towel station by the door handles the wipe-down after walks; see our dog boot and towel wall station guide.
Never a food container
Do not pour de-icer into an old food, drink or pet-food container, where someone could mistake it for something edible. Use a bucket or bin that is clearly labeled, and keep the original bag or label with it.
Three under-$50 builds
The single-door stoop
One lipped wall shelf screwed into two studs beside the house door, holding a 12 lb jug of fast blend and an 8 lb pet-friendly jug, with a hook for gloves and a boot tray below. It is the right size for a townhouse or a home with a short walk and steps. Total cost is mostly the shelf and the tray.
The driveway station
Two powder-coated heavy-duty brackets and a sealed 12 inch board at knee height, holding two 5-gallon buckets with gasket lids, one for rock salt and one for a blend, plus coated hooks for the scoop and a hand spreader. This is the build most single-family garages should copy, and it handles a 50 lb bag decanted into two buckets. Price the brackets, one seal lid and the hooks together; a basic version stays under $50.
The two-tier winter wall
The driveway station with a lipped shelf mounted above it for jugs, a liner on the lower board and a long boot tray under the whole thing. Heavy salt stays low, the jugs you grab most stay at chest height, and every drip ends up in the tray. Combine it with our snow shovel holder guide and the whole winter kit lives on one stretch of wall.
Setups for different garages
One-car garage
Space is tight, so go vertical but stay sensible: one low bracket shelf with a single sealed bucket of rock salt, a lipped shelf above for one jug, and the shovel and scraper hung beside them. Keep the station on the wall farthest from the car door.
Snow-belt family garage
Three products, two buckets and two jugs. Give the pet-friendly product its own clearly marked spot, store the 50 lb bag decanted into buckets, and add a second boot tray. A short track rail beside the shelf takes the spreader, scoop, gloves and a broom.
Rented garage or carport
If you cannot drill, a freestanding plastic shelf unit with a solid bottom shelf works well for de-icer, because plastic does not rust. Keep buckets on the bottom shelf and jugs on the next one up, and follow the maker’s instructions for securing the unit so it cannot tip. Our freestanding plastic garage shelves guide covers the options.
Detached garage or shed
Unheated outbuildings are damper than attached garages. Put the shelf on an inside wall, never against the outer wall where condensation forms, use gasket lids on every container and check the buckets after each thaw.
End of season: storing ice melt until next winter
Seal it before spring
Gunther Salt notes that heat and humidity in spring and summer can make stored ice melt attract moisture, harden and clump. When the last storm is over, sweep the shelf, empty the tray, and make sure every bag is folded tight inside a closed bucket.
Keep usable leftovers
Most de-icer that stayed dry is still good next winter. Keep it on the same low shelf, sealed and labeled, and use it first next season.
Check before the first freeze
In autumn, open each bucket, break up any light clumps and note how much you have. Buying before the first storm avoids the empty-shelf scramble at the store, and gives you time to set up the station properly.
Mistakes to avoid
- Leaving an opened bag of rock salt on the bare garage floor all winter.
- Storing 50 lb bags on a shelf above shoulder height.
- Parking the salt bag against a tire, the tool chest or a bare-steel shelf.
- Mounting the de-icer shelf above an outlet, a charger or a water heater.
- Putting a wet scoop or wet gloves back on top of the product.
- Mixing leftovers from different de-icers in one unlabeled bucket.
- Pouring ice melt into an old food or pet-food container.
- Hanging a heavy salt shelf on adhesive strips or plastic drywall anchors.
Related pick: Best Snow Shovel Wall Hangers & Ice Scraper Holders Under $50
Related guides
Browse the hub: Garage wall storage under $50 - all guides
- Best Snow Shovel & Ice Scraper Wall Holders Under $50
- Best Winter Tire & Seasonal Gear Wall Storage Under $50
- Best Car Floor Mat Wall Clamps Under $50 for Garage (Winter Mat Wash & Dry)
- How to Do a Fall Garage Cleanout with Wall Racks Under $50
- Best Freestanding Plastic Garage Shelves Under $50
- Best Garage Track Rail Hooks under $50
- Best Dog Boot & Towel Wall Stations Under $50
- Best Roof Snow Rake Wall Hooks Under $50 for Garage
FAQ
How should I store ice melt in the garage?
Keep it in a dry spot off the floor, in its original bag sealed tightly or inside a bucket or bin with a tight lid. Ice melt makers say to store unused product in a dry area, seal the container and keep it where a leak cannot damage anything.
Why does my rock salt or ice melt turn hard?
Ice melt absorbs moisture from the air. Over time that moisture builds up in the bag and makes the product harden into clumps, or with calcium chloride even turn to liquid brine. Sealing the bag after each use and keeping it off damp concrete prevents most of it.
How high should an ice melt shelf be?
Keep heavy bags and buckets low, roughly between knee and waist height, so you lift them safely and keep them off the wet floor. Put lighter jugs on a shelf at waist to chest height. Never store full bags overhead.
Can I store ice melt on a metal shelf?
Yes, if it is powder-coated or otherwise protected and the de-icer sits in sealed plastic containers. Chloride brines speed up rust on bare steel, so wipe up spills and use a shelf liner or tray.
Is pet-safe ice melt safe to leave out?
No. There are no specific labeling requirements for pet-safe de-icers, and large ingestions can still cause problems. Store every de-icer, including pet-friendly ones, sealed and out of reach.
What can I do with clumped ice melt?
Lightly caked product can often be broken up by knocking the closed bag against a hard surface. Do not hammer hard lumps, because flying chips can hurt your eyes. If it will not break up, dispose of it as the label directs.
Bottom line
The best ice melt storage is a low, stud-mounted shelf beside the door, with every opened bag sealed inside a labeled bucket and the light jugs on a lipped shelf just above. Keep heavy salt low and dry, keep the station away from the car, tools and outlets, hang the scoop and spreader beside it and put a tray underneath. Reseal after every use, store every product, pet-friendly or not, behind a lid, and check the buckets after each thaw. The whole setup costs well under $50 and keeps your de-icer usable from the first storm to the last. Check bracket ratings, shelf depths and current prices on the listing before you buy.