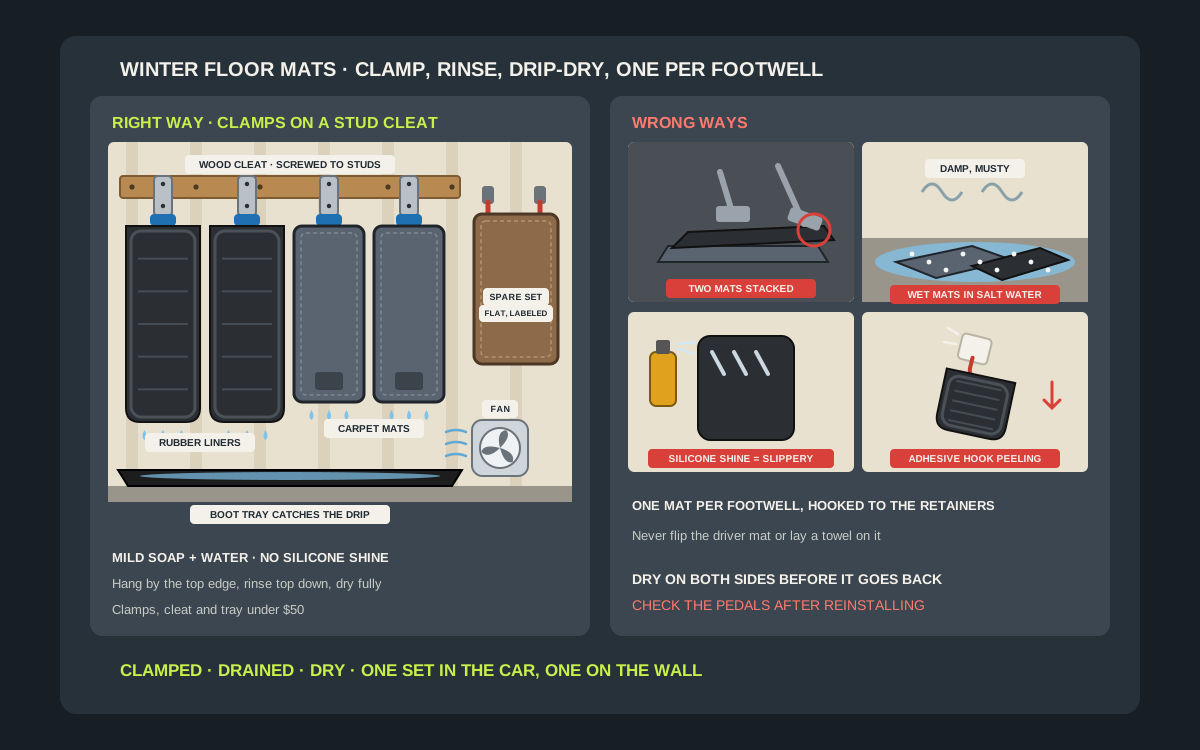
Winter is hard on car floor mats. Every trip brings in slush, road salt and grit, and by February the rubber liners hold a gray puddle in every footwell while the carpet mats wear a white tide line that never quite dries. The fix is simple and cheap: give the mats their own spot on a garage wall, where they can hang to be rinsed, scrubbed and drip-dried, and where the spare set can wait out the season without being bent, stepped on or buried under the snow tires. Detailing shops and car washes have done this for years with spring-loaded mat clamps, and the same clamps cost a few dollars each for a home garage. This guide covers which mat holders work best for rubber liners and carpet mats, how to mount them so the drip lands in the right place, a winter wash-and-dry routine that follows the mat makers’ own care advice, and how to put mats back in the car safely, using the floor mat warnings that automakers publish in their service bulletins. Everything here fits under $50 in hardware.
Shop car floor mat wall clamps on Amazon
Who this is for
- Drivers in snow-belt states and provinces who fight salt, slush and grit on their floor mats from November to April
- Anyone who swaps carpet mats for rubber all-weather liners each winter and needs a clean, flat place to keep the off-season set
- Home detailers who wash mats in the driveway or garage and want them off the floor while they scrub and dry
Quick answer
For most garages, the best setup is two to four spring-loaded floor mat clamps screwed into studs, or into a wood cleat that is screwed into studs, at about chest height, with a long boot tray or drip tray on the floor below. Clamp each mat by its top edge so it hangs straight, rinse and scrub it right there, and let it drip-dry before it goes back in the car. Rubber liners dry in a few hours; carpet mats need longer, and a small fan helps a lot in a cold garage. Hang the off-season set flat on the same wall or on two coated hooks through the retention holes, so the mats keep their shape. Clean rubber with mild soap and water, not silicone shine products, because WeatherTech warns those make the surface slippery. When the mats go back in, use one mat per footwell and hook it to the retainers. A multi-pack of clamps, a cleat and a tray stay under $50; check clamp sizes and current prices on the listing.
Quick comparison
| Option | Best for | How it holds | Trade-off |
|---|---|---|---|
| Single stainless spring clamp | Heavy molded rubber liners | Spring jaw grips the top edge; plate screws to a stud or masonry | Costs more per clamp than plastic multi-packs |
| Plastic clamp multi-pack | Carpet mats and lighter rubber mats | Several spring clamps in a row on a cleat or rail | Lighter grip; test with thick liners before mounting |
| Wood cleat with clamps | Mounting clamps at any spacing between studs | One board screwed to studs, clamps screwed to the board | A little extra work and a few dollars of lumber |
| Coated utility hooks | The off-season set, hung through the retention holes | Mat hangs from a hook through its grommet or hook hole | Only for mats that have holes; not for washing |
| Clip hangers on a rod or rail | Carpet mats drying in a cold garage | Clip hangers pinch the edge and hang from a rod | Light clips can slip on wet rubber |
| Boot tray or drip tray | Catching salty water under the clamps | Sits on the floor below the hanging mats | Needs emptying; not a holder on its own |
Floor mat clamp multi-packsBoot and drip traysCoated heavy-duty utility hooks
What to look for
A jaw that fits thick liners
Molded rubber liners are much thicker at the edge than a flat carpet mat, and many have a raised lip. Check the jaw opening and the spring strength on the listing. Commercial car wash clamps are built for heavy rubber; lighter plastic clamps sold in multi-packs are fine for carpet mats and thinner rubber mats. If you own deep molded liners, test-fit one before you mount the whole row.
A grip that does not mark the mat
Bare metal teeth can dent soft rubber or pull carpet fibers. Look for a clamp with a molded plastic or rubber grip pad. Maxshine, for example, describes its stainless detailing clamp as having a molded plastic grip that holds heavy mats without damaging them.
Rust-proof parts
Mat clamps live in the wettest corner of the garage and get sprayed with salty water all winter. Stainless steel springs and bodies, or sturdy plastic with a stainless spring, will outlast plain steel. Use stainless or coated screws to mount them, too, or the screws will be the first thing to rust.
Mounting holes you can use
Most clamps have two or more screw holes on a flat back plate. Check that the holes match the screws you plan to use, and that the plate is flat enough to sit tight against a stud, a cleat board or a concrete wall. Commercial suppliers such as Kleen-Rite note that hole sizes vary by maker, so check before you buy screws.
Enough clamps for every mat
A typical car has two front mats and either two rear mats or one rear runner. Two cars in winter can mean eight wet mats at once. Count the mats you actually wash together and buy enough clamps to hang them all, plus a pair of coated hooks for the off-season set.
Why winter mats need a wall spot
Salt, slush and grit
Winter road treatments end up on your boots and then in the footwells. Grit and salt crystals grind into carpet fibers and settle into the grooves of rubber liners. WeatherTech’s own care advice is to remove and shake its liners and mats regularly, and the company notes that road salt and gravel left in place get pressed deeper into the mat and become harder to clean later. A mat that hangs on a wall can be shaken, rinsed and scrubbed in a minute instead of being laid on the driveway.
Carpet mats hold water
Carpet mats soak up melted snow and hold it against the car’s carpet underneath. Left like that for weeks, a wet mat can leave the car smelling musty and the windows fogging up. Hanging a carpet mat lets air reach both sides, so it dries much faster than one lying flat on a garage floor or pushed back into the footwell still damp.
Rubber liners hold puddles
Deep rubber liners are built to trap water, which is why they are popular in snow country. The downside is that the trapped water sloshes over the edge when you take them out. Lifting a liner straight onto a clamp, edge first, keeps most of that puddle on the liner until it drains into a tray.
The seasonal swap
Many drivers run carpet mats in summer and rubber liners in winter. Transport Canada advises that if you install rubber mats in the winter months, you should remove the originally equipped floor mats and use only one set. That means the other set needs a home for half the year, and a garage wall is a better place for it than the trunk or a corner of the floor.
The six options, in detail
Stainless spring clamps: the detailing-shop standard
A floor mat clamp is a spring-loaded jaw on a flat back plate. You press a handle, slide the mat’s top edge in and let go. Commercial supplier Kleen-Rite describes typical car wash clamps as about 10 to 12 inches tall, 1 to 3 inches wide and 2 to 3 inches deep off the wall, which is why they take up so little room. Stainless versions are made for heavy rubber mats and constant water. Maxshine sells a single stainless clamp with a spring handle and molded plastic grip, listed on its own site for under $25 at the time of writing, so two of them stay under $50.
Plastic clamp multi-packs: more mats for less
Multi-packs of lighter clamps cost less per mat. SGCB, for example, lists a four-pack of 2.8 inch clamps made from ABS plastic with stainless steel springs, which can be screwed to a wall or mounted on a 19 mm stainless tube. Packs like this suit carpet mats, rear runners and thinner rubber mats. Before you mount a full row, test one clamp with your thickest liner, wet, and pull down on it.
A wood cleat: clamps exactly where you want them
Wall studs are usually 16 inches apart, which rarely matches the width of four mats side by side. A simple fix is a cleat: a 1x4 or 2x4 board screwed across several studs at chest height. Every clamp then screws into the board wherever it is needed, and the board spreads the load across the studs. Paint or seal the board so it does not soak up the spray.
Coated utility hooks: off-season storage
Many molded liners and factory mats have retention holes or grommets near the back edge, where they hook to the car’s retainers. A vinyl-coated utility hook through that hole is an easy way to hang a clean, dry spare set flat against the wall. It is not a washing setup, because the mat swings, but it is ideal for the months the mats spend waiting. Do not stretch or tear the grommet; if the hole is small or fragile, use a clamp instead.
Clip hangers on a rod
Clip-style pants hangers, hung on a closet rod or a garage rail, pinch the edge of a carpet mat well and let it hang in open air. They work in a pinch for drying carpet mats, especially near a fan. They are less secure for wet rubber, which is heavier and slicker, so keep them for carpet.
Boot trays and drip trays
Whatever holds the mats, something needs to catch the drip. A long rubber or plastic boot tray under the clamps keeps salty water off the concrete and away from the car’s tires, and it can be lifted and emptied outside. It also gives you a place for winter boots once the mats are dry.
A winter wash-and-dry routine
Shake and vacuum first
Take the mats out and knock the loose grit off outside before you hang them. A quick vacuum while the mat is on the clamp pulls salt out of carpet fibers before water turns it into a paste. On very cold days, a vacuum alone does a lot of good; WeatherTech makes the same point, that a quick vacuum in deep winter helps even if you skip the hose.
Rubber and thermoplastic liners
WeatherTech’s care instructions say to clean its FloorLiners and All-Weather mats using only a mild detergent soap and water, and warn against harsh chemicals and abrasive cleaners. Its how-to guide adds a medium-bristle brush, a rinse with fresh water and time to dry. With the liner clamped by its top edge, you can scrub both sides and rinse from the top down so the dirt runs into the tray.
Carpet mats
Vacuum, then brush the carpet with a stiff brush to lift salt from the fibers. Rinse or wipe with warm water and a mild cleaner made for automotive carpet, following the instructions on its label, then let the mat hang until it is dry right through, including the rubber backing. A fan pointed at the carpet side makes a big difference in a cold garage.
Skip the shine
It is tempting to make a clean rubber liner look new with tire shine or an interior dressing. WeatherTech specifically says it does not recommend Armor All, Son of a Gun or any other silicone-based surface treatment because it makes the surface slippery. A slick mat under the driver’s feet is the last thing you want. Use a protectant made for floor mats with a non-slip finish, or nothing at all.
Dry completely before it goes back
Put mats back only when they are dry on both sides. A damp carpet mat pushes moisture into the car’s carpet, and a rubber liner with water still in its grooves will pour it out the first time you brake hard. If you need the car before the mats are dry, drive without them for the day rather than putting them back wet.
Cold garage, slow drying
In a garage below freezing, wet mats can freeze on the clamp instead of drying. On those days, bring carpet mats inside to dry, or run a small fan and wait for a milder afternoon to wash. Rubber liners can be wiped dry with a towel and put back sooner.
Where the clamps should go
Near the door you carry mats through
Mats come out of the car and go back in, sometimes several times a week in winter. Put the clamps on the wall closest to where you park, so you are not carrying a dripping liner across the garage.
Over a spot water can drain
Pick a wall where the drip lands in the tray, not in a walkway or near stored boxes. If your garage floor slopes toward the door or a drain, mount the clamps on that side. Keep wash water out of storm drains where local rules ask you to, and empty salty trays onto gravel or into a sink rather than onto plants.
Away from outlets and appliances
Do not hang wet mats over an electrical outlet, a power strip, a battery charger or a water heater. Spray and drips travel further than you expect when you rinse with a hose. Leave a clear gap between the wash zone and anything electrical.
Clear of the car door and walkway
Mats hanging at chest height stand out from the wall only a few inches, but a full liner is wide. Keep the row outside the swing of the car door, and leave room to stand in front of the clamps with a brush and hose.
At a height you can work at
Mount the clamps so a hanging front mat ends a few inches above the tray. For most people that puts the clamp jaw somewhere around chest height. Too low and you stoop to scrub; too high and you lift a heavy wet liner over your head.
Installing the clamps
Studs, a cleat or concrete
On a framed wall, screw each clamp into a stud, or screw a cleat across the studs first and mount the clamps to the cleat. On a concrete or block wall, use masonry anchors sized for the clamp’s holes. Kleen-Rite’s install advice is the same: masonry anchors for concrete, lag bolts for wall studs, and a check of hole sizes before you start.
Use rust-resistant screws
Salt water will reach the screws, so use stainless or exterior-coated screws. Plain zinc screws rust fast in a mat-washing corner and stain the wall below.
Pilot holes and a level row
Mark the clamp positions with painter’s tape, check them with a level and drill pilot holes so the screws do not split the cleat. Tighten until the plate sits flat. A clamp that rocks on its plate loosens every time you pull a mat out.
Test with the heaviest wet mat
Hang your thickest rubber liner, wet, and give it a firm tug downward. If the clamp slips, move that clamp to carpet duty and use a stronger clamp for the liners.
Why adhesive hooks are the wrong tool
A wet rubber liner is heavy, and you pull on it every time you take it down. Garage walls are cold, dusty and damp in winter, which is exactly where adhesive strips struggle. Screws into studs, a cleat or masonry anchors are the only mounts worth using here.
Storing the off-season set
Clean and dry first
Before the summer mats go up for the winter, or the rubber liners go up for the summer, wash them and dry them completely. Stored dirt and salt are harder to remove later, and a damp carpet mat stored for months can grow mildew.
Keep them flat and unfolded
Molded liners are shaped to the floor of one car. Folding or rolling them for months can leave a crease or a warp that stops them sitting flat. Hang them flat against the wall by a clamp or through a retention hole, or lay them flat on a shelf with nothing heavy on top.
Label which mat goes where
WeatherTech notes that the side, LHS or RHS, is molded into the underside of its mats next to the part number, and that the liners only fit the correct side. Not every mat is marked, so put a small label on each one, or hang them in the order they sit in the car: driver, passenger, rear.
Keep the stored set out of the footwell
Never store a second mat on top of the one you are using. Toyota’s pre-delivery bulletin tells dealers that a secondary set, such as all-weather mats, must go in the trunk rather than on top of the installed driver mat. At home, the wall is a better place than the trunk, because the mats stay flat and clean.
Putting mats back safely
One mat per footwell
Automakers are clear on this. A GM service bulletin says not to place another mat on top of the driver’s floor mat, and gives the example of rubber all-weather mats on top of carpet mats. Mazda’s bulletin explains why: the retention pins can only keep one floor mat from sliding forward, so a second mat can slide into the pedals.
Hook it to the retainers
If your car has floor mat retainers, the hooks, posts or twist knobs near the seat rails, use them every time. GM’s bulletin says that if a vehicle has a driver’s side retainer, it must be used, and Toyota warns that an unsecured driver mat can slip and interfere with the pedals.
Never flip the mat
Do not turn a driver’s mat upside down to keep it clean, and do not lay a towel or a carpet remnant over it. Both GM and Toyota warn against it in their floor mat guidance.
Check the pedals
After the mats go back in, press the accelerator and brake pedal all the way, and the clutch if there is one, and make sure nothing catches. It takes ten seconds and it is the step that matters most.
Three under-$50 builds
The basic two-clamp spot
Two clamps screwed straight into neighboring studs, plus a boot tray on the floor. This handles the two front mats, which are the ones that collect most of the salt, and it is the cheapest way to start. Rear mats can wait their turn or hang over the edge of a clean bin while the fronts drip. If you pick single stainless clamps, two of them plus screws come in under $50 at typical listed prices; check the current price on the listing.
The four-mat cleat
A multi-pack of four clamps, a painted 1x4 or 2x4 cleat long enough to span three or four studs, stainless screws and a long tray. Every mat in a typical car hangs at once, the cleat lets you set the gaps to suit your mats rather than your studs, and the whole row can be washed and left to dry in one go. This is the build most single-car garages should copy.
The swap-season wall
Four clamps on a cleat for washing, plus two vinyl-coated utility hooks beside them for the off-season set. In spring the carpet mats come off the hooks and the clean, dry rubber liners take their place; in late fall the swap runs the other way. One stretch of wall handles washing, drying and storage, and nothing ends up on the floor or in the trunk. Price the multi-pack, hooks and tray together; a basic version still fits under $50.
Setups for different garages
One car, one set
Four clamps on a short cleat on the wall beside the car, a boot tray underneath, and two coated hooks next to them for the off-season set. That is the whole system, and it fits on one stretch of wall.
Two cars in snow country
Two cars can mean eight wet mats on a Sunday. Run a longer cleat with six to eight clamps, put two boot trays end to end below it, and wash one car’s mats while the other set dries. A small fan at one end keeps the carpet mats moving.
Home detailer
If you also wash towels and pads, keep the mat clamps next to the microfiber towel rack and the pressure washer wand, so the whole wash station is on one wall. Our microfiber towel rack and pressure washer wand guides cover the rest of that wall.
Rented garage or carport
If you cannot drill, a freestanding drying rack or a sturdy garment rack with clip hangers does the job for carpet mats, and a pair of sawhorses with a board across them works for rubber liners to drain. Store the off-season set flat under a shelf.
Mistakes to avoid
- Stacking a winter rubber mat on top of the carpet mat in the driver’s footwell.
- Putting mats back in the car while they are still wet underneath.
- Leaving wet mats on the garage floor in a puddle of salty water.
- Using tire shine or silicone dressing on rubber liners, which makes them slippery.
- Hanging heavy wet liners from adhesive hooks or plastic drywall anchors.
- Mounting the wash spot above an outlet, a charger or a water heater.
- Folding or rolling molded liners for months so they no longer sit flat.
- Skipping the retainer hooks or forgetting to check the pedals after reinstalling.
Related guides
Browse the hub: Garage wall storage under $50 - all guides
- Best Winter Tire & Seasonal Gear Wall Storage Under $50
- Best Snow Shovel & Ice Scraper Wall Holders Under $50
- Best Microfiber Towel Wall Racks Under $50 for Garage Detailing
- Best Pressure Washer Wand Wall Mounts Under $50
- Best Garden Hose Reel Wall Mounts Under $50 for Garages
- Best Cordless Vacuum Wall Mounts under $50 for Garage Storage
- Best Garage Track Rail Hooks under $50
- Best Ice Melt and Rock Salt Storage Shelves Under $50 for Garage Walls
FAQ
How do you hang car floor mats on a garage wall?
Screw spring-loaded floor mat clamps into studs, or into a wood cleat screwed to the studs, at about chest height. Clamp each mat by its top edge so it hangs straight, and put a boot tray or drip tray on the floor below to catch the water.
What is a floor mat clamp?
It is a spring-loaded jaw on a flat back plate that screws to a wall. You press the handle, slide in the mat’s edge and let go. Car washes use them so customers can hang mats for cleaning, and the same clamps work in a home garage.
How should I clean rubber floor liners in winter?
Shake and vacuum off grit, then scrub with mild soap, warm water and a medium-bristle brush, and rinse with fresh water. WeatherTech warns against harsh chemicals, abrasive cleaners and silicone-based treatments, which make the surface slippery.
Can I put winter rubber mats on top of my carpet mats?
No. Automaker service bulletins from GM, Toyota and Mazda all say to use only one mat in the driver’s footwell, because the retainers hold only one mat and a second one can slide into the pedals. Remove the carpet mat first and store it.
How do I store the off-season floor mats?
Wash and dry them completely, then keep them flat and unfolded. Hang them on a wall clamp or a coated hook through a retention hole, or lay them flat on a shelf. Label each mat so you know which footwell it belongs to.
How long do floor mats take to dry in a garage?
Rubber liners usually dry within a few hours once the water drains off. Carpet mats take much longer, especially in a cold garage; a fan helps, and on freezing days it is better to dry carpet mats indoors.
Bottom line
The best car floor mat wall storage is a short row of spring clamps on a stud-mounted cleat, with a tray underneath. Hang each mat by its top edge to rinse, scrub and drip-dry, clean rubber with mild soap instead of silicone shine, and let carpet mats dry right through before they go back. Keep the off-season set flat and labeled on the same wall, and when the mats go back in, use one per footwell, hook it to the retainers and check the pedals. The whole setup costs well under $50 and keeps salt out of the car all winter. Check clamp sizes, materials and current prices on the listing before you buy.