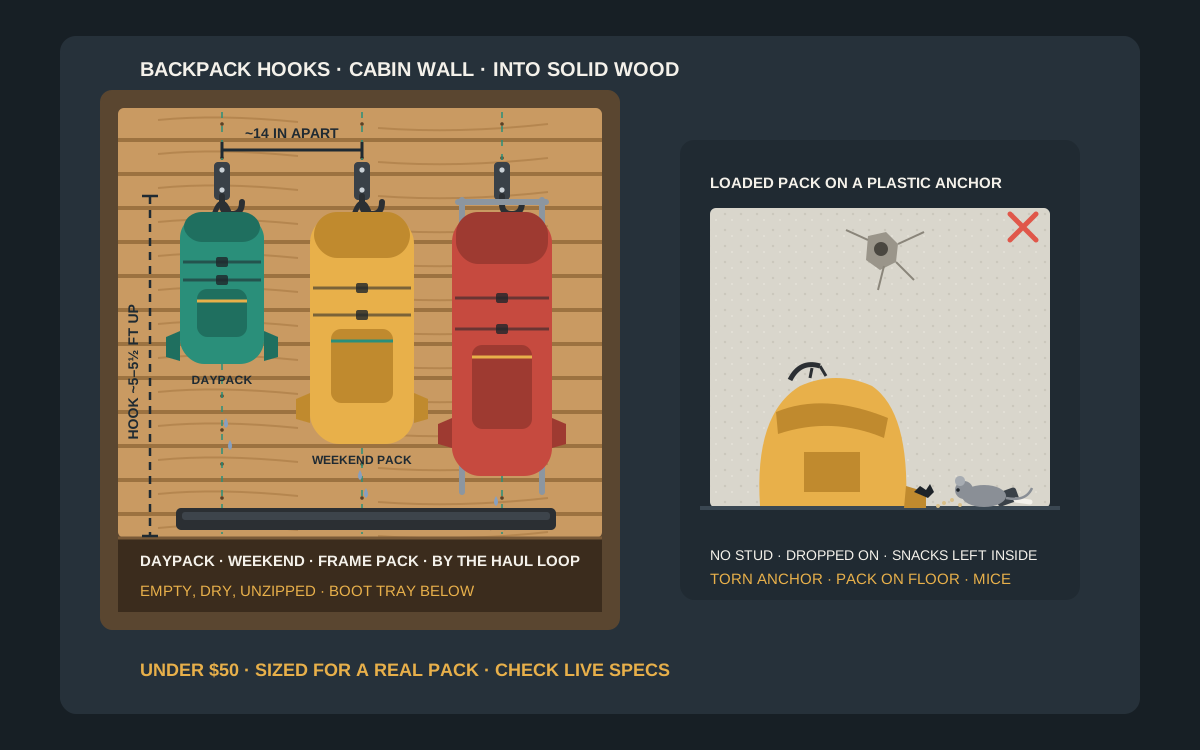
For most cabins, the best under-$50 setup for camping backpacks is a row of individual heavy-duty, vinyl-coated utility hooks with a deep upturned lip, each screwed into a stud or solid log about 14 inches apart and roughly 5 to 5½ feet up, with a boot tray underneath for drips. Pick a hardwood peg rail when daypacks and jackets share one wall, a shelf-and-hook rack when helmets, hats and headlamps need a home above the packs, and an over-door rack only for empty daypacks in a rental cabin you cannot drill. Hang packs empty and dry by the haul loop, keep them out of the stove’s clearance zone, and check the current ratings, dimensions and price on the listing before you buy.
Shop backpack wall hooks on Amazon
Who this is for
- Cabin owners who are tired of hiking and backpacking packs piled on the floor, the bench and the bunk by the second day of every trip
- Families and guest-weekend hosts who need one hook per person for packs that come in wet, muddy and still half-full
- Anyone deciding between single heavy-duty hooks, a peg rail, a hook rail, a shelf with hooks or an over-door rack under $50 for a log, pine-plank or drywall cabin wall
Quick answer
For most cabins, the best under-$50 setup for camping backpacks is a row of individual heavy-duty, vinyl-coated utility hooks with a deep upturned lip, each screwed into a stud or solid log about 14 inches apart and roughly 5 to 5½ feet up, with a boot tray underneath for drips. Pick a hardwood peg rail when daypacks and jackets share one wall, a shelf-and-hook rack when helmets, hats and headlamps need a home above the packs, and an over-door rack only for empty daypacks in a rental cabin you cannot drill. Hang packs empty and dry by the haul loop, keep them out of the stove’s clearance zone, and check the current ratings, dimensions and price on the listing before you buy.
Quick comparison
| Format | Best for | Typical price band | Why it wins |
|---|---|---|---|
| Heavy-duty single utility hooks | Loaded daypacks and weekend packs, one per person | Often $10–$25 for a multipack | Deep coated lip, each hook placed on a stud or log |
| Hardwood peg rails | Mixed daypacks, jackets and hats on one cabin wall | Often $20–$45 | Rounded pegs are gentle on webbing and look at home in a cabin |
| Metal hook rails (double hooks) | Entry walls with 4 to 6 packs where studs line up | Often $15–$40 | One level row, fewer holes, spreads load across studs |
| Wall shelf with hooks | Packs below, helmets, hats and headlamps above | Often $25–$50 | Two storage tiers from one stud-mounted bracket set |
| Over-door hook racks | Empty daypacks in rental cabins with no drilling | Often $10–$25 | Zero holes, lifts off at checkout |
Heavy-duty utility hooksWood peg railsWall shelves with hooks
What to look for
Sized for a real pack, including the drop
An empty daypack weighs a pound or two, but a daypack still holding water, a rain shell and snacks is commonly 10 to 15 lb, and a weekend pack that comes off someone’s shoulders at the door can be 25 to 35 lb or more. Packs also get dropped onto a hook rather than placed, which loads it harder than the scale number. To weigh yours, stand on a bathroom scale with and without the pack and subtract. Compare that figure with the maker’s published rating for wood or stud mounting, and if a hook lists no rating at all, treat it as a light-duty hook.
Hook depth, lip and coating that suit webbing
A pack hangs from a haul loop, a strip of webbing about an inch wide, or from the top bar of an external frame. You want a throat deep enough that the loop sits fully in the hook, roughly 3 to 5 inches of projection, and an upturned lip so a bumped pack cannot slide off. Vinyl or rubber coating, or a smooth rounded wood peg, protects the webbing and the pack fabric; thin wire hooks and sharp-edged stamped hooks concentrate the load on a narrow line and slowly abrade it.
Spacing and height for packs, not coats
Most backpacking packs are roughly 11 to 14 inches wide and 25 to 32 inches tall once you count the lid. Plan roughly 12 inches hook-to-hook for daypacks and 14 to 16 inches for overnight and frame packs, or the hip belts lock together and every pack comes down at once. Mount adult hooks about 60 to 66 inches up so a full-height pack clears a bench or a boot tray, and add a lower row around 40 to 48 inches for kids’ packs.
Fixings that match a cabin wall
A pack hook is only as strong as what its screws bite into. Solid logs and studs behind pine planks or drywall carry a loaded pack; the planks or the drywall alone are a much weaker base, and adhesive pads on rough-sawn wood or log are a non-starter. Use the hardware the hook maker specifies for wood, or longer wood screws or lag screws when the hook is designed for them, and pre-drill so you do not split the wood.
Single hooks vs peg rail vs hook rail vs shelf vs over-door
When individual heavy-duty hooks win
For real backpacking packs, separate utility hooks are the most forgiving choice. Each hook goes exactly where a stud, a log course or solid blocking sits, so every pack has its own fixings rather than sharing a rail that might be anchored at only one end. Look for steel hooks with a vinyl or rubber coat, a deep throat and an upturned lip, sold with screws meant for wood. They also let you set each hook at the right height for the person whose pack hangs there, which matters in a cabin shared by adults and kids.
When a hardwood peg rail is smarter
A Shaker-style peg rail is the classic cabin answer when packs share the wall with jackets, hats and wet gloves. Rounded hardwood pegs are kind to webbing and do not snag mesh pockets. The catch is that pegs are shorter and have little or no lip, so a bulky pack can work its way off if the haul loop is short, and the rail is only as strong as the screws holding the board to the studs. Choose a rail long enough to reach two studs, and use it for daypacks and lighter loads rather than a full frame pack.
When a metal hook rail makes sense
A rail with four to six double hooks gives you one tidy, level row and fewer holes in the wall. It works well on an entry wall where the studs happen to line up with the rail’s mounting holes, or where you can screw the rail to a solid board fixed across the studs first. Check the hook spacing before you buy: many rails are designed for coats, with hooks only 6 to 8 inches apart, which is too tight for packs. If the spacing is tight, hang a pack on every second hook and treat the rail as half its advertised count.
When a shelf with hooks earns its place
If every hiker also arrives with a hat, a headlamp, sunglasses and maybe a bike or climbing helmet, a shelf with hooks underneath turns one wall into a complete gear station. Packs hang below; small items and helmets sit on the shelf above where they dry and do not get lost. Keep the shelf for light items: a shelf loaded with water bottles and boots on top, plus packs pulling on the hooks below, is asking a lot of two brackets and a few screws.
When an over-door rack is the only option
In a rental cabin or a bunkhouse where you cannot put a single screw in the wall, an over-door hook rack carries empty daypacks and jackets with no holes at all. Check that the hook depth fits the door thickness and that the door still closes, and use the felt bumpers so the rack does not scuff the finish. Do not hang loaded overnight packs on a door rack; the door, the hinges and the rack were not designed for that load. A freestanding coat tree or a bench with cubbies is the better no-drill option for full packs.
Cabin walls: log, pine plank, drywall and rentals
Solid log walls
A full log wall is the easiest surface in the cabin for pack hooks, because every inch is solid wood. Pre-drill a pilot hole sized for the screw so the log does not split, keep screws a few inches away from the cut end of a log, and avoid driving into a check (one of the natural cracks that open as logs dry) or into the chinking between courses. Aim for the meat of a log rather than a joint, and if the hook plate sits on a rounded face, choose a hook with a narrow plate or add a small flat wood block behind it.
Tongue-and-groove pine planks
Pine or cedar planking is usually nailed over studs, and electronic stud finders often struggle on it. Look for the vertical lines of nail heads, or slide a strong magnet across the boards to find them; those lines mark the studs. Screw pack hooks through the planking into the stud. A hook screwed only into a plank will hold an empty daypack, but a loaded pack levering on it can pull the board off its nails, especially if the board is thin or the wood is soft.
Drywall over studs
Some cabins are framed and finished with drywall, especially newer builds and additions. Find the studs, which are commonly 16 inches on center and sometimes 24, and put every pack hook into one. If a hook has to land between studs, a metal toggle anchor rated for the load is far better than a plastic expansion plug, but drywall still crushes under a heavy pack that swings and gets yanked; keep in-between spots for light daypacks and hats.
Rental cabins and no-drill rules
Read the house rules before you hang anything. Adhesive hooks are not a fix for packs: they rarely bond to rough-sawn wood, logs or unsealed timber, and even on smooth paint they are rated for far less than a loaded pack. Use an over-door rack for empty daypacks, a freestanding coat tree or a bench for full packs, and pack it all back out at checkout.
Sizing hooks to the packs you actually own
Daypacks and hydration packs
Daypacks of about 15 to 30 liters are the easy part: a coated utility hook, a peg or a double coat hook all work. Take hydration bladders out, hang them open and upside down to drain on their own hook or hanger, and unzip every pocket so the pack dries inside. A peg rail or a double hook is fine here, and a lower row lets kids hang their own.
Weekend and overnight packs
Packs of about 35 to 55 liters are where cheap hooks start to fail. Use a single heavy-duty hook into solid wood for each, with a deep lip, and hang the pack by the haul loop. Loosen the compression straps and the hip belt, take out food, stove fuel and anything that leaks, and give each pack a full 14 to 16 inches of wall width so the hip-belt wings do not interlock with the next pack.
Expedition and external-frame packs
Packs of 60 liters and up, and external-frame packs in particular, are long, heavy and awkward. A frame pack hangs most securely by its top crossbar on a wide hook or a pair of hooks, and it needs more height so the bottom of the frame clears the floor. If a big pack lives at the cabin full time, a low shelf or a dedicated floor spot under the hook, where the pack can rest its weight, is often kinder to both the pack and the wall than hanging it at full load.
Kids’ packs and guest packs
For weekends with guests, count hooks for the peak number of people plus one spare, and mark each hook with a small tag or a strip of colored tape. Kids’ packs go on a lower row they can reach without climbing on the boot bench. Guests’ packs belong away from the woodstove and out of the walkway, where nobody trips over a dangling hip belt at night.
Layout for a cabin pack wall that stays tidy
Pick the right wall
The best spot is near the door you actually come in through, on an inside wall away from the woodstove and out of direct sun from a window: UV slowly weakens nylon and fades fabric. An unheated mudroom or entry is fine for dry storage, but in damp shoulder seasons a wet pack dries better in a ventilated, heated room than in a closed porch.
Mark a level line and stud positions first
Run painter’s tape at hook height, mark every stud or log course you can screw into, and only then decide how many hooks fit. On a pine-plank wall, hooks that land on studs 16 inches apart give you natural pack spacing; on a log wall you can space them however you like.
Leave room below for drips and boots
Put a rubber boot tray or a washable mat under the row so mud and meltwater from wet packs land on something other than the floorboards. A low bench a little forward of the wall gives people somewhere to sit and unclip, as long as the hanging packs still clear it.
Keep the stove clearance clear
Woodstoves and many heaters come with a minimum clearance to combustibles in the maker’s manual. Never mount pack hooks, or hang wet gear to dry, inside that zone. Nylon, mesh and foam back panels melt, and a pack that slips off a hook toward a hot stove is a fire risk, not a drying shortcut.
Installation that holds a loaded pack
Pre-drill and drive into solid wood
Drill a pilot hole for every screw, especially in hardwood, dry logs and near board ends, then drive the screws snug so the hook plate sits flat without crushing the wood fibers. If the hook came with short screws and you are going through planking into a stud, use longer wood screws of the same gauge so most of the thread is in the stud.
Orient the hook for the load
Mount utility hooks with the lip facing up and the plate vertical, and check that the haul loop will sit in the deepest part of the throat. On a rounded log face, make sure the whole plate bears on wood; a plate that rocks will work its screws loose over a season.
Proof-load before the trip
Hang an empty pack first, then a pack loaded with something you do not mind dropping, and give it a firm downward tug. If the hook flexes, the plate shifts or the wood creaks, move the hook to a better spot before guests arrive rather than after a pack hits the floor.
Recheck each season
Wood moves with humidity, and log cabins settle. At the start of each season, tighten any screws that have loosened and look for cracks starting at a screw hole. Replace hooks whose coating has worn through to bare metal so they do not chafe webbing or rust onto a pack.
Storing packs between trips
Empty, clean and dry first
Shake out grit, empty every pocket including the hip-belt pockets and the lid, wipe off mud, and let the pack dry fully, inside and out, before it goes back on the wall for the season. Stored damp, packs grow mildew on foam and seams, and the smell rarely comes out.
Hang by the haul loop and loosen everything
The haul loop is built to lift a loaded pack, so it can easily carry the same pack empty on a hook. Loosen the shoulder straps, hip belt and compression straps so the foam and buckles are not stored under tension. Hanging empty packs by a broad hook or a pair of pegs under both shoulder straps is also fine; avoid narrow wire hooks either way.
Keep mice out of the equation
Cabins and mice go together, and mice will chew through a pocket for a single forgotten granola bar or a lip balm. Remove every food item, wrapper and scented item from packs before they go on the wall, and keep a pack off the floor and away from shelving that gives mice a ladder to it. Hooks help, but an empty pack is what actually protects it.
Store accessories separately
Put rain covers, hydration bladders, trekking poles and stuff sacks in a labeled bin or on their own hooks so the packs hang slim and the pieces you always forget are easy to find before the next hike.
Mistakes to avoid
- Hanging a loaded overnight pack on a plastic drywall anchor, a door rack or an adhesive hook.
- Screwing pack hooks only into pine planking, chinking or a log check instead of a stud or solid log.
- Buying a coat rail with 6-inch hook spacing and expecting it to hold five backpacks side by side.
- Using thin wire or sharp stamped hooks that slowly cut into haul loops and mesh.
- Mounting hooks inside the woodstove’s clearance zone, or drying soaked packs right next to the stove.
- Storing packs damp, zipped shut and still holding snacks, which invites mildew and mice.
- Hanging full-time frame packs at full load for months instead of emptying them or resting them on a shelf.
Related guides
Browse the hub: RV & camping storage under $50 - all guides
- Best Cabin Mudroom Hook Rails Under $50
- Best Camping Gear Wall Hooks Under $50 for Van & Cabin
- Best Sleeping Bag Wall Stuff-Sack Hooks Under $50 for Camping
- Best Camping Lantern Wall Hooks Under $50 for Cabins
- Best Camping Chair Wall Hangers Under $50 for Cabins
- Best Van Life Key & Headlamp Wall Hooks Under $50
- How to Hang Camping Rope & Paracord on a Cabin Wall Under $50
- Best Dog Hiking Pack Wall Hooks Under $50
- Best Trekking Pole Wall Racks Under $50 for Garage & Cabin
- Best Bear Spray & Bear Canister Wall Holders Under $50
- Best Hydration Bladder Drying Hangers Under $50 for Camping Gear
- Best Bug Spray & Sunscreen Wall Caddies Under $50 for Camping Gear
FAQ
What is the best backpack wall hook for a cabin under $50?
For most cabins, a set of heavy-duty, vinyl-coated utility hooks with a deep upturned lip, each screwed into a stud or solid log about 14 inches apart. Use a hardwood peg rail for daypacks and jackets, a shelf with hooks if hats and helmets need a home, and an over-door rack only for empty daypacks in a rental.
How far apart should backpack hooks be?
Plan about 12 inches center to center for daypacks and 14 to 16 inches for overnight and frame packs. Most backpacking packs are roughly 11 to 14 inches wide, and hip-belt wings add more, so coat-rail spacing of 6 to 8 inches is too tight.
Can I hang a fully loaded backpack on a wall hook?
Briefly, yes, if the hook has a published rating that covers the pack’s weight and it is screwed into a stud or solid log. For storage, empty the pack first. Never hang a loaded pack on a plastic anchor, an adhesive hook or an over-door rack.
Should I hang a backpack by the haul loop or the shoulder straps?
The haul loop is designed to lift a loaded pack, so hanging an empty pack from it is fine and keeps the shoulder straps free to dry. Hanging an empty pack by both shoulder straps on a broad hook or two pegs is also fine; avoid narrow wire hooks either way.
How do I put backpack hooks on a log or tongue-and-groove wall?
On a log wall, pre-drill and screw into the solid log, away from checks, chinking and cut ends. On pine planks, find the studs by the lines of nail heads or with a strong magnet, and screw through the plank into the stud rather than into the plank alone.
Bottom line
Camping backpack wall hooks under $50 work in a cabin when each hook bites into a stud or solid log, has a deep coated lip for the haul loop, and gets enough wall width that the hip belts do not tangle: individual heavy-duty hooks for loaded packs, a hardwood peg rail for daypacks and jackets, a shelf with hooks for hats and helmets, and an over-door rack only for empty daypacks in a rental. Weigh the packs you really carry, space hooks about 14 inches apart, keep everything out of the stove clearance zone, and hang packs empty, dry and food-free so mildew and mice have nothing to work with. Verify live ratings, dimensions and price on the listing before you buy.