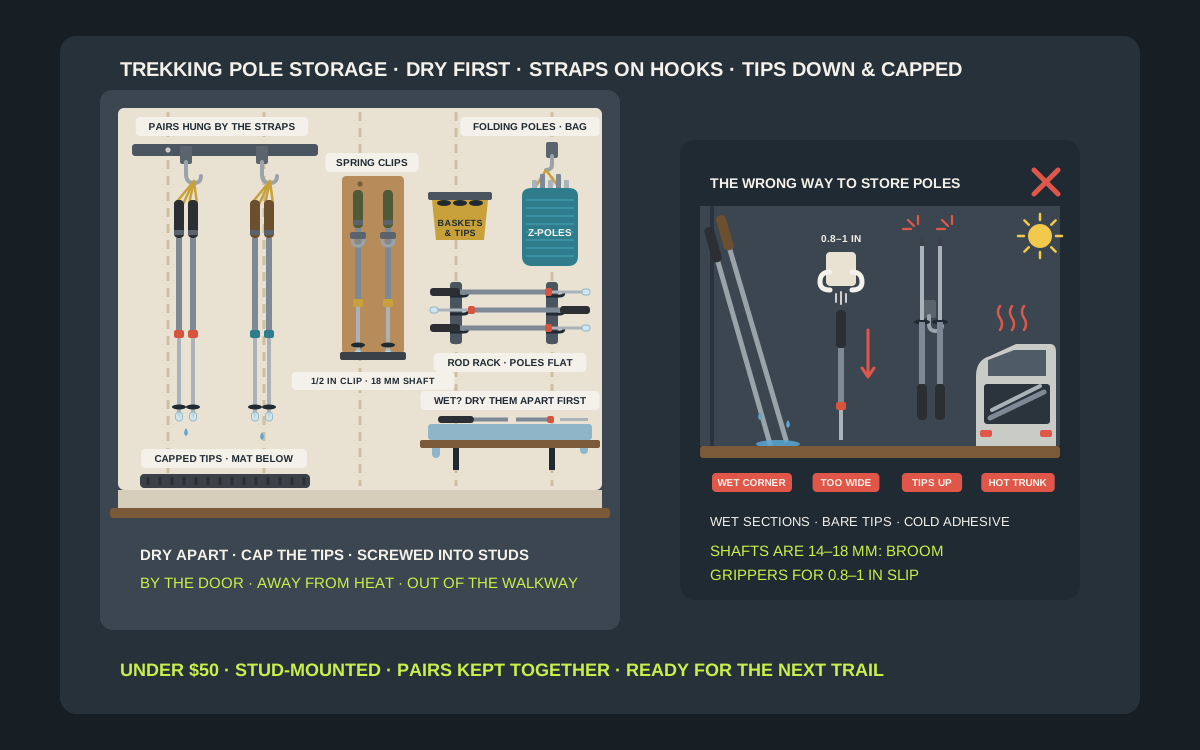
Trekking poles weigh almost nothing and still manage to be some of the most annoying gear to store. A collapsed telescoping pole is about two feet long, the carbide tips scratch whatever they lean on, the wrist straps snag on everything, and the poles usually come home wet, muddy or both. So they end up leaning in the corner behind the door, where one slides down and takes the snow shovel with it, or they ride around in the car trunk for the rest of the summer. A small wall setup fixes that for well under $50, and the hardware is the easy part. A hook rail, a strip of pegboard, a pair of small spring clips or a stuff sack on a hook will hold almost any pair. The details that matter are the ones most racks ignore: shafts that are thinner than a broom handle, tips that need a cap, poles that should dry apart before they hang, and a wall that stays away from the water heater, the wood stove and the car door. This guide covers which holder suits which kind of pole, where it should go in a garage, cabin or RV, and how to keep a pair ready for the next hike.
Shop trekking pole wall mounts on Amazon
Who this is for
- Hikers and backpackers with two or three pairs of poles who want them off the floor, paired up and ready to grab on the way out
- Cabin owners and hosts who keep guest poles by the mudroom door and need them dry, labeled by length and out of the walkway
- RV and van campers who store poles at home between trips and want a spot that is not a hot trunk or a damp corner of the storage bay
Quick answer
For most garages and cabins, the best under-$50 setup is a short hook rail or a strip of pegboard screwed into the studs, with each pair hung grip-up by its wrist straps on its own hook and the tips down in rubber tip protectors over a mat. If you want the poles to stand still instead of swinging, add small spring clips sized for thin shafts. Standard poles are about 18 mm (0.71 in) across at the top section, so a broom gripper made for 0.8 to 1 inch handles will not hold them. Folding poles go in a stuff sack on a single hook. Before anything goes on the wall, dry it. Black Diamond and LEKI both tell owners of telescoping poles to take the sections apart after wet use and let them dry completely. Check the clip’s size range and the current price on the listing before you buy.
Quick comparison
| Holder | Best for | How it holds the poles | Trade-off |
|---|---|---|---|
| Hook rail or pegboard hooks | Telescoping pairs you use every week | Each pair hangs grip-up by its wrist straps on its own hook | Poles swing and tap the wall; straps must be dry |
| Small spring clips for thin shafts | Single poles that should stand still | A clip grips the top section just below the handle | Check that the clip closes down to about 1/2 inch |
| Horizontal rod rack | Several pairs on a narrow strip of wall | Poles lie flat in padded slots between two brackets | Needs wall width longer than the collapsed pole |
| Vertical rack with a base | Mixed poles and staffs at full length | Tips sit in a base tray and an upper clip holds the shafts | Takes floor space; tips need caps |
| Stuff sack or mesh bag on a hook | Folding poles, spare tips and baskets | The folded bundle rides in a bag hung from one hook | Hidden from view; only for dry poles |
| Tall caddy by the door | Guest poles and wooden hiking staffs | Poles stand tips-down in a tall bin or stand on a mat | Poles lean and tangle; least tidy option |
Small spring tool clipsTrekking pole tip protectorsHorizontal wall rod racks
What to look for
It fits the kind of poles you own
Trekking poles come in three shapes, and they store differently. Telescoping poles slide into themselves and stay fairly long: Black Diamond’s Trail Back collapses to 61.5 cm (24.2 in), and LEKI’s Voyager packs to about 65 cm. LEKI’s UK distributor puts most telescoping poles at 60 to 70 cm packed. Folding poles break down like tent poles into a short bundle, about 35 to 44 cm for Black Diamond’s Distance Carbon Z depending on its length. Fixed-length poles and wooden hiking staffs do not shrink at all. Measure the longest pole you own in the state you will store it, then pick a holder and a spot on the wall that leave room for it.
It grips a thin shaft, or skips the shaft entirely
This is where many generic tool holders fail. LEKI lists its standard trekking poles at 18, 16 and 14 mm for the top, middle and bottom sections, and its ultralight poles at 16, 14 and 12 mm. Even the thickest of those is only about 0.71 inch. Command lists its Broom Gripper for handles of about 0.8 to 1 inch, so a pole simply slides through it. If you want a clip, look for one whose listed range starts at about 1/2 inch and grip the top section just below the handle. Or skip the shaft and hang the pole by its wrist strap, which fits every pole you will ever buy.
It keeps the tips down and covered
Most trekking poles end in a carbide tip, hard enough to bite into rock and ice and equally good at gouging drywall, scratching a car door and poking holes in a pack. LEKI sells clear rubber tip protectors made for storage and transit for exactly this reason. Hang poles grip-up so the tips point at the floor, put a cap on each one, and set a rubber mat or boot tray underneath to catch drips and grit. A tip pointing up at face height is the one arrangement to avoid on every wall.
It lets the poles dry
Water trapped inside a telescoping pole is how locks seize and tubes corrode. Black Diamond’s instructions say to remove the lower shafts after use and let them dry completely before storage, and LEKI recommends pulling its telescoping poles apart into separate segments and letting them dry, so a layer of oxidation does not form inside the tubes. An open hook, clip or rack lets air move around the poles. A closed bag or a sealed tub is fine for dry poles and a bad place for wet ones. Whatever holder you choose, plan a few minutes of drying before the poles go on it.
Screws in the garage, adhesive only indoors
Load is rarely the problem. A pair of Black Diamond Trail Back poles weighs about 534 g, or roughly 1.2 lb, so even a light hook holds them. The problem is the wall and the temperature. Command rates its Large Utility Hook at 5 lb for indoor use, and its indoor strips are made for about 50°F to 105°F, which an unheated garage, shed or closed-up cabin can leave behind in winter or summer. A screw into a stud costs almost nothing, does not let go when the poles get bumped, and works at any temperature. Rubbermaid’s FastTrack utility hooks, for example, are rated at 50 lb on a rail screwed into the studs, far more than poles need.
Know your poles before you buy a rack
Telescoping poles
These are the most common trekking poles: two or three sections that slide inside each other and lock with a lever or a twist. Black Diamond’s Trail Back, for instance, adjusts from 100 to 140 cm and collapses to 61.5 cm. Because they stay about two feet long when collapsed, they suit hooks, clips and rod racks better than bags. They also have the most places for water to hide, which is why both Black Diamond and LEKI tell owners to take them apart to dry. Plan the rack for the collapsed length and hang them collapsed once they are dry.
Folding poles
Folding poles, often called Z-poles after Black Diamond’s design, use an internal cord like a tent pole and fold into three short sections. LEKI’s UK distributor puts its folding poles at about 35 to 40 cm packed, and Black Diamond’s Distance Carbon Z packs to 35 to 44 cm depending on its length. That makes them easy to lose. Keep each pair bundled with its strap or a hook-and-loop tie, and store the bundle in a small sack or bin so the pieces stay together.
Fixed-length poles and hiking staffs
Nordic walking poles, some running poles and wooden hiking staffs do not adjust at all, so they need a spot that clears their full length. Clips high on a stud board, a vertical rack with a base, or a tall caddy by the door work best. A carved wooden staff is also worth keeping out of a damp corner, where the bottom end sits in grit and water.
The small parts that go missing
Poles come with extras: snow baskets, rubber tip covers, spare tips, sometimes a bundle strap. Black Diamond’s Trail Back ships with extra snow baskets, and LEKI makes baskets, tips and grips replaceable on most of its poles. Give these parts a small labeled bin next to the poles. It costs a few dollars, and it saves a spring morning spent hunting for the summer baskets you took off in January.
Six ways to store trekking poles on a wall
A hook rail or pegboard hooks, one pair per hook
This is the default for most garages and cabins. A short rail screwed into two studs, or a pegboard panel with hooks to match its holes, gives each pair its own hook. Hang the poles grip-up by their wrist straps so the tips point at the floor, then cap the tips and put a mat or boot tray underneath. Space the hooks far enough apart that two pairs do not knock together when you take one down, and give each hook a small label if several people share the wall. It is fast, it fits every pole with a strap, and the straps dry in the open air. The only trade-off is that the poles swing when bumped, so keep the rail out of a busy walkway.
Small spring clips sized for thin shafts
If you want poles to stand still, spring clips do it well, as long as they are the right size. Grip the top section just below the handle, where the shaft is thickest, and let the capped tip rest on a small tray or mat below. Because standard upper sections are about 18 mm and ultralight ones about 16 mm, look for clips listed for handles down to about 1/2 inch, not broom grippers made for 0.8 inch and up. Screw the clips to a board fastened across the studs so you can space them as you like. One clip per pole is enough for telescoping poles. A long fixed pole or staff may want a second clip lower down.
A horizontal rod rack
Some horizontal wall racks are sold for fishing rods, ski poles and hiking poles alike: two brackets with padded slots, and the poles lie across them. It is a tidy choice for a narrow strip of wall above a workbench or along a cabin hallway, and it keeps tips away from the floor. Mount the two brackets far enough apart to support the pole near each end, which for a telescoping pole means close to its full collapsed length, and into studs or a board that spans them. Tuck the wrist straps around the shafts so they do not dangle at face height.
A vertical rack with a base
Freestanding and wall-leaning rod racks, the kind with a base tray and an upper bar of clips, also work for poles, especially fixed-length poles and staffs. Stand the poles tips-down in the base and clip the shafts at the top. Cap the tips first, because a bare carbide point will dig into a foam or plastic base. This option uses floor space, so it suits a cabin entry or a garage corner more than a tight wall. Fasten the top to the wall if children or dogs are around, so the rack cannot tip.
A stuff sack or mesh bag on a hook
Folding poles are made for this. Bundle each folded pair with its strap, slide it into a small stuff sack or mesh bag, and hang the bag from a single screwed hook. Add the spare baskets and tip covers to the same bag and the whole kit is ready to drop into a pack. A mesh bag is better than a solid one if there is any chance the poles are still a little damp. Label the bag with the pole length, since folding poles come in fixed sizes.
A tall caddy by the door
A tall bin or stand by the cabin or mudroom door is the casual option: guests drop poles in tips-down and grab them on the way out. It works for a quick weekend, and it is the easiest home for a wooden staff. It is also the least tidy. Poles lean, straps tangle and wet tips sit in a puddle at the bottom. If you use one, choose a caddy with a removable tray or a drain, empty it after wet days, and move the poles to hooks or clips once they are dry.
Drying and care before the poles go on the wall
Telescoping poles: take them apart
After a wet or muddy hike, open the locks, pull out the lower sections and stand or lay the pieces somewhere airy until they are fully dry, inside as well as out. Black Diamond’s instructions say to remove the lower shafts after use and let them dry completely before storage, and LEKI says separating the segments keeps a layer of oxidation from forming inside the tubes. A towel on a shelf next to the rack is all you need. Put the pole back together only when it is dry, then hang it.
Folding poles: follow your maker
Folding poles have an internal cord, and the makers differ slightly on how to dry them. Black Diamond’s Z-Pole instructions say to release the tension cord, collapse the pole and let it dry completely before storage. LEKI says to extend its folding poles fully after wet use, wipe each section dry, then fold them and store them somewhere dry. Both agree on the part that matters most: never put a damp folding pole away in a closed bag. Check the instruction sheet that came with your poles and keep it in the parts bin.
No oil on the shafts
It is tempting to spray a sticky pole with lubricant. Do not. Black Diamond warns never to put oil or silicone on the shafts because the joints could slip during use, and LEKI asks owners to wipe its poles with a dry cloth and avoid lubricants, oils and fats. If a lever lock is stiff, Black Diamond suggests a drop of oil on the lever pin and pivot only. If a section is stuck, LEKI’s UK guidance is to look for grit or salt, clean it out, twist gently rather than force it, and let everything dry.
Locks, straps and grips
For long-term storage, Black Diamond says to store its FlickLock mechanisms with the tension released, so open the levers before the poles go up for the winter. LEKI’s UK guidance also warns against storing poles damp or fully collapsed for long periods. Wrist straps and grips soak up sweat, so hang poles where the straps can air out, not packed tightly in a tub. Cork grips can be cleaned with fine waterproof sandpaper and ordinary hand soap, then rinsed and left to dry, which is the method Black Diamond describes.
Where the pole rack should go
By the door you leave from
Poles that live next to the boots and packs get used. Poles that live in the back of the garage get forgotten. Put the rack on the wall between the door and the rest of the hiking kit, near the backpack hooks and the boot tray, so grabbing poles is part of walking out. Our guides to camping backpack wall hooks and cabin mudroom hook rails cover the rest of that wall.
Away from heat
LEKI’s UK guidance warns against extreme heat, such as a car boot in summer, because it can damage the plastic parts of a pole: grips, locks, baskets and the tip housing. The same goes for the wall beside a water heater, furnace or dryer vent, and for the hearth wall in a cabin with a wood stove. Pick an inside wall or a shaded one, and do not use the car as the storage spot between hikes.
Clear of walkways and heads
Hanging poles swing when you brush past them, and a tip at the wrong height catches a shin, a car door or a child’s face. Keep the rack out of the path between the car and the house door and away from the swing of the car door. Hang poles grip-up with the tips low and capped, and keep horizontal racks above the reach of small children or below eye level for adults, never right at it.
Into studs or solid wood
Find the studs with a stud finder and fasten the rail, board or clips into them. Most garages have studs every 16 inches, which also sets a natural spacing for a two-stud rail. In a log or plank-walled cabin you can usually screw straight into the wall. On concrete or block, use masonry anchors rated for the wall. Poles are light, but a rail that comes loose drags every pair down with it.
Garage, cabin, RV or van
Garage
In a garage, the hook rail or pegboard is usually the right call, mounted on an inside wall near the door to the house. The garage floor is where grit and road salt collect, so the mat under the poles earns its place, and caps on the tips keep them from scratching the car on the way past. If the garage is unheated, skip adhesive hooks entirely.
Cabin
Cabins see the most wet poles, the most guests and the most mixed lengths. A short rail of strap hooks by the mudroom door, a towel shelf for drying sections, and a small bin of spare tips and baskets will handle a full house. Label hooks or bundle straps by length or by person so pairs do not get split up, and keep the rack away from the wood stove.
RV and van
In a moving vehicle, open hooks are a poor home for poles, because whatever hangs on them swings and falls on rough roads. Store poles collapsed and dry in a bag or a tube in a closed cabinet, under-bed storage or a storage bay, with the tips capped so they cannot puncture anything packed beside them. Avoid bays and cabinets that bake in the sun, for the same heat reasons LEKI gives for car boots, and dry wet poles at camp before they go back in.
Between seasons
When the poles go up for the winter, clean off the mud, take telescoping poles apart and dry them, put them back together, release the lever tension, cap the tips and hang them. Check the tips, baskets and straps for wear at the same time, since LEKI and Black Diamond both sell replacements. In spring the poles are ready to go.
Mistakes to avoid
- Leaning poles in a corner, where they slide, tangle and stand in their own puddle.
- Hanging wet telescoping poles collapsed instead of taking the sections apart to dry.
- Using a broom gripper made for 0.8 to 1 inch handles on 14 to 18 mm pole shafts.
- Hanging poles upside down with bare carbide tips pointing up at face height.
- Leaving poles in a hot car trunk or next to the water heater or wood stove.
- Spraying oil or silicone on the shafts to free a sticky section.
- Counting on indoor adhesive hooks in an unheated garage or cabin.
- Storing folding poles damp in a closed bag or tub.
Related guides
Browse the hub: RV & camping storage under $50 - all guides
- Best Camping Tent Pole Wall Organizers Under $50
- Best Camping Backpack Wall Hooks Under $50 for Cabins
- Best Cabin Mudroom Hook Rails Under $50
- Best Camping Gear Wall Hooks Under $50 for Van & Cabin
- Best Ski and Snowboard Wall Racks for Garages Under $50
- Best Fishing Rod Racks for Garage Walls Under $50
FAQ
What is the best way to store trekking poles at home?
Dry them first, then hang each pair grip-up by its wrist straps on a hook screwed into a stud, with tip protectors on and a mat underneath. A short hook rail or pegboard strip by the door handles several pairs for well under $50.
Can I use a broom holder for trekking poles?
Usually not. Standard trekking pole shafts are about 14 to 18 mm, or 0.55 to 0.71 inch, while broom grippers such as Command’s are made for handles of about 0.8 to 1 inch. Use small spring clips listed for handles down to about 1/2 inch, or hang the poles by their straps.
Should trekking poles be stored collapsed or extended?
Dry them completely first, then follow the maker. Black Diamond says to store its FlickLock poles with the lever tension released, and LEKI’s UK guidance warns against storing poles damp or fully collapsed for long periods. Collapsed and dry, with the locks loosened, suits most telescoping poles on a wall.
Do I need tip protectors for storage?
They are worth it. Carbide tips scratch walls, cars and floors and can puncture packs and tents. LEKI makes clear rubber tip protectors for storage and transit, and generic rubber caps are widely sold too.
Can I hang trekking poles on adhesive hooks?
Indoors, a single dry pair is light enough for a large adhesive hook. Command rates its Large Utility Hook at 5 lb and its indoor strips at about 50°F to 105°F. In an unheated garage, shed or cabin, use a screwed hook instead.
How should I store folding trekking poles?
Dry them as the maker describes, fold them, bundle each pair with its strap and keep them in a stuff sack or mesh bag on a hook, together with spare tips and baskets. Never bag them while they are still damp.
Bottom line
The best trekking pole wall rack is the simplest one that fits your poles: strap hooks on a stud-mounted rail or pegboard for telescoping pairs, small spring clips sized for thin shafts if you want them still, a rod rack for a narrow wall, and a stuff sack on a hook for folding poles. Dry the poles apart before they go up, cap the tips, keep the rack by the door and away from heat, and check the clip’s size range and the current price on the listing before you buy.