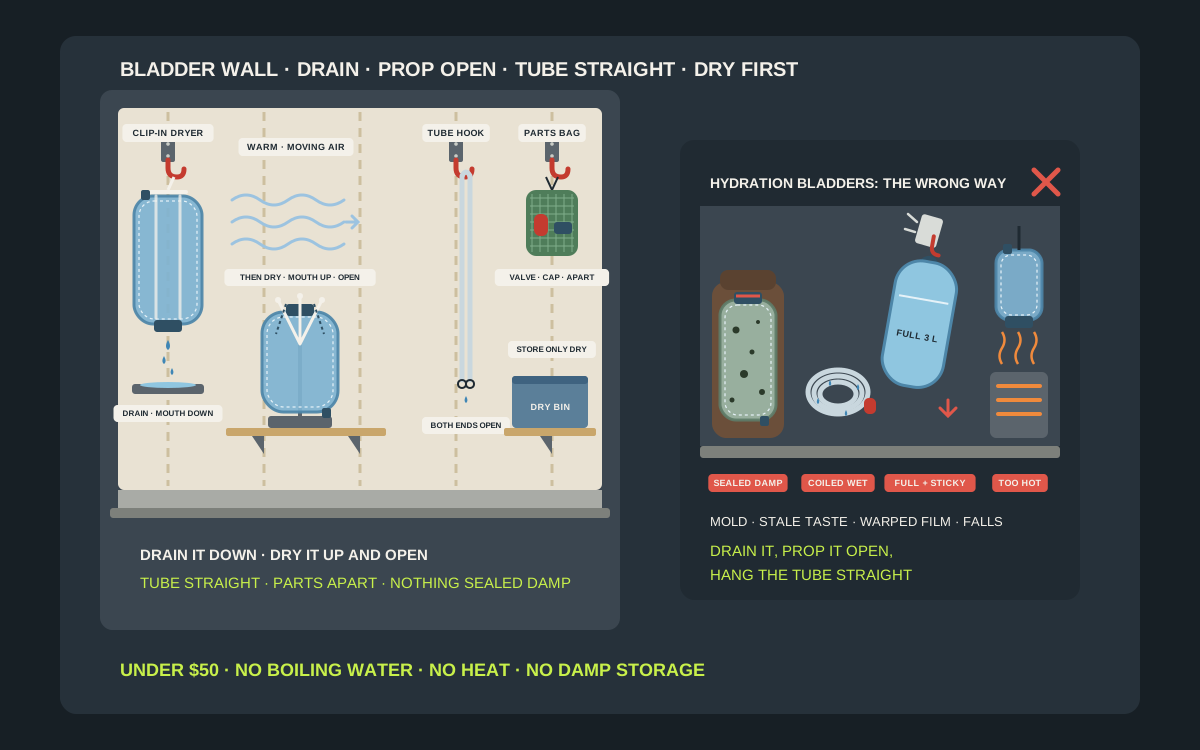
A hydration bladder is the one piece of camping gear that can go bad in the dark. It comes home from a hike or a ride with a few spoonfuls of water still in the corners, gets stuffed back into the pack or a drawer, and two weeks later the tube has black specks in it and the next sip tastes like a swamp. Every major maker says the same thing in different words: rinse it, dry it completely, and never store it damp. CamelBak puts it bluntly in its care guide: never seal or store a hydration reservoir while moisture remains. The hard part is the drying, because a soft bladder collapses on itself, its walls stick together, and water hides in the seams and in the low points of the tube. That is what a drying hanger is for. For well under $50 you can set up a small drying station on a wall that drains the bladder, holds it open in moving air, hangs the tube straight and keeps the bite valve and cap where they will dry and not get lost. This guide covers which hanger suits which reservoir, what CamelBak, Osprey, Platypus and HydraPak actually say about draining, drying direction, heat and storage, and where the drying wall belongs at home and in the rig.
Shop hydration bladder dryer hangers on Amazon
Who this is for
- Hikers, trail runners and mountain bikers who use a 1.5 to 3 liter reservoir every week and are tired of musty tubes
- Campers and RV owners who come home from a trip with two or three bladders to clean and nowhere good to dry them
- Families with several hydration packs who want each bladder, tube and bite valve dried and stored as a set, ready for the next outing
Quick answer
For most people, the best under-$50 hydration bladder drying setup is a clip-in reservoir dryer or a simple bag dryer that holds the bladder walls apart, hung from a coated hook in a warm room with moving air, plus a second hook for the drinking tube so it hangs straight with both ends open. Drain the bladder opening-down first, then let it finish drying open, and lay the bite valve and cap apart in a mesh bag or tray. Store the system only when every part is completely dry, out of the sun and away from heat, or keep the clean, dry bladder in the freezer as CamelBak suggests. Check that a dryer fits your reservoir’s opening, and confirm the hook rating and current price on the listing before you buy.
Quick comparison
| Setup | Best for | How it holds | Trade-off |
|---|---|---|---|
| Brand reservoir dryer | CamelBak Crux and Antidote, Osprey, Platypus Big Zip | Clicks or slides into the opening and holds the walls apart | Fits its own brand best |
| Kitchen bag dryer | Any bladder with a wide opening | Arms hold the bladder mouth-up and open | Needs counter or shelf space |
| Coated wall hook plus a prop | Garage, mudroom, laundry room or RV door | Hangs by the handle or loop, a spoon or whisk props it open | The prop can slip out |
| Clip hanger on a rod | Two or more bladders, shower or closet rods | Clips grip the top edges and hold the mouth open | Clips can crease thin film |
| Tube hook or clip | Drinking tubes and quick-connect hoses | Tube hangs straight with both ends open | Holds the tube only |
| Mesh parts bag or tray | Bite valves, covers, caps and fittings | Small parts lie apart in moving air | Easy to forget without a label |
| Dry-storage bin or freezer | Fully dry systems between trips | Bladder flat, tube loose, parts together | Only once everything is dry |
Reservoir cleaning kits with brushesPlastic bag drying racksCoated screw-in utility hooks
What to look for
Holds the walls apart
A bladder dries from the inside, and it cannot do that while its walls are stuck together. Platypus says its water lab testing found that when the sides of a bladder touch each other, drying slows drastically, and that the interior dries much faster if it is propped open. CamelBak says a reservoir dryer helps hold the inner surfaces apart and lets water drain. Whatever you buy, the first test is simple: does it keep the inside of the bladder open from top to bottom, not just at the mouth?
Fits your reservoir and its opening
Reservoirs differ more than they look. CamelBak’s Crux comes in 1.5, 2 and 3 liter sizes, and the company lists the 3 liter at 46 by 23 by 6 cm, about 18 by 9 by 2.4 inches, with a 235 g empty weight. Platypus Big Zip and HydraPak bladders open along a wide slide-top, while CamelBak and Osprey use a screw cap. CamelBak’s own Reservoir Dryer is made for Crux and Antidote reservoirs; Osprey’s Hydraulics cleaning kit includes a drying rack for its reservoirs. A universal kitchen bag dryer or a wall hook with a prop works with almost anything, but a brand dryer fits its own bladder best.
Hangs the tube straight
The tube is where most of the trouble starts. CamelBak says to drain the drinking tube and hang it vertically with both ends open, and to avoid leaving it tightly coiled, which can let water collect in low points. A good drying station gives the tube its own hook or clip, so it hangs as one straight run or folded once over the hook with both ends pointing down, instead of looped back around the bladder.
Rated for the real load
An empty bladder weighs next to nothing; the Crux 3 liter is about 8 oz. A full one is a different load: 3 liters of water weighs about 3 kg, or 6.6 lb, before you add the reservoir. A drying hook only ever holds an empty, drained bladder, so a small hook is fine, but it must never be the place you hang a full bladder while you look for the pack. Command lists its Large utility hook at 5 lb and its Medium Bath hook at 3 lb, so a full 3 liter bladder is beyond both. If you want a hook that can take a full bladder by mistake, screw a coated utility hook into a stud.
Lets air move around it
Drying is evaporation, and evaporation needs air that moves and is not already saturated. Osprey’s instructions end the same way every time: hang the reservoir to dry in a well-ventilated area. That rules out the back of a closed closet, the inside of a pack and the corner behind the water heater. The best spot is a room you use every day, with a window, a vent or a fan, where the bladder hangs clear of the wall on all sides.
Keeps the small parts together
A bite valve, its silicone cover, the cap and a quick-connect fitting are small, slippery and easy to lose down a sink drain. CamelBak says to place the bite valve, cap and other removable parts on a clean surface with good airflow while they dry. A small mesh bag on its own hook, or a tray on a shelf right under the bladder, does that and keeps every set together, which matters once there are three packs in the house.
Why bladders are so hard to dry
Soft walls that stick together
A hydration bladder is a bag of thin polyurethane or TPU film welded at the seams. Drained, it collapses flat, and the two inner surfaces cling to each other with a film of water between them. Air cannot reach that water, so it sits there for days. That is why every maker talks about holding the bladder open, and why a bladder that looks dry on the outside can still be wet inside.
Corners, seams and baffles
Water hides in the corners at the bottom, along the welded seams and around the tube port. Bladders with an internal baffle, which keeps them slim in the pack, have even more hiding places. HydraPak says its fixed-baffle reservoirs can only be reversed until the baffle is exposed, and recommends a bottle brush or its cleaning tablets, then hanging the bladder upside down to dry. CamelBak tells owners to turn the reservoir in different directions over the sink to release water trapped in the corners.
The tube and the bite valve
The drinking tube is a long, narrow channel with a valve on one end, and it holds water in every low point. Left coiled in a pack, it can stay wet for a week. The bite valve and its cover trap moisture under the silicone. These are the parts that most often show spots, and the parts CamelBak and Osprey both say to remove and dry separately.
What is in the bladder matters
Plain water leaves little behind. Sports drinks, electrolyte mixes and untreated stream water are another story. Platypus says that if you use a drink mix you should rinse after every use, because these mixes can leave a lingering taste and allow bacteria to grow, and that a bladder filled with untreated water from a stream or lake should be disinfected when you get home. Osprey says rinsing after each use keeps a reservoir fresh, especially when using sugary drink mixes.
Which way up: drain first, then dry open
Drain opening-down
Right after rinsing, gravity is your friend. CamelBak says to hold the reservoir over a sink and drain as much water as possible, turning it in different directions. HydraPak tells owners to dry the reservoir by drying it manually or hanging it upside down to drip dry. A clip-in dryer or a hook through the bladder’s handle that lets it hang opening-down over a sink, a tray or a towel for ten or fifteen minutes gets the standing water out.
Then dry mouth-up and open
Once the drips stop, the job changes from draining to evaporating, and the makers’ advice shifts with it. Platypus says it is optimal to prop or hang reservoirs upright to dry, because moisture evaporates and escapes upward, and that in its water lab the most efficient way to dry a bladder was with the opening pointed up. Its Big Zip EVO leaflet says to dry the reservoir zipper end up for maximum moisture evaporation. That is why a two-stage routine works best: drain it down, then flip it mouth-up and propped open to finish.
Follow your own manual on reversing
HydraPak builds most of its reservoirs to be reversed, turned inside out like a sock, and says to let the reservoir dry completely while reversed. That exposes the whole inner surface to air and is the fastest way to dry a HydraPak. Other bladders are not built to be turned inside out. CamelBak says do not force apart components that are not designed to be removed, and to check the care instructions for your specific reservoir first.
Wipe what you can reach
Wide-opening bladders can be dried by hand. Platypus says to shake out the excess droplets and dry the inside film with a paper towel if possible, and for the Big Zip it suggests wiping the interior with a dry towel, then propping the reservoir open with its SlideLock slider. A clean, dry dish towel over two fingers gets most of the water out of a slide-top bladder in a minute, and the hanger finishes the rest.
Six drying setups for under $50
A brand reservoir dryer
If you own a CamelBak, Osprey or Platypus bladder, start with the maker’s own part. CamelBak’s Reservoir Dryer is a two-piece set for Crux and Antidote reservoirs: a click-in dryer that hangs a Crux reservoir so the water drains, and a hanging hook the tube snaps onto so it can hang vertically and drain too. Osprey’s Hydraulics cleaning kit includes a drying rack that you insert into the reservoir before hanging it to dry. Platypus says to insert the Big Zip EVO’s SlideLock sideways into the zipper opening and hang it from its lanyard so air can get in. These cost little and fit their own bladders properly.
A kitchen bag dryer
Platypus recommends a plastic bag dryer, the kind of countertop rack with several upright arms sold for drying zip-top food bags, and says they are widely available at kitchen supply stores. Slide the bladder mouth-down over one or two arms, and the arms hold the walls apart from top to bottom. It works with almost any bladder that has a wide opening, holds two or three at once and stands on a shelf or a counter. It is the best universal option for a family with several packs.
A coated wall hook plus a prop
The cheapest setup is a coated hook and something to hold the bladder open. Hang the bladder by its handle or hang loop from the hook, then prop the inside open. Platypus suggests something like a cooking spoon, a spatula or another utensil. A clean wooden spoon, a whisk or a short length of rigid plastic tubing all work. Use a coated hook so it cannot scratch the film, and put it where the bladder hangs free of the wall on all sides.
A clip hanger on a rod
A trouser or skirt hanger with two sliding clips can grip the top edge of a bladder on both sides and pull the mouth open. It hangs from a shower rod, a closet rod or a hook, and three or four hangers hold a whole family’s bladders in a row. Clip only the reinforced top edge or the handle, not the thin walls, so the clips do not crease the film, and put a piece of folded paper towel under each clip if the jaws are sharp.
A tube hook or clip
Give the tube its own hook right beside the bladder. Disconnect it if your reservoir has a quick-connect fitting, pull off the bite valve, and hang the tube folded once over the hook, with both ends pointing down and open, or clip one end so it hangs straight down. CamelBak’s dryer does this by snapping the tube to the hanger. A peg, a cup hook or a small adhesive hook indoors is enough, because a tube weighs almost nothing.
A mesh parts bag or tray
The bite valve, its silicone cover, the cap, any O-rings you can remove and the quick-connect fitting go in a small mesh bag hung on its own hook, or in a tray with holes on a shelf under the bladder. Osprey says to remove the silicone bite valve cover and clean it and the bite valve separately, and to let the hose and bite valve dry in a well-ventilated area. A mesh bag lets air through while keeping each set together; one bag per pack, labeled, ends the hunt for a missing valve.
Where the drying wall goes
Laundry room or mudroom
The best drying wall is inside the house, in a room that stays warm and has air moving through it. A laundry room with a vent fan or a mudroom near the door you come home through is ideal. Screw a coated hook into a stud at about head height, so a 3 liter bladder hangs clear of the floor, add a tube hook beside it and a small shelf or rail below for the parts bag and a drip tray. The bladder dries in a day or so, and it is in the same room as the packs.
Kitchen or bathroom
A bag dryer on the kitchen counter beside the sink is the easiest option if there is room. A bathroom works too, but not right after a shower: wet air slows drying, and Command notes that humidity changes are one of the reasons adhesive hooks let go. Hang the bladder on a towel hook or a clip hanger on the shower rod after the room has aired out, or run the fan.
The garage
A garage can work in mild, dry weather, especially near an open door, but it is a poor long-term spot. CamelBak says to store reservoirs in a clean, dry location away from direct sunlight and excessive heat, and a garage in July or a damp garage in November is neither. Dry it in the house, then bring the finished set out to the gear wall in a bin if that is where your packs live. Adhesive hooks are a poor match here too; Command’s indoor strips are rated for roughly 50 to 105°F.
In the RV or van
On the road, drying is harder and more important. Hang the bladder from a clip hanger on the shower rod or a hook inside the bathroom door, with the roof vent fan running, and let the tube hang straight from a second hook. When you are parked in the sun, Platypus says its hydration systems are UV-safe and can be left in the sun to dry, so an hour on a hook outside under the awning speeds things up. Bring it in before night dew. For mounting hooks inside the rig, see our guide to hooks in an RV without damaging walls.
Three sample drying stations
One hiker, one bladder
A CamelBak or Osprey dryer on a coated hook in the laundry room, a cup hook for the tube beside it and a small mesh bag for the valve and cap. After each hike: rinse, drain opening-down over the sink for ten minutes, flip it mouth-up on the dryer, hang the tube, drop the parts in the bag. Next morning it is dry; it goes in a drawer or the freezer as a set.
A family of four packs
A kitchen bag dryer with four arms on a shelf in the mudroom holds four bladders mouth-up at once. A short rail above it with four small hooks holds the four tubes, each with a colored tag that matches its pack. Four mesh bags, one per pack, hang from the end of the rail. On Sunday evening the whole family’s hydration kit dries in one place, and on Monday it goes back into the bin by the door.
Weekend RV trips
Two clip hangers on the shower rod hold the bladders mouth-open with the fan running. Two adhesive hooks on the inside of the bathroom door hold the tubes. The parts go in a mesh bag clipped to the rod. At home, everything is finished on the bag dryer in the kitchen before it is stored, because a bladder dried in a damp RV bathroom is rarely completely dry.
A drying routine that works every time
- Empty the bladder as soon as you are home, or at the trailhead, rather than leaving water in it overnight.
- Rinse the bladder, tube and valve with warm water; after a drink mix or untreated water, wash them with warm soapy water or the maker’s cleaning tablets.
- Disconnect the tube, pull off the bite valve and its cover, and unscrew the cap, if your reservoir is designed to come apart.
- Hang the bladder opening-down over a sink, tray or towel for ten to fifteen minutes so the standing water drains out of the corners.
- Wipe the inside with a clean towel if the opening is wide enough, then put the bladder on its dryer, bag dryer or hook with a prop, mouth-up and open.
- Hang the tube straight from its own hook with both ends open, and put the small parts in a mesh bag or tray in moving air.
- Leave everything until it is completely dry, often a full day, then check the seams, corners and tube for droplets before you put it away.
- Store the set together, dry, out of the sun and away from heat, or put the clean, dry bladder in the freezer.
Cleaning, heat and storage rules from the makers
No boiling water, and check before bleach
Osprey says not to pour boiling water into its reservoirs, because it can damage the reservoir and will void the warranty, and its manual says not to use bleach. Platypus, on the other hand, gives a disinfecting recipe of 2 to 5 drops of unscented household bleach per liter, left overnight and then rinsed three times with hot water. Both are right for their own products. Use the method in your own reservoir’s manual, and never dry a bladder with heat from a hair dryer, a heater or a dashboard.
Cleaning tablets and brushes
Osprey’s tablet routine is warm water, one tablet, five minutes to dissolve with the reservoir flat, a 30 second shake, the tube filled with solution, 15 minutes to sit, then a rinse with cool, clean water and hang to dry in a well-ventilated area. HydraPak suggests 15 to 30 minutes with its Bottle Bright tablets, two for reservoirs 3 liters and larger. Osprey’s blog suggests a deep clean about once a month for regular users. A cleaning kit with a large reservoir brush and a long tube brush belongs on the drying wall with the hanger.
Dishwasher only if your maker says so
HydraPak says its reservoirs are top-shelf dishwasher safe and can go in reversed. CamelBak says its backpacks and reservoirs should be hand washed only and air dried. Read the care instructions for your model before a bladder goes anywhere near a dishwasher, and dry it on the hanger afterward either way.
Store only when completely dry
CamelBak’s storage advice is to keep the reservoir in a clean, dry location, away from direct sunlight and excessive heat, protected from sharp or heavy objects, with removable parts disconnected when practical, and to inspect and rinse it before using it again after long storage. A bin on the gear wall or a drawer that holds the bladder flat, the tube in a loose loop and the parts bag together meets all of that. For CamelBak’s Fusion reservoirs, the company’s FAQ says to store them dry with the zipper closed.
The freezer trick
CamelBak’s FAQ says to store a reservoir in the freezer to help prevent bacteria growth, and to make sure it is clean and dry first. Osprey says freezing will not affect the quality of its reservoirs, but that water expands as it freezes and can damage an overfilled reservoir. Platypus says you can occasionally skip a full clean by rinsing the system and putting it in the freezer until the next use, and that if you freeze it with water inside, fill it no more than three quarters full. A freezer is a good home for a bladder you use every week, not a substitute for drying one you will not use until spring.
Replace what will not come clean
CamelBak says to replace a tube or bite valve that is cracked, leaking, excessively worn or no longer possible to clean, and to consider replacing any part that still smells after a second cleaning. A tube with dark spots deep inside is usually cheaper to replace than to rescue, and most makers sell tubes and valves separately.
Mistakes to avoid
- Sealing the cap or zipping the slide-top on a bladder that is still damp inside.
- Leaving the tube coiled tightly in the pack, where water collects in the low points.
- Hanging a full bladder on a small adhesive hook while you look for the pack.
- Drying a bladder with a hair dryer, over a space heater or on a sunny dashboard.
- Pouring boiling water into a reservoir, or using bleach when your maker’s manual says not to.
- Turning a bladder inside out that is not designed to be reversed.
- Clipping hanger jaws onto the thin walls instead of the reinforced top edge or handle.
- Drying everything in a damp RV bathroom and storing it without a final dry at home.
- Losing the bite valve and cap because they were left loose on the counter.
Related guides
Browse the hub: RV & camping storage under $50 - all guides
- Best Camping Backpack Wall Hooks Under $50 for Cabins
- Best Camping Water Jug Wall Holders Under $50
- Best Portable Camping Shower Bag Wall Hooks Under $50
- Best Collapsible Camping Bucket Wall Hooks Under $50
- Best Collapsible Dish Drying Racks for RVs Under $50
- Best Trekking Pole Wall Racks Under $50 for Garage & Cabin
- How to Mount Hooks in an RV Without Damaging Walls Under $50
FAQ
What is the best way to dry a hydration bladder?
Drain it opening-down for ten to fifteen minutes, then hang or prop it mouth-up and open on a reservoir dryer, a bag dryer or a hook with a spoon or whisk holding the walls apart, in a warm room with moving air. Hang the tube straight with both ends open and lay the small parts apart. Platypus says its lab found bladders dry fastest pointed up with the sides kept from touching.
Should a hydration bladder dry upside down or right side up?
Both, in that order. Hanging it upside down drains the standing water, which is why HydraPak and CamelBak talk about draining and drip drying. Once it stops dripping, Platypus says drying is most efficient with the opening up, because moisture evaporates and escapes upward.
How long does a hydration bladder take to dry?
Usually a day or so when it is held open in a warm, ventilated room, longer in a damp bathroom or a cold garage. Check the corners, seams and the inside of the tube for droplets before storing it; CamelBak says to keep air-drying if you find any moisture.
Can I dry a hydration bladder with a hair dryer?
It is better not to. Makers warn against excessive heat, Osprey says boiling water can damage its reservoirs, and CamelBak says to let the system air-dry unless its care instructions say otherwise. A dryer that holds the bladder open in moving air does the job without heat.
Is it okay to store a hydration bladder in the freezer?
Yes, if it is clean and dry. CamelBak’s FAQ suggests the freezer to help prevent bacteria growth, and Osprey says freezing does not affect the quality of its reservoirs. If you freeze one with water inside, Platypus says to fill it no more than three quarters full, because water expands as it freezes.
Why does my hydration tube get black spots?
Usually because water was left in the tube, often while it was coiled tightly in a pack. Rinse and clean the tube with a tube brush, then hang it vertically with both ends open to dry, as CamelBak recommends. If the spots will not come out after a second cleaning, replace the tube.
Bottom line
The best hydration bladder drying hanger is the one that holds the bladder open from top to bottom in moving air: a brand reservoir dryer, a kitchen bag dryer or a coated hook with a prop. Drain it opening-down, finish it mouth-up and open, hang the tube straight with both ends open, and keep the valve and cap together in a mesh bag. Store it only when every part is dry, away from sun and heat, or in the freezer, and check fit, hook rating and current price on the listing before you buy.