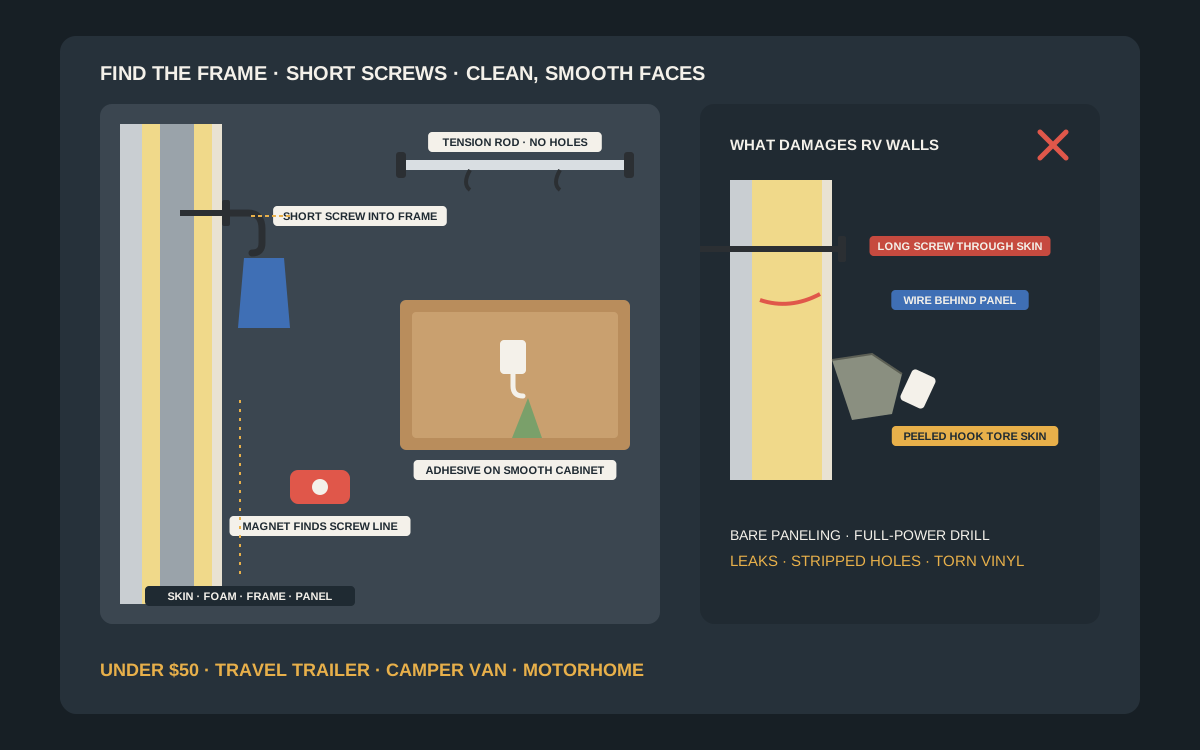
RV walls are not house walls. Most are a thin skin of vinyl-wrapped plywood or luan, often around an eighth of an inch thick, glued over foam insulation, with aluminum or wood framing only every so often behind it. That is why a hook that would be fine in a garage can pull straight through, tear the wallpaper-like skin, or leave holes that let water and drafts in. The good news is that you can add plenty of hooks for towels, jackets, keys and leashes for well under $50 without damage, if you identify what you are mounting into first and match the method to it. This guide walks through the process step by step: reading the wall, finding framing, prepping surfaces, fixing the hook, testing it on the road and taking it off cleanly later.
Shop RV-friendly wall hooks on Amazon
Who this is for
- RV, camper van and travel trailer owners who want more hooks without holes they will regret
- Renters and buyers of used rigs who want removable fixes that will not hurt resale
- First-time owners who have already had an adhesive hook peel the wall skin off
Quick answer
Start by finding out what is behind the spot: tap and use a magnetic finder to locate framing screws, and check for wiring, plumbing and slide-out mechanisms. For anything heavier than a towel or a set of keys, drive short pan-head screws (around 5/8 inch, sized to the panel plus the frame) into framing or into cabinet face frames, not into bare paneling. For light items, use removable adhesive hooks on smooth, clean, non-textured faces such as cabinets, mirrors or tiles, after cleaning with isopropyl alcohol and letting them cure. Use tension rods, over-door hooks and existing fixtures where you can avoid fixing to the wall at all. Test every hook with a firm tug and recheck it after the first drive.
Quick comparison
| Wall or surface | Best hook method | How it fixes | Watch out for |
|---|---|---|---|
| Thin vinyl-wrapped paneling | Avoid fixing to the panel alone; move to framing or a backer strip | Screws into a framing member behind | Skin tears if adhesive is peeled; screws strip out |
| Wall framing member | Screw-in hook or small rail | Short pan-head screws into the frame | Wiring and the outer skin close behind |
| Cabinet face frame or trim | Screw-in hook | Small screws into solid wood | Splitting thin trim; pre-drill |
| Smooth laminate cabinet door | Removable adhesive hook | Adhesive strip on cleaned surface | Door slams shake light items loose |
| Shower surround, mirror or tile | Adhesive or suction hook rated for wet use | Waterproof adhesive or suction | Textured plastic will not hold suction |
| Doors and shower openings | Over-door hooks or tension rods | No fixing at all | Check door still closes and latches |
Removable adhesive hooksShort pan-head screwsStud & frame findersAdhesive remover
What to look for
Know your wall before you buy
Press and tap the wall. A hollow, slightly flexible feel means thin paneling over foam; a solid, dull knock usually means framing or a cabinet. Wallpaper-like vinyl skins and textured finishes are poor surfaces for adhesive, while laminate cabinet doors, glass, tiles and smooth plastic shower surrounds take adhesive much better.
Find the framing
RV framing members are spaced irregularly, often around windows, doors and cabinet runs. A strong magnet run slowly across the wall finds the screw or staple lines that hold the paneling to the frame, and a vertical line of them usually marks a member. Check the owner’s manual or the manufacturer’s diagrams where available.
Use short fasteners
Long screws are the main cause of damage. They punch through the frame into the exterior skin, wiring or a water line. Measure the paneling and frame depth if you can, and choose a screw that bites into the frame without going further. Pan-head or washer-head screws spread the load better than countersunk ones on soft paneling.
Respect weight and motion
On the road every hook sees bumps and swaying. Keep adhesive hooks for genuinely light items, put anything that swings or weighs more onto screwed hooks in framing, and avoid hanging heavy bags from single points on thin walls.
Plan the removal now
Choose removable adhesive strips with a pull tab where possible, and keep spare strips and an adhesive remover suited to the surface. For screwed hooks, mount on cabinet frames or trim where small holes are easy to fill or hide.
Step by step: mounting a hook without damage
1. Decide what the hook will hold
Weigh or estimate the heaviest thing the hook will ever carry, and how much it will swing. A dish towel, keys or a hat is light. A wet jacket, a leash and harness, or a bag of shoes is not. That decision sets the method before you touch the wall.
2. Check what is behind the spot
Look on the other side of the wall, inside the cabinet or under the outside skin seams, for wiring, plumbing, the water heater, slide-out rooms and the electrical panel. Never drill near outlets, switches, lights or vents, where cables run. Avoid exterior walls you cannot inspect behind.
3. Locate framing with a magnet
Slide a strong magnet or a magnetic stud finder slowly across the wall and mark where it grabs. Several hits in a vertical line usually indicate a framing member. Electronic stud finders struggle with thin paneling over foam, so use them as a second opinion rather than the only test.
4. Prep the surface
For adhesive, wipe the spot with isopropyl alcohol and let it dry; household cleaners leave residue that stops adhesive bonding. Apply in mild temperatures, press firmly for the time on the packaging, and wait the recommended cure time before hanging anything, often about an hour or longer.
5. Fix the hook
For screws, pre-drill a small pilot hole, drive by hand or on a low clutch setting so the screw does not strip the soft panel, and stop as soon as the hook is snug. For a row of hooks on paneling between framing members, screw a thin wood strip across two members first and mount the hooks to the strip.
6. Test, then recheck after the first trip
Tug firmly in the direction the load will pull. After the first drive, check every new hook for loosening or lifting edges, and retighten screws gently. Temperature swings in a parked rig also test adhesive, so look again after a hot or cold spell.
No-fix options worth trying first
Tension rods
A spring tension rod across a shower, a closet opening or between cabinets gives you a rail for S-hooks and hangers with nothing screwed or stuck to the wall. Choose a rod with rubber ends and check it after travel.
Over-door and over-cabinet hooks
Hooks that hang over a bathroom door, a closet door or a cabinet door add storage instantly. Make sure the door still closes and latches, because a door that swings open on the road is a bigger problem than a missing hook.
Using what is already there
Existing screws in trim, curtain-rail brackets and grab handles can sometimes host a clip-on hook. Our RV wall organizers guide covers hanging organizers that use these points instead of new holes.
Removing hooks without leaving a mark
Adhesive hooks
Pull a removable strip’s tab slowly, straight down along the wall, not outward; pulling away from the wall is what lifts the vinyl skin. For non-removable adhesive, warm it gently with a hair dryer, work dental floss or fishing line behind the base, then remove residue with a remover that is safe for the surface, testing in a hidden spot first.
Screwed hooks
Back screws out by hand. Fill small holes in paneling or trim with a color-matched filler or a wax repair stick, and seal any hole in a wet area so water cannot get into the wall.
Mistakes to avoid
- Driving long screws that go through the frame into wiring, plumbing or the outer skin.
- Screwing hooks into bare paneling with nothing solid behind it.
- Sticking adhesive hooks onto textured vinyl or wallpaper-like skins and expecting them to hold.
- Skipping the alcohol wipe or hanging weight before the adhesive has cured.
- Pulling adhesive hooks outward from the wall instead of stretching the tab down.
- Using a drill on full power, which strips soft panel material instantly.
- Drilling near outlets, switches, lights, vents or slide-out mechanisms.
- Hanging heavy, swinging bags from single hooks on thin walls before a drive.
Related guides
Browse the hub: RV & camping storage under $50 - all guides
- Adhesive vs Screw-In Hooks for RV Walls Under $50
- How to Organize an RV Bathroom with No-Drill Hooks Under $50
- How to Hang Towels in an RV Wet Bath Under $50
- Best RV Wall Organizers Under $50 (Collapsible)
- Best Camping Gear Wall Hooks Under $50 for Van & Cabin
- Best Portable Power Cord Wall Wraps for RVs Under $50
FAQ
Can I screw hooks directly into RV walls?
Only into framing, cabinet face frames or trim, using short screws that do not pass through to wiring or the exterior. Bare paneling alone is usually too thin to hold a screw under load.
Do adhesive hooks damage RV walls?
They can, especially on textured vinyl skins, which may peel off with the hook. Use removable strips on smooth, clean surfaces, and remove them by stretching the tab down along the wall.
How do I find studs in an RV wall?
Run a strong magnet slowly across the wall to find the screws or staples that fix the paneling to the frame. A vertical line of hits usually marks a framing member. Electronic finders are less reliable on thin paneling over foam.
What length of screw should I use in an RV?
Short ones, often around 5/8 inch, but it depends on the paneling and frame depth in your rig. The screw should bite into the frame without going through it. Measure where you can and check the manufacturer’s guidance.
How do I hang heavier things on thin RV walls?
Screw a thin wood strip across two framing members and mount hooks to the strip, which spreads the load. Keep truly heavy items in cabinets or bins rather than on wall hooks while driving.
Will hooks hurt my RV warranty or resale?
Holes in exterior walls and water damage can. Stick to interior mounting, avoid wet areas unless sealed, keep hooks on framing or cabinets where holes are easy to fill, and check your warranty terms before drilling.
Bottom line
Mounting hooks in an RV without damage comes down to knowing what is behind the wall. Find framing with a magnet, check for wiring and plumbing, use short screws into framing, cabinet frames or a wood strip for real loads, keep removable adhesive for light items on clean smooth faces, and use tension rods or over-door hooks where you can avoid fixing at all. Test after the first drive and remove adhesive by stretching it down, never peeling it out. Check the listing’s current size, rating and price before you buy.