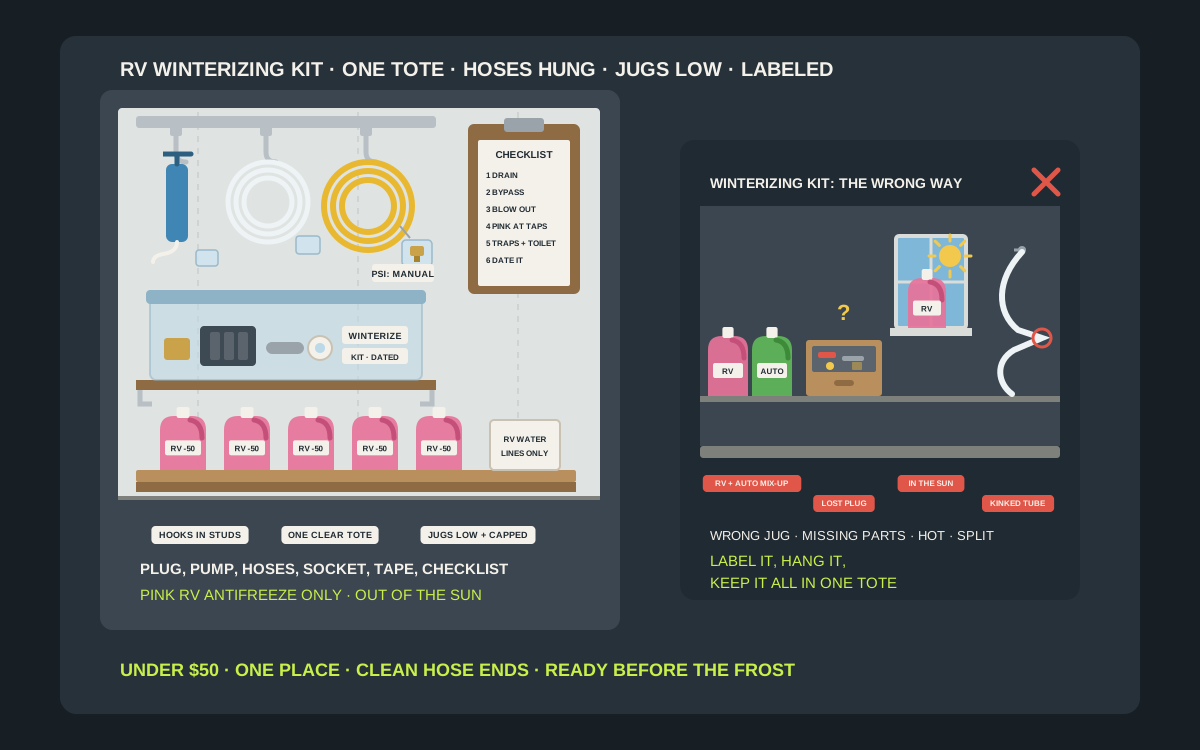
Winterizing an RV takes an afternoon once a year, and finding the kit for it takes the first hour. The blowout plug is in a junk drawer, or in the cup holder of the truck. The hand pump is in a bay with the sewer hose, the siphon tube from the pump converter has a kink from being stuffed into a bucket, and the two leftover jugs of pink antifreeze from last fall are somewhere at the back of the garage, one of them next to a jug of green automotive coolant that looks a lot like it. Then the first hard frost is in the forecast and you are at the hardware store buying a second plug and a third jug. None of that needs an expensive fix. One labeled tote for the small parts, two or three hooks for the hoses and pump, a low shelf for the jugs and a checklist on the wall cost far less than one cracked water line, and they turn winterizing into a job you can start the minute you decide to. This guide covers what is actually in an RV winterizing kit, what Camco, Winnebago and Keystone say about the parts and the antifreeze, where the kit should live in the garage, in the coach and at a storage lot, which under-$50 storage pieces do the job, and how to put it all back in spring so it is ready next year.
Shop RV winterizing kits on Amazon
Who this is for
- RV owners who winterize their own rig every fall and lose an hour looking for the plug, the pump and the hoses
- Anyone storing leftover jugs of RV antifreeze in a garage, shed or basement between seasons
- Owners who use the blowout method and want the plug, the air hose and their manual’s pressure limit in one place
- Families who keep automotive antifreeze in the same garage and want no chance of a mix-up
Quick answer
For most RV owners, the best under-$50 setup is one clear lidded tote, labeled and dated, on a stud-mounted garage shelf at chest height, holding the blowout plug, the hand pump or pump converter kit, the bypass hoses, the water heater drain plug socket, spare plugs, Teflon tape and a printed checklist. Hang the bulky pieces, such as the air hose and the siphon or bypass hose coils, on two or three utility hooks next to the tote, with the hose ends bagged. Stand the sealed jugs of pink RV antifreeze on a low shelf or a lipped tray near the floor, out of the sun, and keep them on a different shelf from automotive antifreeze. Measure the shelf, check the hook ratings and the tote size against your parts, and compare the current price on the listing before you buy.
Quick picks
- Best overall: a clear lidded tote, about the size of a shoebox or a little bigger, on a screwed-in garage shelf. Everything small lives in it, you can see the parts through the side, and it lifts down in one move.
- Best for antifreeze jugs: a low shelf or a floor tray with a lip, close to the garage door you load from. Jugs are heavy, so they go low, upright and capped.
- Best for hoses and the hand pump: two or three screw-in utility hooks or rail hooks into the studs, with each coil hung loosely and the ends in a zip-top bag.
- Best for blowout gear: a hook for the air hose coil with the plug in a small bag clipped to it, and a tag with the pressure limit from your manual.
- Best for small parts: a small divided case inside the tote for plugs, adapters, O-rings and the Teflon tape, so nothing rolls to the bottom.
- Best for storage-lot rigs: a second, smaller kit bin that rides inside the coach, so a cold snap at the lot does not mean a trip home first.
Quick comparison
| Setup | Best for | How it holds | Trade-off |
|---|---|---|---|
| Clear lidded tote on a wall shelf | The whole small-parts kit | Sits on a stud-mounted shelf at chest height | Needs a label and an inventory card inside |
| Low lipped shelf or floor tray | Sealed jugs of RV antifreeze | Jugs stand upright, lip stops them sliding | Uses floor-level wall space |
| Screw-in utility hooks | Siphon and bypass hose coils, hand pump | Screwed into studs, coils hung loosely | Hose ends need bags against dust |
| Track rail with hose hook | Air hose with the blowout plug clipped on | Rail screwed to studs, hook slides along | Costs more than single hooks |
| Small divided parts case | Plugs, adapters, O-rings, Teflon tape | Rides inside the tote | Latch must be closed or parts spill |
| Wall clipboard or document pocket | Checklist, valve diagram, manual pages | Screwed or hung next to the tote | Paper needs to stay dry |
| Zip-top bags and labels | Hose ends, plugs, leftover parts | Inside the tote or clipped to hooks | Not a mount on its own |
| Small kit bin inside the coach | Storage-lot rigs and cold-snap re-dos | Latched cabinet or interior bay | Takes space in the RV |
Clear storage totes with lidsHeavy-duty garage utility hooksRV water heater bypass kits
What to look for
It puts the whole kit in one place
A winterizing kit is a dozen small things that are used together once a year and then forgotten for eleven months. The best storage is the one that keeps all of them in a single place you can carry to the RV: plug, pump, hoses, socket, tape, checklist and spare plugs. If any part lives somewhere else, write that on the lid, such as air compressor in the shed or antifreeze on the low shelf, so nobody has to search.
It keeps the jugs low, upright and capped
A US gallon of water weighs about 8.34 pounds, according to the US Geological Survey, and a gallon jug of RV antifreeze is in the same range, so the four to six gallons Keystone tells owners to have on hand for the antifreeze method is a 30-to-50-pound load. That belongs on a low shelf or the floor, not on an upper shelf or a hook. Jugs should stand upright with the caps tight: Camco’s safety data sheet for its Premium Ban Frost antifreeze concentrate says to keep containers tightly closed and describes the liquid as hygroscopic, meaning it pulls moisture from the air.
It keeps the parts clean
Most of this kit touches the drinking-water system. The blowout plug screws into the city water inlet, the pump converter siphon tube goes into the jug and then into the pump, and the bypass hoses carry water you will drink next summer. Bag the hose ends, keep the plug in a closed bag or box, and do not store any of it in the bay or bin with the sewer hose, the black tank rinse hose or the tank treatment.
It keeps hoses from kinking
Siphon tubes and short bypass hoses are thin and stiff in the cold, and a tube that spends the summer folded in the bottom of a bucket takes a permanent set that restricts flow and can split at the fold. Loose coils on a wide hook, or laid flat on top of the tote, keep them round. Larger hooks with a rounded saddle are kinder to hose than a nail or a narrow screw hook.
It separates RV and automotive antifreeze
This is the one rule that is not about convenience. Camco says automotive antifreeze is ethylene glycol and highly toxic, while RV antifreeze is propylene glycol, and Winnebago, Keystone and Camco all say never to use automotive antifreeze in the RV water system. In a garage that also holds car coolant, give the RV jugs their own shelf, mark them RV WATER LINES ONLY, and never pour either kind into an unmarked container.
It is labeled, dated and easy to see
Write the date you bought each jug, the rating on the label, such as -50 or -100, and the season you opened it. Put a label on the tote that says what is in it and what it is for, and tape your own checklist inside the lid. A clear tote helps, because you can see the plug and the pump without opening it, and a quick look in September tells you whether to buy antifreeze before the stores run low.
What is actually in an RV winterizing kit
Pink RV antifreeze
RV antifreeze is the pink, propylene glycol based liquid that goes into the water lines, traps and toilet. Camco’s blog says to choose a -50 °F or -100 °F rating to match how cold your winters get. Keystone lists four to six gallons for its antifreeze method, Winnebago’s lifestyle guide says to plan on about 2 gallons and check your owner’s manual for your rig, and Winnebago’s Travato manual uses 2 to 3 gallons in a pail. Even owners who use the blowout method keep some on hand, because Winnebago says the dry method still needs antifreeze in the P-traps and toilet.
The blowout plug
A blowout plug is a small fitting that screws into the city water inlet and lets you connect an air compressor, so you can push the water out of the lines. Camco’s winterizing guide lists several versions, including plastic and brass plugs, plugs with a Schrader valve or a quick connect, and a blowout hose kit with a ball valve. It is the smallest part of the kit, and the easiest to lose, so it is the first thing that should go into a bag with a label.
Hand pump or pump converter kit
To get antifreeze into the system you need either a way for the RV’s own pump to draw from the jug, or an outside pump. Camco describes two options: a pump converter kit that fits on the water pump and draws antifreeze straight from the jug through a siphon hose, and a hand pump kit that connects at the city water inlet from outside. Keystone and Winnebago describe the same idea with a bypass or siphon hose on the suction side of the pump. Whatever your rig has, the tube, the fittings and the jug adapter need a dry, clean place to live.
Water heater bypass hoses or kit
Bypassing the water heater keeps antifreeze out of the tank, and Camco says it saves as much as 6 to 8 gallons. Many rigs have permanent bypass valves on the back of the heater, and Winnebago notes there may be up to three. Others use an add-on kit: Camco sells a temporary seasonal bypass kit that is removed in spring, permanent versions with short hoses, and a quick-turn version. If yours is temporary, the hoses and fittings belong in the kit tote for eleven months of the year.
Drain plug socket and spare plugs
Water heaters are drained through a plug or an anode rod at the bottom of the tank, and Winnebago’s guide lists a socket wrench for it. Camco’s guide says to open the drain plug and leave it open over winter, or fit a vented plug, and sells a drain plug kit that fits 7/8-inch and 15/16-inch plugs. Keep the right socket, a spare plug and a roll of Teflon tape together, so you are not hunting for a socket size with water running down your sleeve. Flushing the tank and checking the anode rod are a separate job with their own tools.
The supporting bits
The rest of the kit is ordinary but easy to forget: a measuring cup for the drains, a small funnel, a towel or two for the drips at the pump, disposable gloves, a flashlight, zip ties, a marker, and a printed checklist for your rig. Winnebago’s manuals say to empty the water pump strainer bowl as part of winterizing, so a small dish for the screen helps too. A small dehumidifier bucket or moisture absorber for the closed-up coach is part of many owners’ storage routine, and Camco’s guide includes one in its storage tips.
What the manuals and labels say about the kit
Use RV antifreeze, never automotive
Every source agrees here. Camco says automotive antifreeze is ethylene glycol and highly toxic, while RV antifreeze is propylene glycol, which it describes as generally recognized as safe. Keystone says not to use automotive antifreeze because it is poisonous and not suitable for potable water systems, and Winnebago’s manuals say not to put automotive antifreeze in the toilet or holding tanks. Winnebago’s lifestyle guide also notes that pink RV antifreeze is food grade but not meant for drinking. Storage is how you keep this rule: separate shelves, clear labels, original jugs.
Keep the jugs closed and out of the heat
Camco’s safety data sheet for its Premium Ban Frost antifreeze concentrate says to keep containers tightly closed, and to store them away from heat, sparks, open flames and direct sunlight. A shelf on a north wall or under a workbench is better than a window ledge or the spot next to the water heater. Keep the jugs in their original containers; the Poison Control service, writing about antifreeze generally, says never to transfer it to other containers, especially food or drink containers.
A frozen jug in the garage is normal
Owners are often surprised to find a jug of RV antifreeze that has turned to slush or looks solid in an unheated garage. Camco’s FAQ says this is not a defect. For its -50 product, ice crystals start to form at around +10 °F and the liquid can look frozen at about -10 to -15 °F, but it does not expand until -50 °F, which is the burst protection the rating refers to. Let a slushy jug come back to liquid indoors before you try to pump it, and keep it upright so a cap that was not quite tight does not leak as it thaws.
Blowout pressure: write your limit on the kit
If you use compressed air, the pressure limit belongs on a tag tied to the plug. Camco’s blog says a regulator is required and never to exceed 50 PSI, and the instructions on Camco’s blowout plug package say the same and specify an oil-less compressor. Winnebago’s manuals are stricter: regulate air to 30 PSI or less, and do not burst air into the system, because that can damage the water pump. Use the lower number from your own coach’s manual, and write it on the tag so it is in front of you every fall.
Leftovers, spills and disposal
Camco’s FAQ says small spills of RV antifreeze on a driveway or grass can be hosed down thoroughly, and that propylene glycol is biodegradable. The Missouri Poison Center suggests absorbing antifreeze spills with kitty litter or sand. Automotive antifreeze is a different matter: Poison Control says to clean up spills immediately and dispose of used antifreeze according to your community’s hazardous waste rules, never in storm drains or on the ground. Keep a small bag of absorbent near the jugs, and recap any partly used jug tightly before it goes back on the shelf.
Children and pets
RV antifreeze is far less toxic than automotive antifreeze, but it is still a chemical. The American Animal Hospital Association warns that a teaspoon of ethylene glycol antifreeze can be deadly to a cat, and says propylene glycol products are less toxic but not risk-free. Poison Control notes that ethylene glycol tastes sweet, which is why pets and children are drawn to it. Store all antifreeze high or in a closed cabinet if children or pets use the garage, and keep the Poison Help number, 1-800-222-1222 in the US, on the checklist.
Where the kit should live
Garage wall: the main kit
For an RV that is winterized at home or in the driveway, the garage wall closest to where the RV parks is the best place. Put the tote and the hooks at chest height on one stud bay, the jugs low on the same wall, and the checklist beside the tote. Everything is then a few steps from the rig, and you can load it into a single bucket or wagon. If the garage has a workbench, a shelf above it works as well, as long as the antifreeze jugs go below the bench rather than above it.
Inside the coach: the cold-snap kit
Many owners winterize early, then use the RV once more on a mild weekend and have to do part of the job again. A small second kit that rides inside the coach, with a jug of antifreeze, the siphon tube, a few cups and the checklist, saves a trip home. Keep it in a latched interior cabinet or a lidded bin on the floor of a closet, not in an exterior bay with the sewer gear, and keep the jug upright with a strap or a bin around it.
Storage lot: what travels and what stays
If the RV spends the winter at a storage lot, the parts that stay in the coach should be the ones you need for a spring check, and the rest should come home. The blowout plug, the compressor and the main supply of antifreeze are usually better kept in the garage, where they are dry and you can see them. Leave the coach with traps and toilet protected, the water heater drain open as Camco advises, and a note on the dash or in the kit bin that says exactly what you did and when.
Keep it away from the sewer gear and the food
Fresh-water parts and waste-water parts should never share a bin. The bypass hoses, the siphon tube and the blowout plug go into the same water that comes out of the kitchen tap. The sewer hose, the black tank rinse hose and the tank chemicals belong in their own bay or tote. Antifreeze also should not share a shelf with food, drinks or pet food. A separate tote with a clear label does this without effort.
Eight ways to store the kit under $50
A clear lidded tote on a stud-mounted shelf
This is the heart of the system. Choose a tote big enough to hold the hand pump or pump converter kit, the bypass hoses, the plug, the socket and the small parts case, with a little room to spare, and put it on a shelf whose brackets are screwed into the studs. A clear side lets you see the plug and pump without opening it. Tape an inventory card inside the lid and tick it off when you put things back in spring.
A low shelf or tray with a lip for the jugs
Jugs of antifreeze are heavy and slippery, so they live low, on a shelf about a foot off the floor or in a shallow tray on the floor against the wall. A front lip of an inch or two stops them sliding off, and the tray catches a drip from a cap that was not quite tight. Keep it out of direct sun and well away from car coolant, and leave enough room to read the labels.
Screw-in utility hooks for hoses and the pump
Two or three heavy-duty utility hooks screwed into the studs will hold the siphon hose, the bypass hoses and a hand pump. Hang each coil loosely in a wide loop rather than wrapping it tight, so it keeps its shape, and slip a zip-top bag over each open end with a rubber band. Check the rating on the hook package and use the stud, not drywall alone.
A track rail with a hose hook for the air hose
If you blow out the lines, the compressor air hose is the bulkiest part of the kit. A short track rail screwed to the studs, with a hose hook or a wide saddle hook, keeps it coiled and off the floor, and lets you slide the hooks around as the kit changes. Clip the blowout plug, in its own small bag, to the hose hook, and tie on the tag with your pressure limit.
A small divided parts case
Blowout plugs, quick connect adapters, spare drain plugs, O-rings and the Teflon tape are small, and in a big tote they sink to the bottom and get lost. A small divided case with a latching lid, of the kind sold for screws or fishing tackle, keeps them in order and slides into the tote. Label each compartment, and keep the case latched, or the next time you tip the tote the parts will be everywhere.
A clipboard or document pocket on the wall
Winterizing steps differ from rig to rig, and Winnebago, Keystone and Camco all point owners back to their own manuals. Print the winterizing pages from yours, add your own notes, such as where the low point drains are and which way the bypass valves turn, and keep them on a clipboard or in a document pocket next to the tote. Add the spring de-winterizing steps on the back.
Zip-top bags and labels
Cheap and indispensable. Bag every open hose end, every plug and every loose fitting, and label the bags with a marker. Use one bag for anything that touches drinking water and keep it apart from anything that touches the drains or tanks. A few spare bags in the tote are handy for the drain plug and the strainer screen while you work.
A small kit bin inside the coach
For a cold-snap kit or a storage-lot rig, a small lidded bin in a latched interior cabinet holds one jug of antifreeze, the siphon tube, a cup, a towel and a copy of the checklist. Wedge the jug upright, or strap it, so it cannot tip on the road. Our guide to mounting hooks in an RV covers how to secure things inside the coach without damaging the walls.
Mounting it in a garage
Find the studs and use them
Garage walls are usually drywall over wood studs. A loaded tote, a shelf of antifreeze and a coiled air hose add up quickly, so the shelf brackets and hooks should go into the studs with the screws the hardware maker supplies. A stud finder and a pilot bit make it a ten-minute job. On masonry walls, use the anchors the hardware is rated for and drill into the block, not the mortar.
Put the weight low
The weight math is simple: four gallons of antifreeze is more than 30 pounds, and six is about 50. That is fine on a low shelf or the floor but awkward to lift down from above your head, and a jug that slips from an upper shelf can split. Put the jugs low, the light tote at chest height, and the hoses on hooks in between.
Leave room to load out
Mount the kit where you can reach it without moving the car or squeezing past the RV, and leave floor space in front of it for a bucket or a wagon. A short wall beside the garage door, near the driveway where the RV is parked, is often ideal. If you winterize at a storage lot, keep the tote and one jug near the door to the house so they go into the truck on the way out.
Mind cold and heat
An unheated garage is fine for RV antifreeze, and Camco says a jug that looks frozen there is not defective. It is less fine for paper checklists in a damp corner, or for a jug on a south window ledge in summer. Keep the jugs out of the sun and away from the water heater, furnace and any open flame, as Camco’s data sheet advises, and keep the paperwork in a sleeve.
Spring: de-winterizing and putting the kit back
Flush, then reset the bypass
Winnebago’s de-winterizing guide says to fill the fresh tank with potable water, run the pump, and open each hot and cold faucet, plus the shower, toilet, outdoor shower and any washer or ice maker, until the water runs clear with no antifreeze color. Then flip the water heater bypass back to normal. Your manual has the exact steps for your coach, and it is the version to follow.
Sanitize and replace the filter
Winnebago’s guide then sanitizes the fresh water system: mix 1/4 cup of household bleach with a gallon of water, add a gallon of that solution for every 15 gallons of fresh tank capacity, top up the tank, run the faucets until you smell chlorine, let it stand at least four hours, then drain and flush until the smell is gone. It also says to replace the water filter cartridge afterwards. Keep the bleach in its own bottle on the cleaning shelf, not in the winterizing tote.
Check, clean and restock the kit
Before the tote goes back on the shelf, rinse the siphon tube and the bypass hoses with fresh water, let them dry, and bag the ends. Wipe the plug and check its O-ring or threads. Count the antifreeze, write the date on any partly used jug and recap it tightly, and make a note on the inventory card of anything to replace before fall. If you removed a temporary bypass kit, as Camco’s seasonal version requires, it goes into the tote now.
Recap the inlet
Winnebago’s manual says to recap the city water inlet after winterizing to keep out dirt and insects, and to close all drains and faucets against dirt, insects and rodents. Those caps and drain plugs are easy to misplace in spring. Keep a spare city inlet cap and a spare low point drain cap in the parts case, so a missing one is a two-minute fix.
Three garages, three setups
Travel trailer winterized in the driveway
A couple with a 26-foot trailer and a one-car garage uses one stud bay beside the garage door. A low shelf holds four jugs of -50 antifreeze in a lipped tray, a shelf at chest height holds a clear tote with the hand pump kit, the blowout plug, a spare drain plug, the socket, Teflon tape and a parts case, and two utility hooks hold the siphon hose and a short air hose. The checklist hangs on a clipboard beside the tote, and the car coolant lives on the other side of the garage.
Class A at a storage lot
An owner who stores a motorhome at a lot keeps the main kit at home and a small cold-snap bin in the coach. The home tote holds the blowout plug with a tag reading 30 PSI MAX, the air hose on a rail hook, spare caps and the de-winterizing notes. The coach bin holds one jug of antifreeze strapped upright, the pump converter siphon tube in a bag, a measuring cup, gloves and a copy of the checklist, in a latched cabinet away from the sewer bay.
Camper van, blowout method
A van owner who blows out the lines and uses antifreeze only for the traps keeps everything in one small tote on a garage shelf: the brass blowout plug, a regulator note, two jugs of antifreeze on the floor beside it, a funnel and a measuring cup. The tote fits in the van with room to spare, so the kit travels on late-season trips and comes back to the shelf after the first hard freeze.
Set it up in an afternoon
- Gather every winterizing part you own from the garage, the truck and the RV, and lay it out on a tarp or the workbench.
- Check each jug of antifreeze for its rating, a tight cap and a purchase date, and write the date on any that are unmarked.
- Print the winterizing and de-winterizing pages from your owner’s manual and add your own notes about drains, valves and the pressure limit.
- Choose one wall near where the RV parks, find the studs, and mark a low zone for jugs and a chest-height zone for the tote and hooks.
- Fit a low shelf or a lipped tray for the jugs, out of the sun and away from automotive antifreeze and other chemicals.
- Screw a shelf and two or three utility hooks, or a short track rail, into the studs at chest height.
- Pack the tote: blowout plug, pump or converter kit, bypass hoses, socket, spare plugs and caps, Teflon tape, a parts case and a few spare bags.
- Hang the hose coils loosely, bag every open end, and tie the pressure tag to the blowout plug or the air hose.
- Tape an inventory card inside the tote lid, hang the checklist beside it, and set a reminder in early fall to check the antifreeze supply.
Mistakes to avoid
- Storing pink RV antifreeze on the same shelf as green or orange automotive antifreeze, or in an unmarked container.
- Keeping the blowout plug in a junk drawer or the truck console, where it is never there when the first frost comes.
- Putting the siphon tube and bypass hoses in the same bay or bin as the sewer hose and tank chemicals.
- Folding the siphon tube into a bucket for the summer so it kinks or splits at the fold.
- Stacking jugs of antifreeze on a high shelf or hanging the weight from adhesive hooks.
- Leaving jugs on a sunny window ledge or next to the water heater, or with the caps loose.
- Forgetting to write your manual’s air pressure limit on the plug, then guessing on the compressor.
- Putting the kit away in spring without rinsing and drying the hoses, or without noting what needs replacing.
Related guides
Browse the hub: RV & camping storage under $50 - all guides
- Best RV Fresh Water Hose Wall Holders Under $50
- Best RV Water Filter Cartridge Wall Holders Under $50
- Best RV Black Tank Rinse Hose Wall Holders Under $50
- Best RV Holding Tank Treatment Wall Organizers Under $50
- Best RV Sewer Cap & Fitting Wall Organizers Under $50
- Best RV Battery Tender Wall Mounts Under $50
- Best RV Tire Cover Storage Hooks & Bags Under $50
- How to Do a Fall Garage Cleanout with Wall Racks Under $50
- How to Mount Hooks in an RV Without Damaging Walls Under $50
FAQ
What should be in an RV winterizing kit?
Most kits include pink RV antifreeze, a blowout plug if you use compressed air, a hand pump or pump converter kit with a siphon hose, water heater bypass hoses if your rig does not have permanent valves, a socket for the water heater drain plug, spare plugs and caps, Teflon tape, a measuring cup, gloves, towels and a checklist from your owner’s manual. Keystone lists four to six gallons of RV antifreeze and a bypass hose for its antifreeze method.
Where should I store RV antifreeze?
Keep the sealed jugs upright on a low shelf or a lipped tray, out of direct sunlight and away from heat and flame, with the caps tight, as Camco’s data sheet advises. Keep them in their original containers, away from food and drink, and on a different shelf from automotive antifreeze. If children or pets use the garage, a closed cabinet is better.
Is it OK if RV antifreeze freezes in the garage?
Yes. Camco says a -50 RV antifreeze that looks frozen in a garage is not defective. Ice crystals start forming at around +10 °F and it can look solid at about -10 to -15 °F, but it does not expand until -50 °F. Let it return to liquid indoors before you pump it.
How much RV antifreeze should I keep on hand?
It depends on the rig and the method. Keystone lists four to six gallons for its antifreeze method, Winnebago’s guide suggests about 2 gallons and says to check your manual, and Winnebago’s Travato manual uses 2 to 3 gallons. Bypassing the water heater matters, because Camco says it saves as much as 6 to 8 gallons. Even with the blowout method, you need some for the traps and toilet.
What air pressure should I use with a blowout plug?
Use the limit in your own RV’s manual. Camco says a regulator is required and never to exceed 50 PSI, while Winnebago’s manuals say to regulate air to 30 PSI or less and not to burst air into the system because it can damage the water pump. Write your number on a tag tied to the plug.
Can I store RV antifreeze next to automotive antifreeze?
It is better not to. Automotive antifreeze is ethylene glycol and highly toxic, and all the RV makers say never to put it in the water system. Keep the two on separate shelves with clear labels, and never pour either into another container. AAHA warns that a teaspoon of ethylene glycol antifreeze can be deadly to a cat.
Bottom line
The best RV winterizing kit storage is one place for everything: a clear, labeled tote of small parts on a stud-mounted shelf, the hoses and pump on hooks with the ends bagged, the air hose coiled with the blowout plug and your pressure limit, and sealed, dated jugs of pink RV antifreeze low on a lipped shelf, out of the sun and away from automotive antifreeze. Rinse and restock it in spring, check the antifreeze in early fall, and the first frost becomes an afternoon’s job instead of a hunt. Measure the shelf, check the hook ratings and the tote size, and compare the current price on the listing before you buy.