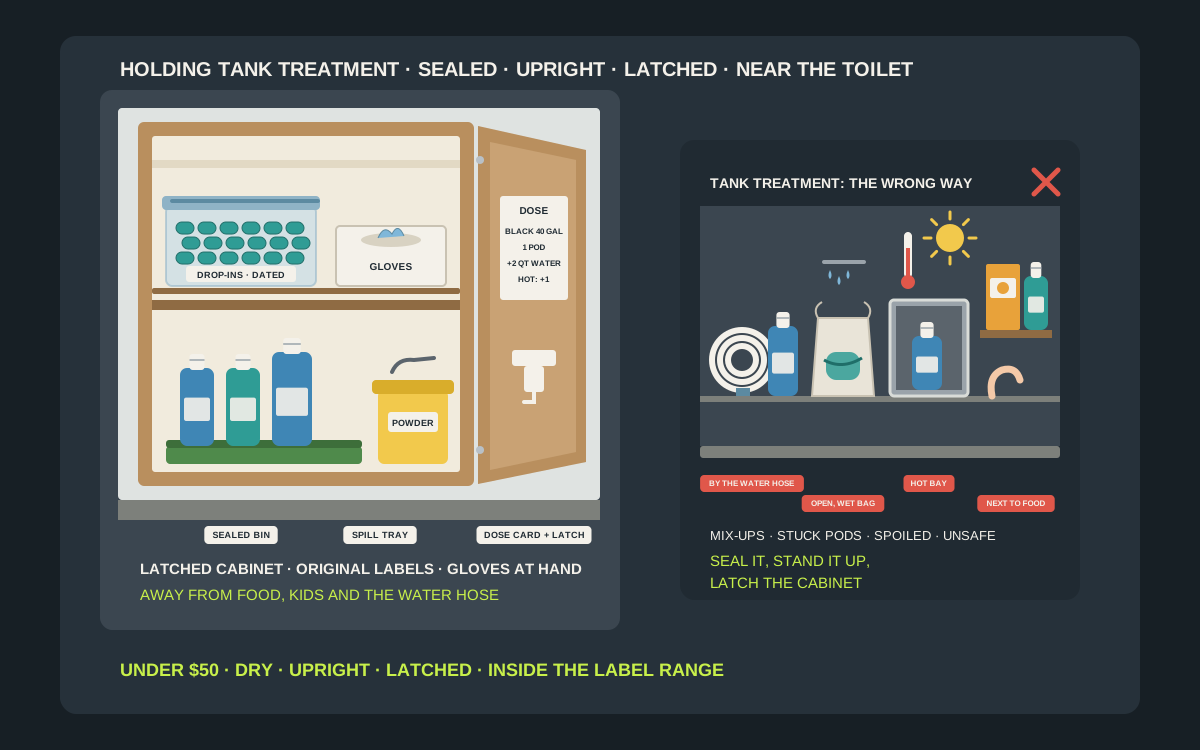
Holding tank treatment is the least glamorous thing you carry in an RV, and it is usually stored that way. A half-used bottle rolls around under the bathroom sink, a bag of drop-in pods sits open next to the shower where the steam gets at it, and the spare jug rides in the same exterior bay as the drinking-water hose, baking all summer and freezing all winter. Then one day the pods have fused into a single sticky lump, the bottle cap has leaked blue liquid across the cabinet floor and nobody can remember how much goes in a 30-gallon tank. None of that needs an expensive fix. A latched cabinet bin, a spill tray, a sealed container for the pods and a card taped inside the door cost far less than a season of treatments, and they keep the supply dry, upright, out of reach of children and pets, and well away from anything you eat or drink. This guide covers what you are actually storing, what the treatment labels say about heat, cold and moisture, where the supply should live in the RV and at home, which under-$50 organizers do the job, and how to set up a simple dosing routine so the right amount goes in every time.
Shop RV cabinet storage bins on Amazon
Who this is for
- RV owners whose tank treatment lives loose under the bathroom sink or in a basement bay
- Families who need the chemicals out of reach of children and pets in a small coach
- Full-timers and long-weekend campers who buy treatment in bulk and need somewhere to keep the backup supply
- Anyone who has found a bag of drop-in pods melted together or a leaked bottle in a cabinet
Quick answer
For most RVs, the best under-$50 setup is a small lidded bin or a lipped shelf inside a latched cabinet near the toilet, holding one bottle or one sealed bag of pods, a box of disposable gloves and a dose card on the inside of the door. Stand liquid bottles upright in a shallow spill tray, keep drop-ins in their original resealable bag or a gasketed canister so moisture cannot reach them, and keep the backup supply inside the coach or in the house, not in an exterior bay that cooks in summer and freezes in winter. Keep everything in its original labeled container, away from food and the fresh-water gear, with a child safety latch on the door if children or pets travel with you. Check the bin size against your cabinet, the latch type against your door, and the current price on the listing before you buy.
Quick comparison
| Setup | Best for | How it holds | Trade-off |
|---|---|---|---|
| Lidded bin in a latched cabinet | The everyday dose near the toilet | Sits on a cabinet shelf behind a latch | Takes a little shelf space |
| Shallow spill tray | Liquid bottles that might drip | Tray under the bottles on any shelf | Holds a leak but does not stop tipping on its own |
| Gasketed canister for pods | Drop-ins, toss-ins and powders | Snap or screw lid, label taped on | Keep the original bag or label inside it |
| Cabinet-door rack with a lip | One bottle, gloves and the dose card | Screws to the inside of a cabinet door | Check the door closes and the hinge can take the weight |
| Screw-mounted wall shelf with a rail | Bathrooms with no spare cabinet space | Screwed into wall framing or a cabinet face | Out in the open, so not for homes with small children |
| Child safety cabinet latch | Any cabinet that holds the supply | Adhesive or screw-on latch inside the door | Adds a step every time you open it |
| Disposable glove dispenser or box holder | Gloves at the toilet and at the dump station | Box sleeve on a wall or door | Keep a second box in the sewer bay |
| High lidded tote on a garage shelf | Bulk supply between seasons at home | Shelf above head height, lid on | Not for garages that freeze in winter |
Child safety cabinet latchesSmall clear storage bins with lidsRV holding tank treatments
What to look for
It keeps moisture out
Drop-in pods and toss-ins are pre-measured doses wrapped in a film that is designed to dissolve in water. That is exactly what makes them easy to use and exactly why they spoil in a damp bathroom. Camco’s directions for its TST drop-ins say to store them in the bag with the top tightly sealed to keep moisture out. A container with a snap lid or a gasket, kept away from the shower, protects powders and pods from steam, wet hands and drips.
It holds bottles upright and catches drips
Liquid treatments come in bottles with child-resistant caps, and a cap that was not fully closed, or a bottle that tipped on a rough road, will leave a sticky, dyed puddle in the cabinet. A shallow tray or a bin with solid sides under the bottles keeps a leak contained and makes it easy to clean. Look for a lip or a rail that stops bottles sliding when the coach moves.
It can be latched
Treatments are household chemicals. The US Consumer Product Safety Commission recommends safety latches and locks on cabinets and drawers to keep cleaners and similar products away from children, and notes that even products in child-resistant packaging should be locked away, because that packaging is often not childproof. If children or pets ever ride in the RV, the cabinet needs a latch that adults can open easily and a child cannot.
It stays inside the label limits
Every treatment label sets a storage range, and they are narrower than you might think. Camco tells you not to freeze its TST Pro drop-ins and to keep them below 110 °F. Thetford’s safety data sheet for Aqua-Kem Blue gives a storage range of -5 to 40 °C, roughly 23 to 104 °F. An organizer is only as good as the place it lives, so pick a spot inside the coach, out of direct sun and away from the furnace and water heater.
It keeps the chemicals separate
The supply should not share a shelf with food, drinks, pet food or the fresh-water hose and filter. Thetford’s data sheet says to store Aqua-Kem Blue away from food, drink and animal feed, and the CPSC advises keeping household chemicals away from food. A dedicated bin does that by default.
It fits the space and the dose
RV bathroom cabinets are shallow, and the space under a wet-bath sink is often shared with the plumbing. Measure the depth, width and height before you buy, then size the bin to what you actually use between restocks: a few weeks of pods or one bottle in the bathroom, the rest of the supply somewhere else. A bin that is too big tempts you to fill it with heavy jugs.
What you are actually storing
Liquid treatments
Liquids are the classic blue or green bottles. Thetford sells Aqua-Kem liquid in 8-ounce bottles with child-resistant caps, and says 8 ounces treats a 40-gallon holding tank; retail listings for the 32-ounce bottle describe it as four treatments for a 40-gallon tank. Liquids are easy to dose for odd tank sizes, but they are the heaviest form, they can leak, and a big jug is awkward to pour in a cramped wet bath. Most owners keep one small bottle in the bathroom and refill it from a larger one stored elsewhere.
Drop-ins and toss-ins
Drop-ins are a measured dose sealed in a water-soluble film. You drop one into the toilet, flush it down with water and that is it. Camco’s TST drop-in directions say to add one drop-in for each 40 gallons of holding tank, follow it with 2 quarts of water, and not to open the individual drop-ins. They are the tidiest form to use, but the film starts to dissolve as soon as it touches water, so wet fingers, steam and condensation are the enemy. A bag left open in a humid bathroom can turn into a single lump.
Powders
Powder treatments come in a tub or a pouch with a scoop. Happy Campers, for example, says to use one scoop, which it describes as 2 tablespoons, per 40 gallons of tank capacity, mixed into a toilet bowl of water and flushed straight away. Powder is light and compact, but it clumps if moisture gets in, and an open scoop dropped back into the tub with wet hands spoils the next dose. Keep the scoop dry and the lid closed.
Tank and sensor cleaners
Alongside the routine treatment, many owners carry a stronger cleaner for buildup or misreading tank sensors, such as Thetford’s Level Gauge Cleaner or Happy Campers’ Extreme Cleaner. These are used occasionally, so they tend to be forgotten at the back of a cabinet. Give them a place in the same bin, so you see them when a sensor starts reading two-thirds full on an empty tank.
The supporting kit
The treatment is only part of the kit. Disposable gloves, a dedicated measuring cup if you dose liquid by volume, a few zip-top bags for a leaking bottle, a roll of paper towels and the dose card all belong in the same place. RV toilet paper, if you use it, lives near the toilet rather than in the chemical bin, and the black tank rinse hose and the sewer hose live outside in their own bay.
What the labels say about storing it
Keep it sealed and dry
Camco’s drop-in bags tell you to store them in the bag with the top tightly sealed to keep moisture out, and Camco’s safety data sheet for TST drop-ins lists storing them in a dry place, in a closed container. Walex’s safety data sheet for its Porta-Pak drop-ins says to keep them in the original container and not to handle the packets with wet hands. If the original bag has a zipper, use it every time. If it tears, move the pods into a canister with a good lid and tape the label from the bag to it.
Keep it out of the heat
Heat is the most common problem for RV storage. Camco’s TST drop-in bag says to keep it below 140 °F, its data sheet gives a maximum of 122 °F, and its TST Pro drop-ins say to store them below 110 °F. Thetford’s data sheet for Aqua-Kem Blue sets an upper storage limit of 40 °C, about 104 °F, and lists direct sunlight among the conditions to avoid. A sunny window ledge, the top of a dash, a cabinet next to the furnace or an exterior bay on a hot afternoon can all go past those numbers.
Do not let it freeze
Cold matters too. Camco’s data sheet for its drop-ins says not to freeze them, and its TST Pro directions say the same. Thetford’s lower limit for Aqua-Kem Blue is -5 °C, about 23 °F. A coach in winter storage, an unheated garage or a basement bay in a cold snap can go well below that, which is a good reason to take the supply into the house when the RV is put away.
Mind the date
Treatments do not last forever. Thetford says its holding tank products are stable at room temperature for at least three years from manufacture, prints an expiration date on the bottle, and explains that after that point the product may still work but you may need more of it to get the same effect. Write the purchase date on each bottle or bag with a marker and use the oldest first.
Keep it away from other chemicals
Thetford’s data sheet lists strong acids and strong bases as incompatible with Aqua-Kem Blue, and Camco’s directions say not to mix its TST treatments with other toilet chemicals. The US Poison Help service warns that bleach should not be mixed with anything other than water, and that mixing household or chemical products can create a dangerous gas. Store the treatment in its own bin, not in a jumble with bleach, drain cleaner and bathroom sprays.
Where the supply should live in the RV
The everyday dose: near the toilet, behind a door
You add treatment every time you dump the black tank, so the dose you use this trip should be within arm’s reach of the toilet. The best spot is a cabinet in the bathroom or right outside it, at waist or eye height, with a door that closes and a latch if children travel with you. One bottle, or one sealed bag of pods, a box of gloves and the dose card are enough here.
The backup supply: inside the coach, not in the bay
Exterior storage bays sit behind a thin skin and follow the weather much more closely than the living space does. That makes them a poor home for a product with a storage range of roughly 23 to 104 °F. Keep the backup supply in an interior cabinet, under a bed or in a dinette bench, in a lidded tote, and refill the bathroom bottle or bin from it every week or two.
Never with the food or the drinking-water gear
Treatments do not belong in the galley pantry, next to the pet food or in the bay with the fresh-water hose, the water filter and the pressure regulator. Keep the potable side and the waste side apart in your storage the same way you keep them apart at the hookup, and give each its own bin, its own gloves and its own place.
Small children and pets change the plan
In a house, the chemicals can go on a high shelf. In an RV, the high cabinets are often the only cabinets, and they open towards the bunk beds. If small children or pets ride with you, the CPSC’s advice applies in full: keep cleaning chemicals in a locked cabinet or box, out of sight and out of reach, and keep them in their original child-resistant containers. Re-close the cap fully every time; a child-resistant cap only works when it is closed.
Eight ways to store tank treatment under $50
A small lidded bin in a latched cabinet
This is the default for most rigs. A clear plastic bin with a snap lid, sized to the cabinet shelf, holds the current bottle or bag of pods, the gloves and a spare zip-top bag. You can see what is inside without opening it, the lid keeps steam and drips out, and if a bottle leaks, the mess stays in the bin. Add a child safety latch to the cabinet door and the supply is both tidy and safe.
A shallow spill tray under the bottles
If you use liquid treatment, put a shallow tray with a raised edge under the bottles. A plastic boot tray cut to size, a small drip tray or a deep-sided plastic organizer works. It will not stop a bottle tipping on its own, so pair it with a lip on the shelf or a bin with solid sides, but it turns a leak into a quick wipe instead of a stained cabinet floor.
A gasketed canister for drop-ins and powders
For pods, toss-ins and powder, a food-storage-style canister with a gasket or a screw lid keeps moisture out far better than a torn bag. Mark it clearly as tank treatment, tape the product label or the dosing instructions to it, and never use a container that looks like it holds food. The CPSC warns never to transfer dangerous products into food or drink containers, because the original label carries the identification and first-aid information. Best of all, drop the original bag inside the canister, so the label comes with it.
A cabinet-door rack with a lip
A shallow rack screwed to the inside of a cabinet door holds one bottle, the box of gloves and the dose card without taking any shelf space. Choose one with a deep front lip or a rail, so the bottle cannot bounce out on a rough road, and check that the door still closes over the hinge with the rack loaded. Use short screws that will not go through the door, and keep the weight light: one small bottle, not a jug.
A screw-mounted wall shelf with a rail
In a wet bath with no spare cabinet space, a small shelf with a front rail, screwed into wall framing or into the face of a cabinet, gives the bottle a fixed home beside the toilet. It is the most convenient option and the least child-safe, because it is out in the open, so it suits couples and solo travelers better than families. Keep it away from the shower spray so pods and labels stay dry.
A child safety cabinet latch
A latch is the cheapest safety upgrade in the whole kit. Adhesive or screw-on latches mount inside the door and catch when it closes. The CPSC suggests choosing latches that adults can easily install and use but that are sturdy enough to withstand pulls and tugs from children. In an RV, check that the latch also keeps the door shut on travel days, which is a bonus for any cabinet.
A glove box holder on the wall or a door
Disposable gloves get used at the toilet when you add treatment and at the dump station when you handle the sewer hose. A box sleeve or holder mounted inside a cabinet door keeps a box ready in the bathroom. Keep a second box in the sewer bay for the dump station, so the gloves you wear for the hose never come back into the bathroom.
A high lidded tote on a garage shelf
At home, the bulk supply, the spare jug or the season’s bucket of pods can live in a lidded tote on a sturdy shelf above head height in the garage, away from food, pet food and pool chemicals. That only works if the garage stays inside the label range. If yours freezes in winter or bakes in summer, a shelf in a utility room or basement is the better choice.
Mounting it in an RV
Screw into something solid
RV walls are often thin paneling over a light frame, and the cabinets are built from thin sheet goods. Anything you screw up should go into a cabinet face, a shelf or the wall framing, not into the paneling alone. Pre-drill, use short screws that will not come out the other side, and keep the load small. Our guide to mounting hooks in an RV without damaging the walls, linked below, covers the details.
Use adhesive only for light, dry jobs
Adhesive hooks and strips are fine for a dose card or a light glove holder inside a cabinet, but not for a bottle rack. Command lists its indoor strips for roughly 50 to 105 °F, so they are a poor fit for a bathroom wall that sees steam every morning or a coach that sits cold in winter. If a holder will carry a liquid bottle, screw it.
Think about the weight
Liquid treatment weighs about as much as water. An 8-ounce bottle is roughly half a pound, a 32-ounce bottle about two pounds and a gallon jug more than eight pounds once you count the plastic. That is a lot for a door rack or a small shelf on a bumpy road, which is why the bulk jug belongs on a floor-level shelf in an interior cabinet or at home, not on a door. Every pound you carry also counts against the cargo carrying capacity printed on your RV’s weight label.
Storing the supply at home between seasons
Bring it in when the RV goes into storage
When the rig is winterized and parked, take the treatment out of it. The coach will sit for months at whatever the weather does, which is outside the storage range on most labels in a northern winter or a southern summer. A lidded tote in the house, a basement or a heated utility room keeps the supply ready for spring.
Up high, latched and away from food
The same rules apply at home as in the RV. The CPSC advises keeping household chemicals in a locked cabinet or out of reach of children, and keeping them away from food. A shelf above head height, a lockable cabinet or a tote with a latching lid all work. Do not store it beside the pet food bin or the drinks fridge in the garage.
Make a dose card and keep it with the bin
Write down your tank sizes
Most owners know their fresh tank size and guess at the black and grey tanks. Look them up in the owner’s manual or on the manufacturer’s spec sheet and write them on the card: black tank 40 gallons, grey tank 30 gallons and so on. If your RV has two black tanks or a galley grey tank, list each one.
Write the dose for the product you use
Doses are per tank size and differ by product. Thetford says 8 ounces of Aqua-Kem liquid treats a 40-gallon tank. Camco says one TST drop-in per 40 gallons, followed by 2 quarts of water. Happy Campers says one scoop per 40 gallons. Copy the numbers for your product onto the card, worked out for your own tanks, so nobody has to read the small print on a wet bottle.
Add the hot-weather and long-stay rule
Heat and long holding periods make odors worse. Camco says to add an extra drop-in for longer holding periods, larger tanks or temperatures over 85 °F, and Thetford notes that extremely hot weather or a longer retention time may call for more Aqua-Kem. Thetford also says you can add more than its recommended dose without harming a treatment system. Write your own rule on the card, such as one extra dose in summer heat.
Add water, not just chemicals
Water does a lot of the work. Camco calls for 2 quarts after a drop-in, Thetford for about a gallon after the liquid dose, and Happy Campers for about a gallon in the bowl with the scoop and a couple of gallons more afterwards. Walex says the most common reason a deodorizer underperforms is too little water, which lets waste pile up above the waterline. Put the water amount on the card next to the dose.
Formaldehyde, septic systems and dump stations
Why some campgrounds care what is in your tank
Many campgrounds and rural parks send their dump station waste to a septic system rather than a city sewer. The US Environmental Protection Agency has asked RV owners not to use holding tank chemicals that can harm septic systems and to read product labels, noting that formaldehyde, found in some deodorizers, is a probable human carcinogen. California’s Department of Toxic Substances Control points out that formaldehyde kills the bacteria a septic system depends on.
California has a list
Since 2022, California law has made it unlawful to use holding tank products containing formaldehyde, formalin, paraformaldehyde, glutaraldehyde, bronopol, dowicil, para-dichlorobenzene and other listed chemicals in an RV holding tank that discharges to a septic or other onsite system. Parks that use such systems must post a notice asking campers to use bacteria- or enzyme-based products. Indiana’s campground guidance likewise says holding tanks containing formaldehyde or similar chemicals must not be emptied into an on-site sewage disposal system.
What that means for your bin
Read the label before you buy, and if you travel widely or dump at rural parks, choose a product the maker describes as formaldehyde-free and septic-safe. Thetford, for example, describes its AquaMAX, Campa-Fresh and AQUAbio lines as formaldehyde- and bronopol-free. If you find an old bottle of something else at the back of the cabinet, check the label before you use it. And do not mix products in the tank: Camco says not to mix its treatments with other toilet chemicals, so finish or dump one product before you switch to another.
Spills, splashes and cleanup
Keep a spill kit in the bin
A few paper towels, a zip-top bag and a pair of gloves in the bin turn a leaking bottle into a two-minute job. Thetford’s data sheet for Aqua-Kem Blue warns that a spill can be slippery on a hard floor, and suggests soaking it up with sand or an absorbent, then rinsing the surface with water and letting it dry. In an RV, paper towels and a wipe with water usually do it. Camco’s data sheet for its drop-ins advises wearing gloves and washing your hands after handling, and for skin or eye contact, follow the first-aid section on your product’s label.
If someone swallows it
Call Poison Help at 1-800-222-1222 in the United States, which connects you to your local poison center, and have the container in your hand. This is the other reason to keep the treatment in its original labeled bottle or bag: the label tells the poison center exactly what it is.
Three rigs, three setups
Weekend travel trailer with a wet bath
One latched cabinet above the toilet holds a small clear bin with a resealed bag of drop-ins, a box of gloves and the dose card taped inside the door. The spare bag lives in the house between trips. On the road, the only rule is to close the bag with dry hands before the shower goes on.
Full-time Class A with children and a dog
The bathroom cabinet under the sink gets a child safety latch, a spill tray and one 8-ounce bottle of liquid in a bin with a lip. The month’s supply sits in a lidded tote in a basement-level interior compartment or under the bed, never in the wet bay. A second box of gloves rides in the sewer bay, and the dose card lists both black tanks and the galley grey tank.
Van or truck camper with a cassette or portable toilet
Portable toilets and cassettes have much smaller waste tanks, so check the label for the portable-toilet dose rather than using a full 40-gallon dose. A single gasketed canister of pods or a small bottle in a door rack with a lip, plus a few gloves, is the whole kit. Keep it well clear of the galley and the water jugs, which in a van can be a matter of inches.
Set it up in an afternoon
- Gather every bottle, bag and tub of treatment and cleaner in the RV and the house, check the dates and labels, and set aside anything you will not use.
- Look up your black and grey tank sizes and write a dose card for the product you use, including the water to add and a hot-weather rule.
- Pick a cabinet near the toilet, at waist or eye height, away from the shower spray, the furnace and the water heater.
- Measure the shelf and buy a lidded bin or a spill tray that fits, with room for one bottle or one bag of pods, a box of gloves and a spare zip-top bag.
- Fit a child safety latch to the cabinet door if children or pets travel with you.
- Move any torn bags of pods into a gasketed canister with the label taped on, and date every container with a marker.
- Put the backup supply in a lidded tote in an interior cabinet or in the house, away from food, pet food and the fresh-water gear.
- Put a second box of gloves in the sewer bay and check the cabinet after your first rough road.
Mistakes to avoid
- Leaving a bag of drop-in pods open in a steamy bathroom, or reaching into it with wet hands.
- Storing the spare jug in an exterior bay where it bakes in summer and freezes in winter.
- Keeping the treatment in the same bay or bin as the drinking-water hose and water filter.
- Putting chemicals on the same shelf as food, drinks or pet food.
- Pouring treatment into an unlabeled bottle or a food container.
- Relying on a child-resistant cap instead of a latched cabinet when children travel with you.
- Hanging a heavy jug on a cabinet door rack or an adhesive hook.
- Mixing two different treatments in the tank, or storing them with bleach and drain cleaner.
Related guides
Browse the hub: RV & camping storage under $50 - all guides
- Best RV Black Tank Rinse Hose Wall Holders Under $50
- Best RV Sewer Cap & Fitting Wall Organizers Under $50
- Best RV Sewer Hose Support Wall Storage Under $50
- Best RV Bathroom Wall Caddies Under $50 (No Drill)
- Best RV Toilet Paper Holders Wall Mount Under $50 (No Drill)
- How to Organize an RV Bathroom with No-Drill Hooks Under $50
- Best RV Water Filter Cartridge Wall Holders Under $50
- How to Mount Hooks in an RV Without Damaging Walls Under $50
FAQ
Where should I store RV holding tank treatment?
Keep the dose you are using near the toilet in a latched cabinet, in a lidded bin or on a spill tray, with gloves and a dose card. Keep the backup supply inside the coach or at home in a lidded tote, out of the sun and away from food, pet food and the fresh-water gear. Exterior bays are usually too hot in summer and too cold in winter for the label’s storage range.
Can tank treatment freeze or go bad?
Yes. Camco says not to freeze its TST drop-ins, and Thetford gives a storage range of -5 to 40 °C, about 23 to 104 °F, for Aqua-Kem Blue. Thetford says its products keep for at least three years from manufacture, prints an expiration date on the bottle, and says older product may need a larger dose to work as well. Date your containers and use the oldest first.
How do I keep drop-in pods from sticking together?
Keep them dry. The film around each pod dissolves in water, so steam, condensation and wet hands start the process early. Store pods in their original bag with the zipper closed, or in a gasketed canister with the label taped on, away from the shower, and always take one out with dry hands.
Is it safe to keep tank chemicals under the bathroom sink?
It can be, if the cabinet has a safety latch, the bottles stand in a tray or bin, and nothing else in that cabinet is food or drink. If small children or pets travel with you, the CPSC recommends a locked or latched cabinet, even for products with child-resistant caps.
How much holding tank treatment should I use?
Follow the label for your product and your tank size. Thetford says 8 ounces of Aqua-Kem liquid treats a 40-gallon tank, Camco says one TST drop-in per 40 gallons with 2 quarts of water, and Happy Campers says one scoop per 40 gallons. Write your own tank sizes and doses on a card and keep it with the bin.
Are formaldehyde tank treatments allowed at campgrounds?
Many parks that dump to a septic system ask campers not to use them, and California prohibits using formaldehyde and several other chemicals in RV holding tanks that discharge to septic or onsite systems. Choose a product the maker labels formaldehyde-free and septic-safe if you travel widely or use rural dump stations.
Bottom line
The best RV holding tank treatment storage is small and boring: the dose you are using in a lidded bin or on a spill tray in a latched cabinet near the toilet, pods sealed and dry, liquids upright, gloves and a dose card within reach, and the backup supply inside the coach or at home, inside the temperature range on the label. Keep it in its original container, away from food and the drinking-water gear, and out of reach of children and pets. Measure the cabinet, check the latch and the bin size, and compare the current price on the listing before you buy.