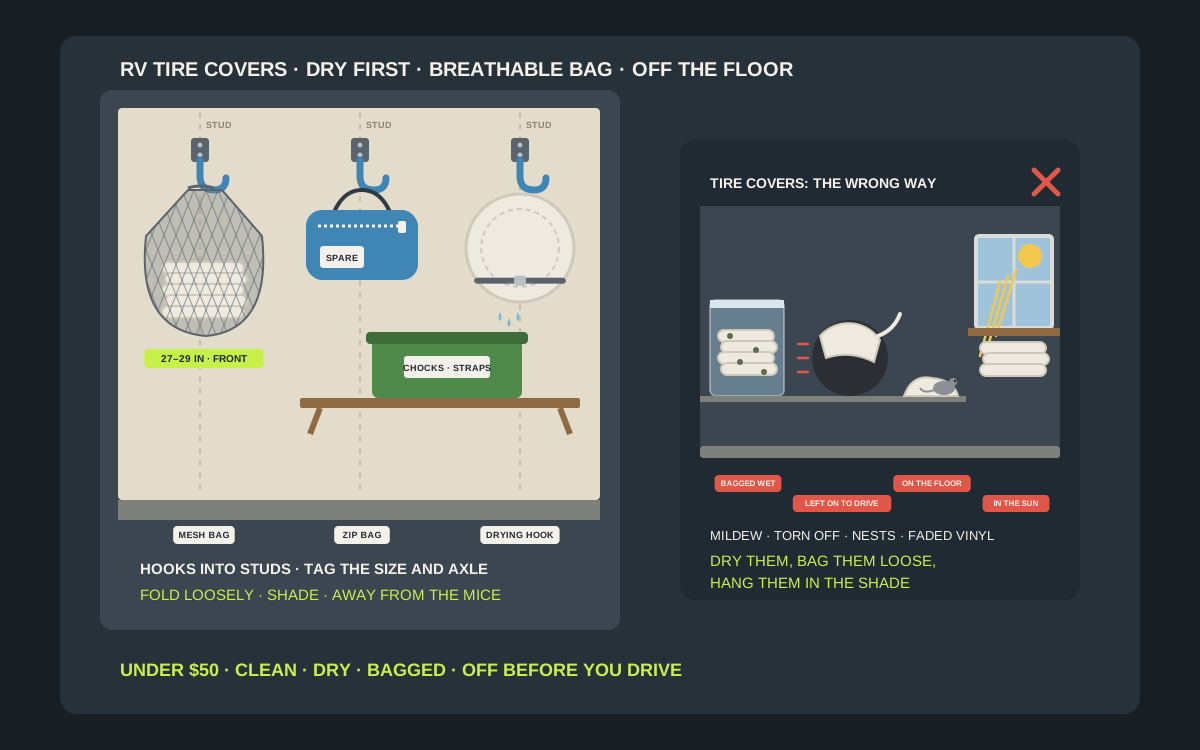
RV tire covers spend half their life doing their job and the other half in the way. When the rig is parked they sit snug over the wheels, keeping the sun off the sidewalls. On travel days they come off in a hurry, get folded any old way and end up stuffed behind the sewer hose, wedged under the leveling blocks or left on the garage floor where the mice find them. By the next stop, one is missing a strap, one smells of damp and nobody remembers which pair fits the front axle. A cheap, sensible storage spot fixes almost all of that. A breathable bag on a stud-mounted hook, a labeled bin in the basement bay and a drying line for wet days cost far less than a replacement set of covers, and they keep the covers clean, dry and ready the moment you park. This guide covers where RV tire covers should live between trips and through the off-season, how to clean and dry them so they do not mildew, which hooks and bags suit a garage wall or an RV bay, and how to put them back on properly when the rig goes into storage.
Shop RV tire cover storage bags and hooks on Amazon
Who this is for
- RV owners whose tire covers ride loose in the basement bay between campsites
- Anyone who stores the rig indoors or under a carport and needs a home for the covers at home
- Owners with more than one set of covers: motorhome, toad, spare and trailer
- Anyone who has opened a bag of covers in spring and found mildew, mouse nests or a missing strap
Quick answer
For most RV owners, the best under-$50 setup is a large breathable mesh or fabric bag for each set of covers, hung from a heavy-duty utility hook screwed into a garage stud, with a tag on the bag that says the tire size and which axle or vehicle it fits. In the RV, the same bag rides in a lidded bin or under a cargo net in the basement bay, next to the wheel chocks, so the covers come out together at every stop. Clean and fully dry the covers before they go in any bag, fold them loosely, keep them off the floor and out of the sun, and never zip a damp vinyl cover into a sealed plastic bag. Check the hook rating, the bag size and the current price on the listing before you buy.
Quick comparison
| Setup | Best for | How it holds | Trade-off |
|---|---|---|---|
| Breathable mesh bag on a stud hook | Covers that might still hold a little damp | Drawstring mesh bag on a screwed-in utility hook | Lets dust in; keep it out of direct sun |
| Zippered duffel or the bag in the box | Clean, dry covers between trips | Carry handles over a hook or in the bay | Covers must be bone dry before you zip it |
| Heavy-duty utility hook | One pair hung by its strap or grommets | Screwed into a stud | Covers stay open to dust and light |
| J-hook rail or track system | Covers, chocks, straps and pads together | Rail screwed across two or more studs | More hardware than a single hook |
| Cargo net on a bay wall | Holding bags in place on travel days | Hooks or anchors at the bay corners | Check what the bay wall can hold |
| Lidded bin in the basement bay | The full road kit in one place | Sits on the bay floor | Uses floor space and counts toward cargo weight |
| Adhesive utility hook | One light, dry pair indoors | Strips on smooth paint or a cabinet side | Not for hot bays or heavy, wet bags |
| Drying line or folding rack | Drying covers before they are packed | Line between two hooks, or a freestanding rack | Temporary; not long-term storage |
Mesh storage bags with drawstringsHeavy-duty garage utility hooksRV tire covers by size
What to look for
It breathes
The enemy of a stored tire cover is trapped moisture. A mesh bag, a canvas or Oxford-fabric duffel with a vent, or an open hook lets any leftover damp escape. A sealed plastic tub or a zip-top bag holds it in, and a vinyl cover that went away slightly wet comes out speckled with mildew. Pick something that lets air move, even if the covers inside are dry.
It is big enough for the whole set
Covers are sold in pairs, one pair per axle, so a single-axle trailer has two, a tandem trailer or fifth wheel has four and a motorhome towing a car can easily have six or eight, plus a spare tire cover. A bag that just fits two folded covers forces a tight fold over the buckles. Choose a bag with room to spare, or use one bag per pair and label each one.
It keeps the covers off the floor
Garage floors are damp, dusty and visited by mice, which like soft vinyl and flannel linings for nests. A hook, a rail or a shelf keeps the bag up where it stays dry and where you can see it. In the RV, a bin with a lid or a bag under a cargo net does the same job in the bay.
It is quick to grab on travel days
Covers go on when you park and come off when you leave. If the storage spot takes two minutes to open and repack, they will end up loose in the bay. The best setups are a bag with a wide drawstring or a big zipper, a hook at chest height in the garage and a bin by the bay door you open first at camp.
It takes a label
Most RV covers look alike once they are folded, and they come in size bands by tire diameter. A bag with a clear pocket, a luggage tag or a strip of tape you can write on saves you from wrestling a 30-inch cover onto a 27-inch tire. Write the size band, the vehicle and the axle.
It mounts to what you actually have
A garage stud takes a screwed-in utility hook or a rail easily. An RV basement bay wall may be thin plywood or composite panel, which is a different job. Pick hardware for the surface you have, and keep adhesive hooks for light loads in room-temperature spots, not for a hot bay or a heavy wet bag.
What tire covers do, and what they do not
They keep the sun off the sidewalls
Sunlight and ozone are the two things that age a parked tire fastest. Michelin’s RV tire guide says to cover the tires when the vehicle is not in use, and to cover them outdoors to block direct sunlight and ultraviolet rays. It describes aging as weather checking or ozone cracking, tiny cracks in the sidewall, and says cracks under 2/32 of an inch are acceptable, while deeper cracks call for an inspection by a dealer and possibly a new tire. A cover is a cheap way to slow that down on a rig that sits for weeks at a time.
Not every tire maker insists on them
Goodyear’s RV tire care guide takes a slightly different line: it says its RV tires do not need dressings, appearance products or covers to protect them, and that products containing alcohol, petroleum or silicone may cause the rubber to deteriorate and crack. It still tells you to keep a stored RV in a cool, dry place out of direct sunlight and UV. The common ground is shade. If your rig lives in a garage or under a roof that keeps the sun off the wheels, covers matter less. If it sits in a driveway or an open storage lot, they earn their keep.
A cover is not tire care
A cover does nothing for pressure, load or flat spots. Goodyear advises unloading the vehicle, cleaning the tires with soap and water before storage, and moving the vehicle at least every three months to help prevent cracking and flat-spotting. Michelin advises a barrier such as plywood, plastic, cardboard or a rubber mat between the tire and the ground. Covers are the last step of a storage routine, not the whole routine.
They come off before the wheels turn
Wheel covers are made for a parked vehicle. Retail listings for Camco’s vinyl covers spell it out: they are not for use while driving and must be removed before the vehicle moves. That is the real reason storage matters. A cover that has a fixed, obvious home in the bay is a cover you remember to take off and put away during the walkaround before you pull out.
Know what you are storing
Covers are sized by outside diameter
RV tire covers are sold in bands by the tire’s overall diameter, not by the size printed on the sidewall. Camco’s vinyl wheel and tire protectors come in 24 to 26, 27 to 29, 30 to 32, 33 to 35, 36 to 39 and 40 to 42 inch bands. ADCO’s Ultra Tyre Gards run from an 18 to 22 inch size up to 43 to 45 inches for bus-size wheels, and ADCO tells you to add 1 to 2 inches to the diameter if your wheels have protruding wheel covers. Measure from the ground to the top of the tire on level ground, then write that number on the bag.
One pack per axle
Most covers come as a pair, which covers one axle. A single-axle travel trailer needs one pair, a tandem-axle trailer or fifth wheel two pairs, and a motorhome needs covers for the front and rear plus whatever the towed car needs. The storage plan has to fit the whole collection. Four large vinyl covers fold into a surprisingly bulky stack.
Vinyl and fabric pack differently
Heavy vinyl covers such as Camco’s and ADCO’s wipe clean and shed water, and ADCO’s are lined with soft flannel to protect the wheel. Vinyl is stiff when it is cold, though, and a retail listing for Camco’s covers warns that vinyl can become brittle in extreme cold, so let a stiff cover warm up before you fold or fit it. Fabric covers in coated Oxford-style cloth fold smaller and lighter. Either way, store them loosely folded and never crush them under heavy gear.
Spare tire covers are a different product
The round cover on a spare tire hanging off a rear bumper or ladder is built to stay on while you drive and is sized by the spare’s diameter. Camco’s vinyl spare tire covers, for example, run from 21 1/2 to 34 inches. It does not need a storage hook during the season, but if you take it off for the winter, give it its own labeled bag so it is not confused with the wheel covers.
What a set weighs
Not much, which is good news for hooks. Retailer listings put a pair of ADCO Ultra Tyre Gards at about 2 pounds and a pair of large Camco vinyl covers at about 3 to 3 1/2 pounds. A full set for a tandem trailer is under 10 pounds dry. A wet set, a bag full of straps and a pair of wheel chocks thrown in on top is heavier, so size the hook for the worst day, not the best.
Two seasons, two homes
Travel season: the covers live in the RV
While you are on the road, the covers come off at every departure and go back on at camp, so they get handled far more often than in the off-season. They need a home in the basement bay, close to the door you open first. A breathable bag in a lidded bin, or a bag held flat under a cargo net, keeps them from sliding into the sewer gear and makes them easy to grab when the rig is level.
Indoor storage: the covers live in the garage
If the rig spends the winter in a garage, a barn or a covered storage building, the wheels are already in the shade and the covers can come home. A stud-mounted hook or a short wall rail in the garage, with one bag per set, keeps them dry and off the floor until spring.
Outdoor storage: the covers go on, the bags go home
If the rig winters in a driveway or an open storage lot, the covers stay on the tires all season. Their empty bags, the spare straps and any repair bits are what need a home. Hang the empty, labeled bags on the same hook, so they are waiting when you take the covers off in spring.
Clean and dry them before they go away
Rinse, then wash gently
Road grime, brake dust and bird droppings end up on the covers. Rinse them with a hose, then wipe them with mild soap and a soft cloth or brush, and rinse again. Skip bleach and harsh degreasers, which can strip coatings and dry out vinyl. Wipe the inside too, where it touched the tire.
Dry them completely, in the shade
This is the step that saves the covers. Moisture folded inside a cover turns into mildew and a musty smell within weeks, and guides for full RV covers say plainly never to put a wet cover into its storage bag. Hang covers open on a hook or a line in a shaded, airy spot until both sides and the seams are dry. Sunlight dries them faster but is exactly what you are trying to keep off the vinyl, so do not leave them out for days.
Shake out the visitors
Covers on a parked rig make a dark, sheltered pocket for spiders, wasps and insects. One cover maker’s care instructions warn about spiders, insects and other critters under the cover, and suggest wearing gloves or shaking the cover out and checking it for dirt and debris before storing it. Do that before the cover goes in the bag, not after it has spent a week in your bay.
Fold loosely, away from the buckles
Fold or roll each cover loosely. A retail care guide for Camco’s vinyl covers says to fold them loosely, store them dry and out of direct sunlight, and avoid folding tightly over buckles or hardware, which creases the vinyl. Fasten the straps or tuck them inside so they do not tangle with the next cover, and keep heavy gear off the bag.
Check the hardware while it is in your hands
Bungee cords, elastic hems, straps and buckles wear out before the cover does. ADCO’s covers use a bungee-ball fastening system, and any elastic loses stretch with age and sun. Look over the straps, grommets and seams as you fold, and put a note in the bag if something needs replacing before the next trip.
Eight ways to store tire covers under $50
A breathable mesh bag on a stud-mounted hook
This is the default for a garage. A large drawstring mesh bag, the kind sold for sports balls, laundry or pool toys, holds a pair or two of folded covers and lets air through. Hang it by the drawstring from a heavy-duty utility hook screwed into a stud. You can see what is inside, damp escapes and the bag is at chest height, not on the floor. Keep it out of the sun from a window, because mesh lets the light in.
A zippered duffel, or the bag that came with the covers
Some covers come with their own storage bag, and a basic canvas or Oxford-fabric duffel does the same job for those that do not. A closed bag keeps dust off and travels well in the bay. The rule is simple: the covers must be completely dry before you zip them in. Hang the duffel by its handles from a garage hook or set it in a bin in the bay.
A heavy-duty utility hook on its own
For a single pair, a vinyl-coated utility hook screwed into a stud can hold the covers themselves, looped through a strap or a grommet, folded over the hook arm. It is the fastest way to put them away and doubles as a drying hook. The trade-off is that the covers stay open to dust and light, so it suits a covered garage wall better than a sunny one.
A J-hook rail or wall track
If the covers share the wall with wheel chocks, leveling blocks, stabilizer jack pads and tie-down straps, a short wall rail with sliding J-hooks keeps the whole road kit together. Screw the rail across at least two studs and hang the cover bags on one hook and the rest on the others. When it is time to pack the bay, everything comes off one wall.
A cargo net on a basement bay wall
On the road, a cargo net stretched across a corner of the basement bay holds a cover bag flat against the wall, so it cannot slide under the slide-out or into the sewer gear on a bumpy road. Use the bay’s existing tie-down points where there are any. If you have to add anchors, keep them small and screw them into the bay’s frame or a solid backing, because thin bay walls do not take a heavy pull.
A lidded bin in the bay
A sturdy lidded bin, sized to the bay, can hold the cover bags, the wheel chocks and the tire gauge as one camp kit. Pull the bin out, set the chocks, fit the covers, done. Choose a bin with a lid that keeps the bay’s road dust out, and put the bags in the bin rather than the bare covers, so a little damp in one cover does not spread to the rest.
An adhesive hook, for a light dry pair indoors
An adhesive utility hook on a smooth painted wall or a cabinet side can hold one light, dry pair in a bag. Command rates its large utility hook at 5 pounds, which is enough for a small pair but not for a bag of wet covers and straps. Adhesive strips are made for room-temperature, indoor spots, so do not rely on them in a basement bay that bakes in summer or freezes in winter.
A drying line or a folding drying rack
This is not storage, it is the step before it. Two hooks and a length of clothesline across a garage wall, or a folding drying rack, let wet covers hang open overnight before they are folded and bagged. If you often pack up in the rain, a line in the garage is the cheapest insurance against mildew you can buy.
Mounting it in a garage
Screw into studs
A hook driven into a wall stud with the screw that came with it is far stronger than one hung from drywall alone. Find the stud with a stud finder or a small test hole, pre-drill if the hook’s instructions say to, and drive the screw fully. For a rail, catch at least two studs. Drywall anchors are fine for a light empty bag, not for the full road kit.
Size the hook for the worst day
A dry pair of covers weighs a few pounds, but a wet set, the straps, a pair of chocks and a jack pad dropped into the same bag can weigh many times that. Read the hook’s rating on the listing and pick one with plenty of margin. The extra cost of a heavier hook is pennies.
Keep it out of the sun and away from heat
A window that throws afternoon sun onto the wall will fade and stiffen vinyl covers through a mesh bag. Pick a shaded stretch of wall, and keep the bags clear of a water heater, a space heater or a furnace, where the vinyl would bake all winter.
Keep rodents in mind
Mice and rats nest in soft, dark material, and an off-season tire cover on the garage floor is ideal for them. Hanging the bags off the floor helps, and so does a quick shake and look whenever you take them down. If your garage has a rodent problem, a lidded bin on a shelf is safer than an open mesh bag.
Storing them in the RV
Choose the right bay
Keep the covers in the bay with the clean outdoor gear: chocks, leveling blocks, jack pads, the outdoor rug. Do not store them with the sewer hose, the black tank rinse hose or the sewer fittings. Covers touch your hands and the wheels, and they should stay clear of anything from the waste side.
Count the weight
Every RV carries a label with its cargo carrying capacity, usually near the entry door or inside a cabinet or compartment door, and everything you load counts against it. A bag of covers is light, but bins, chocks, hoses and blocks add up. Weigh the full bin once on a bathroom scale and you will know what the camp kit costs you.
Secure it for the road
Loose bags slide, rub and end up crushed against the bay door. A bin with a lid, a cargo net or a strap to a tie-down point keeps the covers in one place. Do not hang a bag from a bay door’s hinge or latch, where it will swing and chafe on every bump.
Make the covers part of the walkaround
The walkaround before you drive away is where a forgotten cover gets caught. Put the cover bag on top of the bin or next to the chocks, so when you pick up the chocks you see the bag, and when the bag is full, you know the covers are off the wheels.
Putting them on for storage season
Clean the tires first
Both Goodyear and Michelin say to wash the tires with soap and water before storage. Skip shiny tire dressings: Goodyear warns that products with alcohol, petroleum or silicone may cause its RV tires to deteriorate and crack. Let the tires and wheels dry before the covers go on, because a cover over a wet tire traps the moisture against it.
Get the rig off the bare ground
Michelin recommends a barrier between the tire and the storage surface, such as plastic, plywood, cardboard or a rubber floor mat. Goodyear’s storage advice for tires warns against storing tires on black asphalt or other heat-absorbing surfaces, and its RV guide asks for a firm, clean, well-drained and reasonably level surface. A square of plywood under each wheel solves several of these at once.
Set the pressure the way your tire maker says
Michelin’s RV guide says to inflate to the maximum pressure on the sidewall for long-term storage. Goodyear’s says to inflate to the recommended operating pressure plus 25 percent, without exceeding the wheel maker’s rating. Follow the guidance for the brand on your rig, and put the pressures back to normal before the first trip.
Keep ozone sources away
Goodyear’s storage bulletin says not to store tires near electric motors, battery chargers, generators, welding equipment or other ozone-generating sources, and Michelin’s RV guide likewise says to keep a stored rig away from generators and transformers. In a shared garage or barn, park the rig away from the workbench, the compressor and the battery charger.
Fit the covers snug, then check them
A cover that flaps in the wind wears through and can blow away, which is why ADCO uses a bungee-ball cinch and Camco a buckle and strap. Fit the cover all the way around the tread, cinch it, and check it after storms and every few weeks over the winter. If a cover has filled with water or snow, empty it and let the tire breathe.
Move it and look at it
Goodyear says to move a stored RV at least every three months and Michelin suggests a monthly highway drive of about an hour if storage runs longer than three months. Each time, slip the covers off, look at the sidewalls for cracks and bulges, and put them back on clean and dry.
Label it, count it, keep the set together
Tag each bag
Write the size band, the vehicle and the axle on a luggage tag or a strip of tape on each bag: 30 to 32 inch, fifth wheel, front axle. If you own a motorhome and a toad, or a trailer and a tow vehicle with different wheels, this tag is what stops you fitting the wrong cover in the dark.
One bag per vehicle
Keep the motorhome covers, the toad covers and the spare tire cover in separate bags. Mixed sets mean one cover always goes missing, and the odd one out is always the size you need.
Three rigs, three setups
Single-axle travel trailer in the driveway
The covers stay on all winter, so the garage wall only needs one hook with the empty, labeled bag, a spare strap and the plywood squares hung beside it. In summer, the covers ride in a mesh bag in the trailer’s front bay, on top of the wheel chocks, and a clothesline in the garage dries them after a wet trip.
Tandem fifth wheel stored indoors for the winter
With the rig under a roof, all four covers come home. A short wall rail across two studs holds two labeled mesh bags, one per axle, plus the chocks, the jack pads and the leveling blocks on the other hooks. On the road, the same two bags live in a lidded bin in the pass-through bay.
Class A motorhome with a towed car
This is the biggest collection: the motorhome’s covers, the car’s covers and maybe a spare cover, in different sizes. Give each set its own tagged duffel, hang them from a rail in the garage in a fixed order and pack them in the same order in the bay. At camp, the motorhome bag comes out first, and the car’s bag only when the car will sit for a while.
Set it up in an afternoon
- Count your covers and write down each set’s size band, vehicle and axle.
- Wash the covers with mild soap, rinse them and hang them open in the shade until they are completely dry.
- Shake them out, check the straps, bungees, grommets and seams, and note anything that needs replacing.
- Pick one breathable bag per set, big enough to hold the covers loosely folded, and tag it.
- Find a shaded stretch of garage wall near the door you load from, locate the studs and screw in a heavy-duty hook or a short rail at chest height.
- Hang the bags, with the chocks, jack pads and straps on the hooks beside them.
- Set up a lidded bin or a cargo net in the RV bay for travel season, away from the sewer gear.
- Add a clothesline or a folding rack for drying wet covers before they are bagged.
Mistakes to avoid
- Zipping damp vinyl covers into a sealed plastic bag or tub.
- Leaving covers on the garage floor, where they get damp and the mice move in.
- Driving away with a cover still on a wheel.
- Folding vinyl tightly over the buckles, or folding it while it is cold and stiff.
- Storing the covers in the same bay as the sewer hose and fittings.
- Mixing every set in one bag with no size tags.
- Hanging a full bag of wet covers and chocks from an adhesive hook or a drywall anchor.
- Storing the bags in a sunny window or next to a heater.
- Putting covers over wet or dirty tires at the start of storage season.
- Dressing the tires with a shiny silicone or petroleum product before covering them.
Related guides
Browse the hub: RV & camping storage under $50 - all guides
- Best Stabilizer Jack Pad Wall Storage for RVs Under $50
- Best Awning Crank & RV Leveling Block Wall Mounts Under $50
- Best RV Outdoor Rug & Patio Mat Wall Storage Under $50
- Best Wheel Chock Wall Holders Under $50 for Garage
- Best Winter Tire & Seasonal Gear Wall Storage Under $50
- How to Store Tires on a Garage Wall Under $50
- Best Tire Pressure Gauge Wall Mounts Under $50 for Garage
- Best RV Battery Tender Wall Mounts Under $50
FAQ
How should I store RV tire covers when they are not on the tires?
Clean them, dry them completely, fold them loosely and keep each set in a breathable bag with a size tag. At home, hang the bag from a heavy-duty hook screwed into a garage stud, off the floor and out of the sun. On the road, keep it in a lidded bin or under a cargo net in the basement bay, away from the sewer gear.
Can I store RV tire covers in a plastic bag?
Only if they are completely dry, and a breathable mesh or fabric bag is still the better choice. Any moisture sealed in with vinyl covers turns into mildew and a musty smell. Guides for RV covers say never to put a wet cover into its storage bag.
Do RV tires really need covers?
It depends on where the rig sits. Michelin’s RV tire guide says to cover tires when the vehicle is not in use and to block direct sunlight outdoors. Goodyear says its RV tires do not need covers, but still advises storage out of direct sunlight and UV. If the rig sits in the open for long stretches, covers are a cheap way to keep the sun off the sidewalls.
How do I know what size RV tire cover to buy?
Measure the tire’s outside diameter, from the ground to the top of the tire on level ground, and match it to the maker’s size bands. Camco’s vinyl covers come in bands from 24 to 26 inches up to 40 to 42 inches, and ADCO says to add 1 to 2 inches for protruding wheel covers. Most covers come in pairs, one pair per axle.
Can I leave tire covers on while driving?
No. Wheel and tire covers are made for parked vehicles and must come off before you drive. Make the cover bag part of your pre-departure walkaround so you never pull out with one still fitted.
Where should tire covers go in the RV?
In the bay with the clean outdoor gear, such as wheel chocks and leveling blocks, in a bin or held by a cargo net so they do not slide. Keep them away from the sewer hose and fittings, and remember that everything in the bays counts toward the RV’s cargo carrying capacity.
Bottom line
The best RV tire cover storage is cheap and boring: covers cleaned and dried, folded loosely into a breathable bag tagged with the size and axle, and hung from a heavy-duty hook screwed into a garage stud, or packed in a lidded bin in the bay next to the chocks when you travel. Keep the bags off the floor, out of the sun and away from the sewer gear, never seal damp vinyl in plastic, and take the covers off before the wheels turn. Count your covers, measure the space, then check the hook rating, the bag size and the current price on the listing before you buy.