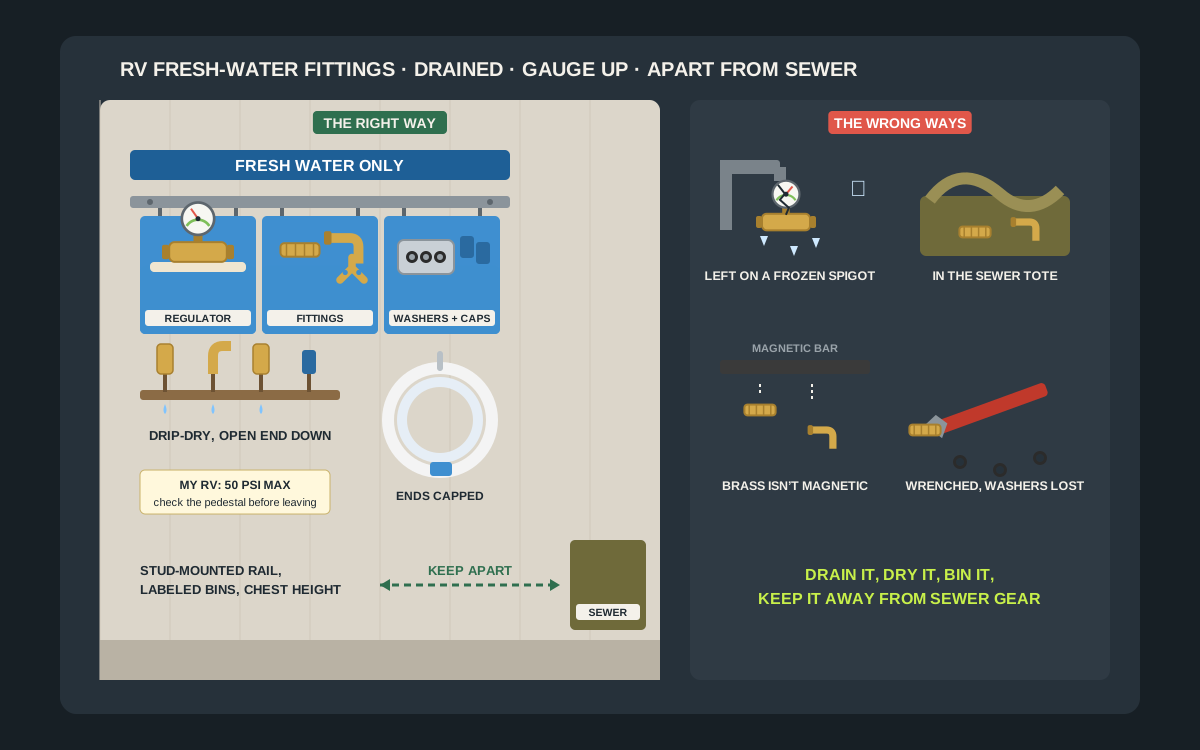
The water pressure regulator is the smallest important part of an RV. It weighs less than half a pound, it costs less than a tank of fuel, and it is the only thing standing between a campground spigot and the plastic plumbing, fittings and water heater in the coach. It also has a habit of disappearing. It gets left screwed onto the pedestal at the last site, it rattles around a wet bay with the sewer fittings, or it spends the winter in an unheated trailer and comes out in spring with a cracked gauge that reads 60 with the water off. The rest of the fresh-water kit goes the same way: the 90-degree elbow that saves the city water inlet, the spare hose washers, the quick-connects, the Y-valve, the end caps and the adapter for a spigot with no threads. None of it needs an expensive answer. A small run of wall in the garage, a few labeled bins and a drip rack, all well under $50, keep every fresh-water fitting clean, dry, together and well away from the sewer gear. This guide covers what is in a fresh-water fitting kit, what Camco, Valterra, Winnebago and Keystone say about regulators and pressure, how to drain and store each part so it survives the winter, which under-$50 wall setups work, and how to pack it for a trip so nothing is left at the pedestal.
Shop RV water pressure regulators on Amazon
Who this is for
- RV owners who use city water at campgrounds and want the regulator and fittings ready for every hookup
- Anyone who has lost a regulator at a pedestal or found one with a frozen, cracked gauge in spring
- Owners who keep fresh-water and sewer gear in the same bay and want a clean, separate home for the drinking-water side
- Weekend campers who store the rig at a lot and bring the small brass parts home for the winter
Quick answer
For most RV owners, the best under-$50 setup is a short rail or louvered panel on the garage wall with two or three labeled hanging bins marked fresh water only: one padded bin for the pressure regulator with its gauge facing up, one for spare fittings such as a fixed regulator, a 90-degree elbow and a Y-valve, and one for a small tin of screened hose washers, quick-connects and hose end caps. Drain and dry every fitting before it goes in, keep the bins well away from the sewer hose and fittings, and bring the regulator inside before the first freeze. Check your RV manual for its maximum water pressure, check bin sizes and hook ratings, and compare the current price on the listing before you buy.
Quick picks
- Best overall: a short rail or louvered panel screwed to the studs with two or three hanging bins labeled fresh water only. Every fitting has a slot, nothing touches the floor and the whole kit lifts off in one move on a travel day.
- Best for a regulator with a gauge: a small padded bin or a soft zip pouch where the regulator lies with the gauge facing up, drained and dry, so the dial is not knocked or crushed.
- Best for washers and small parts: a screw-top tin or a small divided case for screened hose washers, plain washers and O-rings, kept inside the fittings bin so spares travel with the kit.
- Best for drying: a small wall-mounted drip rack or a row of pegs where rinsed fittings drain open end down before they are packed.
- Best for travel: a lidded, labeled fresh-water tote that clips to the same wall in the off-season and rides in a clean compartment, away from the sewer bay, when the rig is out.
- Best on a tight budget: a clear zip pouch per group of fittings on a single stud hook, labeled with a marker, with the regulator in its own padded pouch.
Quick comparison
| Setup | Best for | How it holds | Trade-off |
|---|---|---|---|
| Rail with hanging bins | The whole fresh-water kit | Bins hook onto a stud-mounted rail | Needs a short clear run of wall |
| Louvered panel with bins | Several labeled groups of fittings | Bins hang on louvers, move freely | Panel costs more than a rail |
| Padded bin or zip pouch | Regulator with a gauge | Lies gauge up on a soft pad | Takes a bin for one part |
| Screw-top tin or divided case | Washers, O-rings, small spares | Sits inside the fittings bin | Easy to forget to restock |
| Drip rack or row of pegs | Drying rinsed fittings | Fittings stand open end down | Only useful if you use it |
| Clear zip pouches on a hook | Budget kit, quick to see | Pouches hang on one stud hook | Pouches wear out over time |
| Lidded fresh-water tote | Travel and off-season in one | Hangs on the wall, rides in the rig | Bulkier than bins |
| Small labeled shelf | Spare regulator and hose caps | Fittings sit upright on a shelf | Shelf collects dust and clutter |
Wall-mounted hanging storage binsScreened RV hose washers90-degree RV hose elbows
What to look for
It keeps fresh water apart from sewer gear
This is the rule that matters most. A regulator, an elbow or a quick-connect touches the water you drink, cook with and shower in. RVshare’s advice on hoses is blunt: the hose used to flush the black tank and rinse the sewer hose must be kept separate at all times from the drinking water hose, and tossing hoses into one bin makes cross-contamination a serious concern. Kleen Tank, which cleans RV holding tanks for a living, says keeping sewer hoses and connectors away from other RV tools, and especially from the fresh water hose, is absolutely critical. The same logic applies to every small fitting on the fresh-water side, so its storage should be its own bin, labeled in words, on a different part of the wall from anything that has touched waste.
It lets every fitting drain and dry
Fittings that go into a bin wet stay wet. Water left inside a regulator, an elbow or a Y-valve sits in the dark for weeks, and in an unheated garage or a trailer it can freeze. Retailers who sell Camco’s regulators say to drain and store them indoors before temperatures drop below freezing, because water left inside can freeze and crack the brass body. A good setup has somewhere to stand fittings open end down for an hour or a night before they are put away, and bins with drain holes or open fronts so any last drops can escape.
It protects the gauge
A regulator with a gauge is the most fragile part of the kit. Owners on Forest River’s forums report ruining gauges by leaving them in the camper over the winter, and one owner points out that it is residual water in the small tube inside the gauge, the Bourdon tube, that does the damage. A gauge also breaks the ordinary way, by being dropped or crushed under a heavier fitting. Store it drained, dry, gauge up and padded, on its own or on top of everything else.
It keeps small parts together
Hose washers, O-rings, end caps and the little screened washers that catch grit at the spigot are the parts that go missing and the parts that cause leaks when they do. A small tin or divided case inside the fittings bin, with a few spares of each, means the kit always has a washer when one splits, and the regulator always has the screen it came with.
It is easy to grab on a travel day
The best storage is the one that ends up in the rig. If the fittings live loose in three places, one of them is left behind. Bins that lift off a rail, or a single labeled tote that hangs on the wall when the rig is parked, turn packing into one trip from the garage.
It keeps the kit off the floor and out of the weather
Camco describes its regulators as made for outdoor use, which is about where they are installed, not where they should spend the winter. A garage floor collects water, road salt and dirt, and a bay under the rig collects all of those plus whatever drips from the sewer side. A wall bin at chest height, under a shelf or out of direct sun, keeps brass clean and gauges readable.
What is in a fresh-water fitting kit
Fixed pressure regulators
The simplest regulator is a small brass barrel that threads onto the spigot. Camco’s 40055 is the classic example: brass, lead-free, certified to the NSF/ANSI 372 low-lead standard, with standard 3/4-inch garden-hose threads, and preset to reduce city water to 40 to 50 PSI. Camco lists the maximum incoming pressure as 125 PSI, and one retailer lists the weight at 0.41 pounds. It has no gauge and nothing to adjust, which makes it the toughest part of the kit and a good spare to keep in the bin even if you use another regulator day to day.
Regulators with a gauge
A regulator with a gauge shows the pressure on the outlet side, so you can see that the regulator is working before water reaches the rig. Camco’s 40064 is preset to 40 to 50 PSI like the barrel version, with a gauge on top. Retailer instructions for it say to hand-tighten it onto the pedestal, never to use a pipe wrench on garden-hose threads, and to disconnect and drain it before temperatures drop below 32 degrees Fahrenheit, because trapped water can crack the brass body or the gauge.
Adjustable regulators
Adjustable regulators, such as Valterra’s brass model with a gauge, let you set the outlet pressure with a screwdriver or a knob and usually flow more water than a small barrel. Valterra’s version has a screened inlet washer and the maker cautions against settings above 60 PSI. The gauge and the adjustment mechanism make these the parts most worth storing carefully, and the screen in the inlet is a small part that should be checked and kept, not thrown away.
90-degree elbows
A brass 90-degree elbow at the city water inlet lets the hose hang straight down instead of bending sharply at the connection. Camco says its 22505 elbow prevents hose kinking and eliminates stress and strain on the city water hookup; it is solid brass with a swiveling grip connector and certified to NSF/ANSI 372. Camping World lists a maximum working pressure of 125 PSI for the earlier 22504 version. An elbow is small, cheap and easy to lose, which is a good reason to give it a fixed place in the bin.
Hose washers and screened washers
Garden-hose threads seal on the rubber washer, not on the threads, so a hard, split or missing washer is the usual reason a connection drips. Camco’s 20183 screened washers are 1-inch washers with a stainless steel mesh that catches grit before it enters the hose or the rig. They are sold in packs, they are tiny and they are exactly the kind of part that should live in a tin inside the fittings bin.
Quick-connects, Y-valves, caps and spigot adapters
Many owners add brass quick-connect fittings so the hose clicks on and off, a Y-valve so the spigot can feed the rig and a second hose, end caps that keep dirt out of the hose and fittings, and an adapter for spigots without threads. Camco’s Water Bandit is the best-known adapter: a flexible silicone sleeve that pushes over an unthreaded faucet and gives you a garden-hose thread on the other end, meant for temporary, attended filling rather than a full-time hookup. Each of these belongs in the fresh-water bin, never in the sewer kit, because each one touches drinking water.
What the makers say about pressure and regulators
Use a regulator on every city water hookup
Keystone’s guide to its fresh water systems says to always use a water pressure regulator to control the pressure entering the RV. Winnebago’s operator manuals recommend an in-line regulator to prevent damage to components, connections and seals, and recommend regulators that control water pressure to 50 PSI maximum. Your own RV’s manual is the number that counts, so write its limit on a tag in the regulator bin.
Campground pressure can be very high
When Winnebago’s lifestyle site tested regulators, the reviewer measured 115 PSI at an unregulated hose bib before fitting a regulator, the kind of supply an RV dealer warns about. One RV parts retailer notes that campground supplies can spike well above 100 PSI, far more than most RV plumbing is designed to take. The regulator is cheap insurance against that, but only if it is in the kit when you arrive.
Fit the regulator at the spigot
Retailers who sell Camco’s regulators recommend threading the regulator onto the campground spigot first and then attaching the drinking water hose, so full pressure never enters the hose. That habit matters for storage too: a regulator that lives on the spigot end is the one most likely to be left behind when you pull out, so the last job before leaving a site is to unscrew it, shake it out and put it back in its pouch.
Hand-tight, no pipe dope
Retailer instructions for Camco’s gauge regulator say hand-tight plus a quarter turn, no pipe wrench, and a little thread-seal tape on the male threads only if a connection weeps, never pipe compound. Over-tightened brass threads gall and crack, and a wrench on the body of a gauge regulator can crack the gauge housing. A good bin keeps the regulator away from the toolbox for exactly this reason.
Drain before it freezes
Water expands as it freezes, and a regulator holds a little water in its body and its gauge. Retailers who sell Camco’s regulators say to drain them and store them indoors before freezing weather, and Valterra owners report gauges stuck or ruined after a single winter in the camper. The fix costs nothing: disconnect, shake it out, let it dry gauge up, and bring it into the garage or the house.
Keep fresh-water fittings clean
One wall for fresh water, another for sewer
Give fresh-water fittings their own bins, labeled in plain words such as fresh water only, and put the sewer hose, sewer fittings, black tank rinse hose and gloves somewhere else entirely, ideally on a different wall or at least a different shelf below. Colors help, but labels help more when someone else is putting the kit away. If a fitting has ever been used on the waste side, it stays on the waste side.
Cap the ends
End caps on a hose, a quick-connect or a regulator outlet keep out dust, spiders and grit in the bin and on the road. Joining the two ends of the drinking water hose together does the same job for the hose, and a spare cap or two in the washer tin covers the one that goes missing.
Clean the spigot before you connect
Good Sam’s camping blog warns that past campers may have rinsed their sewer hoses at the site faucet, and suggests disinfecting the faucet area with a spray bottle before you hook up the water hose. A small spray bottle and a cloth can live in the fresh-water bin with the fittings, so the habit comes with the kit.
Rinse and dry at the end of the season
At the end of the season, rinse each fitting in clean water, check the washers and screens, and let everything drain open end down on a rack or a towel for a day. Only then does it go back into its bin. A fitting that smells musty or has a film inside should be cleaned again or replaced before the next trip, not packed and forgotten.
Eight ways to store the kit under $50
A short rail with hanging bins
This is the best home for most kits. Screw a short rail or a strip of bin rail to two studs, hang two or three open-front bins on it and label each one. The regulator, spare fittings and small parts each get a bin, the bins lift off for cleaning, and the whole kit stays in one place at chest height.
A louvered panel with bins
If you also store hoses, filters and cords nearby, a small louvered panel holds a row of hanging bins that can be moved around as the kit changes. Keep the fresh-water bins together on one side of the panel and nothing from the sewer side on it at all.
A padded bin or pouch for the gauge regulator
Line a small bin with a folded microfiber cloth or a piece of foam, or use a soft zip pouch, so the regulator lies gauge up and nothing heavy sits on the dial. If you carry a spare barrel regulator, it can go underneath; the gauge always goes on top.
A screw-top tin for washers
A small screw-top tin, a pill organizer or a divided tackle-style case holds screened washers, plain hose washers, O-rings and a couple of spare end caps. Label it, keep it inside the fittings bin, and restock it whenever you use the last spare of anything.
A drip rack or a row of pegs
A small wall-mounted drying rack, a row of dowel pegs or a short pegboard strip with straight pegs lets rinsed fittings drain open end down before they are packed. It takes a few minutes to use and saves a gauge or a brass body from freezing water.
Clear zip pouches on a stud hook
On a tight budget, put each group of fittings in a clear zip pouch, label it with a marker and hang all of them from one stud hook. You can see every part at a glance, and the pouches can go straight into the rig on a travel day.
A lidded fresh-water tote on the wall
A small lidded tote with a handle can hang on a heavy-duty hook in the off-season and ride in a clean compartment when the rig is out. Mark it fresh water only on the lid and on two sides, and keep the tote out of the bay where the sewer hose lives.
A small labeled shelf
A short shelf above the bins can hold a spare regulator, a spare elbow and the caps for the hose, standing upright. It is the least tidy option on its own, because shelves collect other clutter, but it works well as a top layer over a rail of bins.
Mounting it in a garage
Pick a clean, dry wall
Choose a stretch of wall away from the workbench, the floor drain and the place where the sewer gear is cleaned and stored. Chest height is ideal: high enough to stay clean and dry, low enough to see into the bins and lift them off without a step.
Screw the rail into studs
A rail with three full bins of brass is heavier than it looks. Find two studs with a stud finder, mark them level, and screw the rail into both with the screws the maker supplies. A light adhesive hook is the wrong choice for anything but a single pouch: Command’s Jumbo Utility Hook, for example, is rated at 7.5 pounds.
Brass is not magnetic
A magnetic tool bar is a tempting place to stick small fittings, but brass is not magnetic, so regulators, elbows and quick-connects will not stay on one. Steel hose clamps will, but the fittings themselves need bins, pegs or pouches.
Keep it out of the heat and the cold
Do not hang the bins next to a water heater, a space heater or a sunny window, where a gauge face or plastic parts can warp. In an unheated garage in a cold climate, make sure every part is drained before it goes up; if the garage regularly drops far below freezing, bring the gauge regulator into the house for the winter.
In the RV: fittings that travel
A clean compartment, not the sewer bay
When the rig is out, the fresh-water kit travels in a compartment that has nothing from the sewer side in it. If the only space is a shared wet bay, use a lidded tote with a clear fresh water only label and keep it on the opposite side from the sewer hose.
Hooks inside the coach
A light pouch of fittings can hang on a hook inside a closet or on the back of a door. Our guide to mounting hooks in an RV without damaging walls covers which hooks hold on RV paneling and which ones let go on a rough road.
The last job before you leave a site
Make unscrewing the regulator from the pedestal part of the departure checklist, together with capping the hose ends and checking that the elbow, the Y-valve and any adapter are back in the bin. The pedestal is where regulators are lost.
Cold-weather trips
On trips in freezing weather, many owners run from the fresh tank instead of the hose. Whatever you do, a regulator that is not in use should be disconnected, shaken out and stored inside the coach, not left on the spigot overnight.
A five-minute check before each trip
Read the gauge with the water off
Before a trip, look at the gauge on the regulator. With no water connected, the needle should rest at zero. A needle that sits above zero, sticks or has fogging behind the lens usually means water froze inside the gauge or the gauge was knocked, and it can no longer be trusted. A cheap standalone pressure gauge that threads onto a spigot is a useful second check and fits in the same padded bin.
Check every washer and screen
Open the washer tin and look at the washers in the regulator, the elbow, the Y-valve and both ends of the hose. Replace any that are hard, cracked, flattened or missing, and make sure the screened washer at the regulator inlet is clean and in place. Restock the tin before you close it, so the spares travel with the kit.
Look at the threads
Run a finger over the brass threads on each fitting. Galled, flattened or cross-threaded brass will not seal well and can damage the city water inlet on the rig. A fitting with damaged threads goes in the recycling, not back in the bin, and a quick-connect that no longer clicks firmly should be replaced before it leaks at the campground.
Count the parts
Count what is in the bins against what you use: one regulator in use, a spare if you carry one, an elbow, a Y-valve if you use it, the quick-connects, the end caps and the spigot adapter. A short list taped inside the lid of the travel tote turns this into a one-minute job and catches the part that never came back from the last pedestal.
Pack it clean and on its own
Lift the bins off the rail or take the tote off its hook and put it in the clean compartment of the rig, on its own, before anything from the sewer side goes in. Packing the fresh-water kit first, and keeping it there, is the simplest way to keep the two sides apart for the whole trip.
Three rigs, three setups
Full-time travel trailer couple
A couple who live in a travel trailer and use city water almost every night keep an adjustable regulator with a gauge in a soft pouch, a spare barrel regulator, a 90-degree elbow, a Y-valve and a tin of screened washers in a lidded tote marked fresh water only. The tote rides in the front pass-through, the sewer kit rides at the back, and when the trailer is home for the holidays the tote hangs on a hook in the garage.
Class C weekenders with a storage lot
A family who store a Class C at a lot over the winter bring the small brass parts home in November. The regulator, elbow and quick-connects are rinsed, dried on a pegboard strip for a day and hung in three labeled bins on a short rail beside the drinking water hose, with the RV manual’s 50 PSI limit written on a tag on the regulator bin.
Fifth-wheel owners on a tight budget
Fifth-wheel owners with no spare wall space use three clear zip pouches on one stud hook: regulator, fittings and washers. The pouches go into the rig’s clean bay in April and come back to the hook in October, and the gauge regulator spends the coldest weeks in the house.
Set it up in an afternoon
- Bring every fresh-water fitting you own into the garage: regulators, elbows, Y-valves, quick-connects, adapters, caps and washers.
- Sort out anything that has ever been used on the sewer side and move it to the sewer kit for good.
- Rinse each fitting in clean water, check the washers and inlet screens, and replace any that are hard, split or missing.
- Stand every fitting open end down on a rack, pegs or a towel until it is completely dry inside.
- Choose a clean, dry wall at chest height away from the bench, the floor and the sewer gear, and find two studs.
- Screw a short rail or a small louvered panel to the studs and hang two or three bins on it.
- Label the bins fresh water only and by contents: regulator, fittings, washers and caps.
- Put the regulator in a padded bin gauge up, the spare fittings in the next bin and the washer tin in the last one.
- Write your RV’s maximum water pressure on a tag in the regulator bin and add a pedestal check to your departure list.
Mistakes to avoid
- Leaving the regulator screwed onto the campground pedestal when you pull out.
- Storing fresh-water fittings in the same bin, tote or bay as the sewer hose and fittings.
- Putting a regulator away wet, or leaving it in an unheated rig through a freeze, which can crack the brass body or the gauge.
- Dropping a heavy elbow or a spare regulator on top of a gauge in the bin.
- Using a pipe wrench on garden-hose threads, which can gall the brass or crack a gauge housing.
- Throwing away the screened washer from a regulator inlet, or running out of spare hose washers.
- Sticking brass fittings on a magnetic tool bar, where they will not hold.
- Hanging a full bin rail on drywall anchors or adhesive hooks instead of screwing it into studs.
Related guides
Browse the hub: RV & camping storage under $50 - all guides
- Best RV Fresh Water Hose Wall Holders Under $50
- Best RV Water Filter Cartridge Wall Holders Under $50
- Best RV Sewer Cap & Fitting Wall Organizers Under $50
- Best RV Winterizing Kit Wall Storage Under $50 (Antifreeze, Blowout Plug & Bypass Hoses)
- Best RV Black Tank Rinse Hose Wall Holders Under $50
- Best RV Shore Power Adapter Wall Holders Under $50
- Best Hardware Organizers Under $30 for Screws, Nuts and Bolts
- Best Clear Storage Bins for Garage Organization Under $50
- How to Mount Hooks in an RV Without Damaging Walls Under $50
- Best RV Water Heater Anode Rod & Flush Wand Wall Organizers Under $50 (Anode Rods, Drain Plugs, Tank Rinsers & Sockets)
FAQ
Where should I store my RV water pressure regulator?
Drain it, let it dry, and store it in a labeled fresh-water bin or pouch, gauge up if it has one, away from sewer fittings and off the floor. In the off-season a bin on a clean garage wall works well. Before freezing weather, disconnect it from the spigot and bring it indoors, because water left inside can freeze and crack the brass body or the gauge.
Can I leave the pressure regulator on the RV over the winter?
It is better not to. Retailers who sell Camco’s regulators say to drain them and store them indoors before temperatures drop below freezing, and owners report gauges ruined after a winter in an unheated camper. If it must stay in the rig, shake every drop out first and store it inside the coach, not in an outside bay or on the spigot.
What pressure should an RV water regulator be set to?
Follow your RV’s manual. Winnebago recommends regulators that control water pressure to 50 PSI maximum, Camco’s fixed regulators are preset to 40 to 50 PSI, and Valterra cautions against setting its adjustable regulator above 60 PSI. Write your own RV’s limit on a tag in the regulator bin.
Should fresh-water and sewer fittings be stored together?
No. Keep everything that touches drinking water, such as the regulator, elbow, quick-connects, Y-valve and the drinking water hose, in its own labeled bin or tote, and keep the sewer hose, sewer fittings and black tank rinse hose somewhere else. Once a fitting has been used on the waste side, keep it on the waste side.
Why does my RV hose connection leak?
Garden-hose threads seal on the rubber washer, so a drip at a hose connection is usually a hard, split, flattened or missing washer, not loose threads. Replace the washer before reaching for a wrench, and keep a few screened and plain washers in a small tin in the fittings bin.
Do I need a 90-degree elbow at the city water inlet?
It is not required, but it helps. Camco says its 90-degree elbow prevents hose kinking and reduces strain on the city water hookup by letting the hose hang straight down. It is small and easy to lose, so give it a fixed place in the fresh-water bin.
Bottom line
The best RV water pressure regulator and fitting storage keeps the drinking-water side of the kit clean, dry and together: the regulator drained and gauge up in a padded bin, spare fittings in the next bin, washers and caps in a small tin, all on a stud-mounted rail labeled fresh water only and well away from the sewer gear. Drain everything before it is put away, bring the regulator inside before a freeze, and make the pedestal check part of every departure. Check your RV’s pressure limit, the bin sizes and the hook ratings, and compare the current price on the listing before you buy.