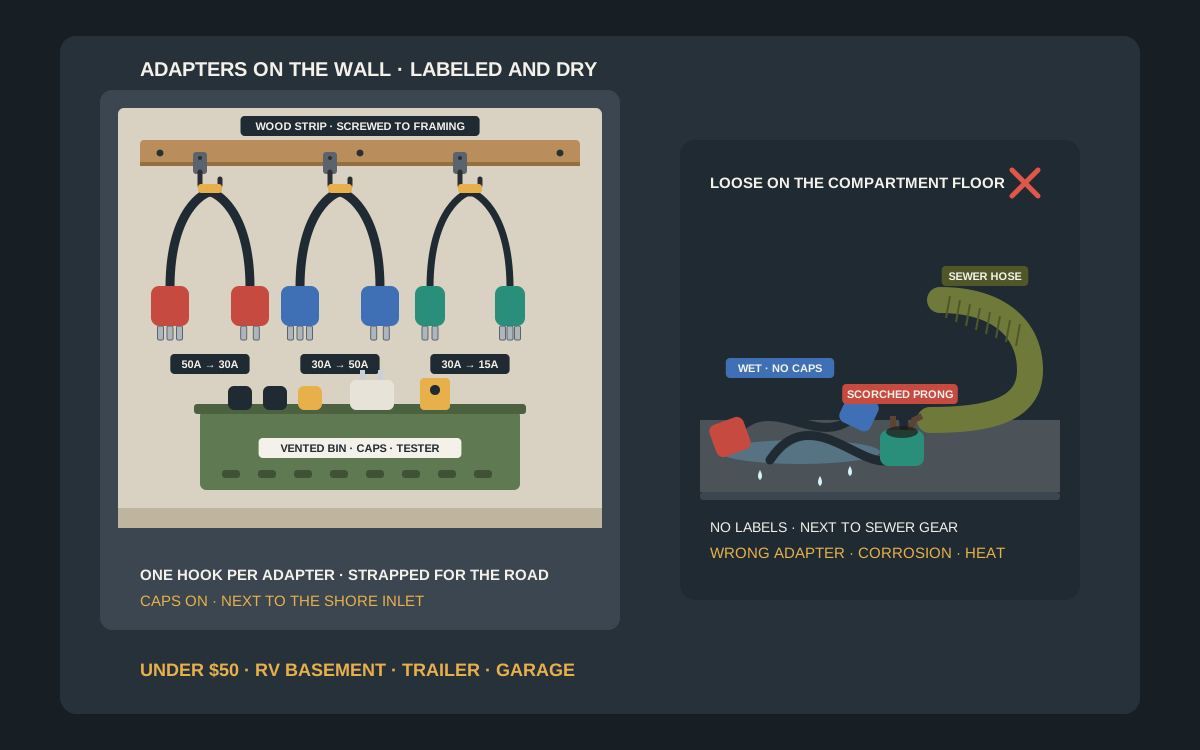
Most RV owners carry at least one shore power adapter, and many carry three: a 50-to-30 amp dogbone for campgrounds with only a 30 amp outlet, a 30-to-50 amp for the reverse, and a 30-to-15 or 20 amp for plugging in at home or a friend’s driveway. They are short, stiff and heavy for their size, so they end up rattling loose in the basement compartment, under the sewer hose or in a bucket with the wheel chocks, and the one you need is never on top. A few under-$50 pieces fix that: smooth hooks or a short bracket with one labeled spot per adapter, a vented bin or pouch for caps and small plugs, all screwed into solid framing near the power inlet. This guide compares the options, explains how to keep adapters dry, clean and safe between trips, and shows how to mount the setup so it survives the road.
Shop RV adapter storage on Amazon
Who this is for
- RV owners with a 30 amp or 50 amp rig who carry one or more dogbone or plug adapters and currently keep them loose in a compartment, bucket or tote
- Weekend campers who also plug in at home or at a friend’s house and want the right 15 or 20 amp adapter in a known spot
- Full-timers who want a tidy, dry power station by the shore inlet, kept apart from water and sewer gear
Quick answer
For most rigs, the best under-$50 setup is a row of rounded or coated utility hooks, or a short hook rail, screwed into the compartment framing near the shore power inlet, with one hook per adapter and a clear label for each: 50 to 30 amp, 30 to 50 amp, 30 to 15 or 20 amp. Hang each dogbone by its cord or handle with a hook-and-loop strap so it cannot bounce off, and fit plug caps so prongs and sockets stay clean. Keep small plug-style adapters and caps in a vented wall bin or a hanging mesh pouch, and keep the whole station away from the sewer and fresh water gear. Check the listing’s current size, fit and price before you buy.
Quick comparison
| Format | Best for | Mounting | Trade-off |
|---|---|---|---|
| Labeled utility hooks | One to four dogbone adapters, each on its own hook | Screwed into compartment framing or a wood strip | Cheap and easy to grab; add straps so adapters do not bounce off |
| Short hook or peg rail | A full adapter set in one row by the shore inlet | Screwed across two fixing points | Neat and easy to label; needs a clear stretch of wall |
| Vented wall bin | Plug-style adapters, caps, a voltage tester and gloves | Screwed through the back, ideally with a lip or lid | Keeps small parts together; heavy dogbones crowd it |
| Hanging mesh pouch | Two or three adapters stored as one grab-and-go kit | Its own closed hook or two screws | Breathes and stays quiet on the road; harder to see which adapter is which |
| Cord storage bracket | A long shore cord with one adapter hung beside it | Screwed into framing | Handles cord and adapter together; one bracket per cord |
| Adhesive utility hook | One light 15 or 20 amp adapter inside a closet or cabinet | Smooth, clean, cured surface indoors | No holes; not for heavy 50 amp dogbones or hot, cold compartments |
Coated utility hooksVented wall binsHanging gear pouchesShore power plug covers
What to look for
One labeled spot per adapter
Adapters look alike in a dim compartment, and grabbing the wrong one wastes time at the pedestal. Give each adapter its own hook or slot and label it with the plug end and the socket end, for example “50A pedestal to 30A rig.” Colored tape on the hook and on the adapter handle makes it faster still. Plan one spare spot for the adapter you will inevitably add later, such as a 20 amp or a short extension.
Hooks that suit heavy, short cords
A dogbone adapter is a short, thick cord with a molded plug at each end, and 50 amp versions are noticeably heavier than 30 amp ones. Choose rounded, coated or rubber-tipped hooks deep enough to cradle the cord, and screw them into framing rather than thin paneling. Avoid sharp screw hooks and narrow cup hooks that can nick the cord jacket. Check the hook’s published weight rating against what you will hang, and add a hook-and-loop strap or a closed hook so the adapter cannot bounce off on rough roads.
Ventilation and dryness
Adapters come back from the pedestal wet with dew or rain more often than people expect. A vented or mesh bin lets moisture escape, while a sealed bag or tote holds it against the prongs and sockets. Whatever you choose, let adapters dry before they go away and keep the station off the compartment floor, where water from hoses and rain collects.
Distance from water and sewer gear
Most RV basements hold power, water and sewer gear within arm’s reach of each other. Keep the electrical station on its own wall section, above and away from the sewer hose and fittings, and away from fresh water hoses. That keeps adapters cleaner and drier, and it avoids handling power gear with hands that just touched the sewer connection.
Fixings that hold on the road
Compartment walls are often thin plywood, composite or plastic, and vibration loosens anything that is only lightly fixed. Screw into framing or a solid wood strip, use short screws that cannot poke through to the outside skin, and choose closed or strapped hooks. Adhesive hooks are a poor fit for heavy adapters in a compartment that swings from cold to hot. In a garage or shed where the RV adapters live between seasons, screw into studs.
Hooks vs rail vs vented bin vs pouch vs cord bracket
When labeled hooks are the best all-rounder
For most rigs, two to four coated utility hooks are the simplest answer. Each adapter gets a spot, you can see at a glance which one is missing, and you can place hooks around the obstacles in a crowded compartment. Hang dogbones by the cord with the heavy plugs pointing down, so the cord is not bent sharply at the plug, and add a hook-and-loop strap around hook and cord for travel days.
When a short rail is neater
If you carry a full set of adapters and have a clear stretch of compartment wall, a short hook rail or peg rail screwed across two fixing points keeps them in one tidy row. Label each peg on the rail itself, and mount it high enough that the longest adapter hangs clear of anything below.
When a vented bin earns its spot
Not every adapter is a dogbone. Some are short, rigid plug adapters, and most hookup kits also include plug caps, a plug-in voltage tester and a pair of gloves. A small vented wall bin keeps those together beside the hooks. Choose one with a lip or a lid so contents stay put when the compartment door opens after a bumpy drive, and do not overload it with heavy 50 amp dogbones.
When a hanging pouch is the answer
A mesh or canvas pouch on a closed hook turns two or three adapters into a single kit you can carry to the pedestal. It breathes, it stops adapters knocking against the compartment wall, and it is quieter on the road. The trade-off is visibility: mark each adapter clearly so you are not unpacking the pouch to find the right one.
When a cord bracket covers both cord and adapter
If your shore cord is detachable and lives in the same compartment, a screwed cord storage bracket can hold the coiled cord with its most-used adapter hung beside it. Our guides to RV surge protector wall mounts and portable power cord wall wraps cover the cord and protector side of the station in more detail.
Which adapters most RVers carry
50 amp pedestal to 30 amp rig
Common at campgrounds where the 30 amp outlet is broken or taken, this adapter lets a 30 amp RV plug into a 50 amp receptacle. The rig still draws within its own 30 amp system; the adapter only changes the connector.
30 amp pedestal to 50 amp rig
For 50 amp coaches at sites with only a 30 amp outlet. It lets you connect, but you only have 30 amps available, so you will need to manage which appliances run at the same time.
30 amp rig to a 15 or 20 amp household outlet
Useful for plugging in at home or in a driveway to keep the fridge and battery topped up. Available power is limited to what that household circuit can supply, so running the air conditioner is usually off the table. Many owners keep this adapter in the house or garage rather than in the RV.
Plug caps and covers
Rubber or plastic caps for the plug ends keep dirt, insects and moisture out of the prongs and sockets when the adapter is stowed. They are inexpensive and worth keeping in the same bin as the adapters.
Keep adapters safe between trips
Dry and clean before you stow
Wipe adapters down after unplugging, let them dry if they are wet, and fit caps before they go on the hook. Dirt and moisture in the prongs and sockets cause poor contact, and poor contact creates heat.
Inspect at every hookup
Before plugging in, look for discolored, melted or pitted prongs, a cracked plug body or a cut cord jacket. Retire any adapter that shows heat damage or feels unusually hot after use instead of hanging it back on the wall. Turn the pedestal breaker off before you connect or disconnect, then switch it on once everything is plugged in.
Do not let adapters hang by the plug
Hanging a heavy adapter by one plug end puts the strain on the joint between cord and plug. Support it by the middle of the cord or a handle, and avoid tight bends right at the plug when you strap it down.
Keep the station away from heat and sun
Compartments on the sunny side of the RV, or next to the water heater or furnace, can get hot. Rubber and vinyl last longer in a cooler compartment, so choose the shadiest bay near the power inlet if you have a choice.
Installing the holders so they stay put
Pick the bay nearest the shore inlet
Mount the holders in the compartment closest to the power inlet or cord hatch, so the adapter you need is one reach away from the pedestal. Stage hooks in the order you use them: surge protector, shore cord, then adapters.
Find solid fixing points
Look for framing behind the compartment wall, or screw a solid wood strip across the wall first and mount the hooks to the strip. Check screw length against the wall thickness so nothing pokes through the outside skin, and pre-drill to avoid splitting thin plywood.
Secure everything for travel
Use closed hooks or hook-and-loop straps so adapters cannot bounce off, give bins a lip or lid, and leave enough space between items that they do not knock together. Our comparison of adhesive and screw-in hooks for RV walls covers fixing options in more detail.
Adhesive only for light adapters indoors
A large adhesive utility hook can hold one light 15 or 20 amp adapter inside a closet or cabinet on a smooth, clean surface, within the hook’s published rating. 3M, for example, lists an application range of about 50 to 105°F for its Command products. Skip adhesive for heavy 50 amp dogbones and in basement compartments that bake in summer and freeze in winter.
Test it, then check it each season
After installing, hang the adapters, strap them, and take a short drive. Open the compartment and check that nothing has moved. Recheck screws at the start of each camping season.
Mistakes to avoid
- Leaving adapters loose on the compartment floor, where water collects and heavier gear lands on them.
- Storing power adapters in the same bin as the sewer hose and fittings.
- Stowing wet or dirty adapters without caps.
- Hanging a heavy dogbone by one plug end, or bending the cord sharply at the plug.
- Using open hooks with no strap in a compartment that sees rough roads.
- Keeping adapters with scorched or pitted prongs instead of replacing them.
- Relying on adhesive hooks for heavy 50 amp adapters in a hot or cold compartment.
- Leaving the adapters unlabeled, so the wrong one comes out at the pedestal.
Related guides
Browse the hub: RV & camping storage under $50 - all guides
- Best RV Surge Protector Wall Mounts Under $50
- Best Portable Power Cord Wall Wraps for RVs Under $50
- Best RV Battery Tender Wall Mounts Under $50
- Best RV Sewer Cap & Fitting Wall Organizers Under $50
- Best RV Fresh Water Hose Wall Holders Under $50
- Adhesive vs Screw-In Hooks for RV Walls Under $50
- Extension Cord Storage Ideas
- Best Portable Solar Panel Wall Mounts Under $50 for Camping Gear Storage
FAQ
Where should I store RV shore power adapters?
Store them on labeled hooks, a short rail or in a vented bin screwed into the compartment nearest the shore power inlet, off the floor and away from the sewer and fresh water gear. Strap or close the hooks for travel and fit plug caps.
How do I keep dogbone adapters from rattling on the road?
Hang each one by the cord on a coated or rubber-tipped hook screwed into framing and wrap a hook-and-loop strap around the hook and cord, or keep two or three adapters together in a hanging pouch on a closed hook so they cannot knock against the wall.
Can I keep shore power adapters in a sealed tote?
Only if they are completely dry, and a vented bin or mesh pouch is the better choice. A sealed tote can trap moisture against the prongs and sockets, which leads to corrosion and poor contact.
Do adhesive hooks work for RV power adapters?
A large adhesive hook can hold one light 15 or 20 amp adapter indoors on a smooth, clean surface within its rating. For heavy 50 amp dogbones and in basement compartments with big temperature swings, use screw-in hooks.
How do I know when to replace a shore power adapter?
Replace it if the prongs are discolored, melted or pitted, the plug body is cracked, the cord jacket is cut, or the adapter gets unusually hot in use. Do not hang a damaged adapter back on the wall.
Should I keep my 15 amp adapter in the RV or the house?
Either works. Many owners keep the 30-to-15 or 20 amp adapter in the garage near the outlet they use at home, and keep the campground adapters in the RV. If you have only one, give it a labeled hook in the compartment so it always travels.
Bottom line
RV shore power adapter wall holders under $50 work when every adapter has its own labeled, dry spot near the power inlet: coated hooks or a short rail screwed into framing for dogbones, a vented bin or pouch for caps and small plugs, and straps or closed hooks for the road. Keep the station away from sewer and water gear, fit caps, inspect prongs at every hookup and replace anything heat-damaged. Check the listing’s current size, fit and price before you buy.