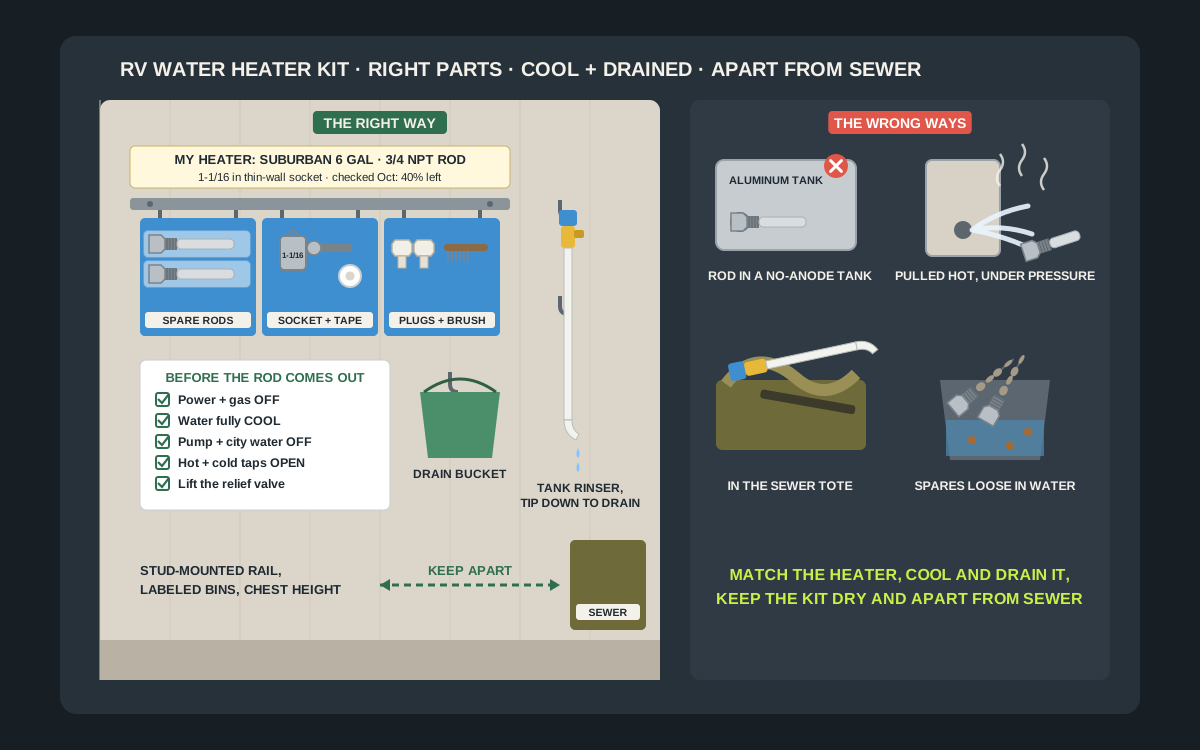
The RV water heater gets serviced once or twice a year, and that is exactly why its tools go missing. The spare anode rod is in a drawer somewhere, the 1-1/16-inch socket is in the mechanic’s set in the truck, the roll of thread-seal tape is in the kitchen, and the tank rinser wand is in the sewer bay, where it should never have been. So the job that should take thirty minutes becomes an afternoon of searching, or it gets skipped, and a steel tank goes another season with a rod that has already been eaten down to the wire. The fix is cheap and boring in the best way: one small run of garage wall, a labeled bin or two, a pair of hooks for the wand and a tag that says which heater you own and which parts fit it, all well under $50. This guide covers which parts belong in a water heater kit for Suburban, Dometic and Atwood heaters, what the makers say about anode rods, drain plugs and flushing, the safe order for getting a rod out of a tank, how to store spare rods so they are still good when you need them, which under-$50 wall setups work, and how to keep the whole kit clean and well away from the sewer tools.
Shop RV water heater anode rods on Amazon
Who this is for
- RV owners with a Suburban tank water heater who inspect or replace the anode rod every season
- Owners of Dometic or Atwood heaters who need a home for spare plastic drain plugs and a flushing wand
- Anyone who has turned the garage upside down looking for the 1-1/16-inch socket on the day the tank needed draining
- Campers who store the rig at a lot or in the driveway and keep the maintenance tools at home between trips
Quick answer
For most RV owners, the best under-$50 setup is a short rail on the garage wall, screwed into studs, with two or three labeled bins: one for spare anode rods or plastic drain plugs sealed in zip bags, one for the socket, ratchet and thread-seal tape, and one for the small extras such as a wire brush, gloves and a rag. Hang the tank rinser wand tip down from two hooks beside the rail so it drains and dries, hang a drain bucket on its own hook, and tape a tag to the rail that names your heater, the rod or plug thread size and the socket size. Keep the kit well away from the black tank wand and sewer gear, check your heater’s manual before buying any rod, and compare bin sizes, hook ratings and the current price on the listing before you buy.
Quick picks
- Best overall: a short rail screwed to two studs with three labeled hanging bins for rods or plugs, socket and tape, and small extras, plus two hooks for the wand. The whole kit is visible at a glance and lifts off in one move on service day.
- Best for spare anode rods: a slim lidded bin or a clear tube long enough for a 9-1/2-inch rod, with each rod kept in its own zip bag with a desiccant pack and a label for thread size and length.
- Best for the flush wand: two plain screw-in hooks or a pair of tool clips that hold the wand level or tip down, so the last of the water runs out and nothing bends the plastic.
- Best for the socket: a magnetic socket rail or a single pegboard socket holder for the 1-1/16-inch socket, extension and ratchet, labeled so the socket goes back to the kit, not into the mechanic’s set.
- Best for travel: a small zip pouch with a spare rod or plug, the socket and the tape that clips to the rail at home and rides in a clean, dry compartment of the rig.
- Best on a tight budget: one stud hook with two clear zip pouches, one for rods or plugs and one for the socket and tape, and a second hook for the wand.
Quick comparison
| Setup | Best for | How it holds | Trade-off |
|---|---|---|---|
| Rail with labeled bins | The whole water heater kit | Bins hook onto a stud-mounted rail | Needs a short clear run of wall |
| Slim lidded bin or clear tube | Spare anode rods up to 9-1/2 in | Rods lie sealed in their own bags | Must be long enough for the rod |
| Two screw-in hooks or tool clips | Tank rinser wand | Wand hangs level or tip down | Clips must fit the wand body |
| Magnetic socket rail | Socket, extension, ratchet | Steel tools stick to the rail | Small parts still need a bin |
| Small parts box with dividers | Plastic drain plugs, tape, brush | Sits inside a bin or on a shelf | Easy to forget to restock |
| Utility hook for a bucket | Drain bucket and rags | Bucket hangs empty and dry | Takes floor-to-hook clearance |
| Clear zip pouches on a hook | Budget kit, quick to see | Pouches hang on one stud hook | Pouches wear out over time |
| Travel pouch on the rail | Spares that ride in the rig | Clips to the rail at home | Duplicates a few parts |
RV water heater tank rinser wandsAnode rod sockets and wrenchesWall-mounted hanging storage bins
What to look for
It matches the parts to your heater
The first job of a water heater kit is to hold the right parts. Suburban tank heaters are protected by a magnesium or aluminum anode rod that comes out with a 1-1/16-inch thin-wall socket. Dometic, which now makes the Atwood line, says its Dometic and Atwood water heaters do not use anode rods at all, and tells owners not to fit aftermarket ones. A kit with the wrong spare in it is worse than an empty bin, so the storage should start with a tag that names the heater brand, the model from the plate inside the outside access door, and the part that fits.
It keeps spare rods dry and sealed
A spare anode rod is designed to corrode. That is its whole job inside the tank, and it does not stop just because the rod is sitting in a damp garage. A good bin keeps each spare in its packaging or a sealed zip bag, off the floor, away from the drain bucket and the hose, and labeled with the thread size and length so you can see what you have without opening anything.
It gives the flush wand a home where it drains
A tank rinser is a stiff wand with a garden-hose fitting at one end, a thumb valve and an angled tip that goes into the drain opening. Camco’s 11691 is listed at 13 inches long and is made of high-impact plastic. After a flush it is full of water and whatever it stirred up from the bottom of the tank. Two hooks that hold it level or tip down let it drain and dry, and keep it from being bent or crushed under heavier tools in a bin.
It keeps the socket and tape with the rods
An anode rod is useless without the socket that turns it. Suburban and RV Education 101 both name a 1-1/16-inch socket for the rod, and the RV Education 101 tool list adds an extension, a small wire brush, mineral oil and thread-seal tape rated for drinking water. Storing the socket, tape and brush in the same bin as the rods is what turns service day into one trip to the wall.
It keeps water heater tools apart from sewer tools
The water heater holds the water you shower in and wash dishes with. The wand that goes inside it belongs with the fresh-water gear. The black tank wand, the sewer hose and the rinse hose belong somewhere else entirely. Two wands that look alike, stored in the same tote, will eventually be swapped, so the water heater wand gets its own hooks and its own label on a different part of the wall.
It is easy to grab on service day
Water heater service happens at awkward times: before a trip in spring, after the last trip in fall, or when the hot water starts to smell. The kit that gets used is the one that is visible, complete and light enough to carry to the rig in one hand. Bins that lift off a rail, or a single pouch that holds the essentials, make that possible.
Know your water heater before you buy a single part
Suburban: steel tank, anode rod
Suburban tank heaters have a steel tank with a glass lining, and the anode rod doubles as the drain plug at the bottom center of the outside panel. Suburban says running without the rod shortens tank life and voids the tank warranty, and recommends replacing it when consumption or weight loss is greater than 75 percent. Camco’s 11562 is a common replacement: magnesium, 9-1/2 inches long on a 3/4-inch NPT thread, sold for Suburban and Mor-Flo heaters. Camco’s catalog also lists an aluminum version, the 11563, at the same length and thread.
Dometic and Atwood: aluminum tank, plastic plug
Dometic and Atwood heaters use an aluminum tank with a clad lining, and they drain through a plastic plug, not an anode. Dometic’s own support page says its Dometic and Atwood water heaters do not use anode rods and tells owners not to use aftermarket anode rods. Its manual for 6- and 10-gallon gas heaters says that replacing the drain plug with an anode rod will damage the coupling. If yours is a Dometic or Atwood, the spares bin holds plastic drain plugs, not rods.
Why the shop shelf can confuse you
Anode rods sold for Atwood-style heaters do exist. Camco lists the 11553 as a magnesium rod for Atwood heaters on a 1/2-inch NPT thread, 4-1/2 inches long, and it sells a rod with a built-in drain. That does not change what Dometic says about its own tanks. When the heater maker and an accessory listing disagree, follow the heater maker, because the warranty and the tank are theirs.
Read the plate before you shop
Open the outside access door and find the rating plate on the heater. Write the brand, the model and the tank size on a tag, then add the part that fits: rod material, thread and length for a Suburban, or the plug size for a Dometic or Atwood. Tape that tag to the rail. It answers the question at the parts counter, and it keeps a well-meaning family member from buying the wrong spare.
Tankless and combination units
Some newer rigs have an on-demand or tankless water heater instead of a tank. Those units have their own maintenance steps in their manual, and many have no anode rod or drain plug to store at all. If that is your rig, the bin holds whatever the manual calls for, and the rest of this guide still applies to the hooks, the labels and keeping the kit away from sewer gear.
What goes in a water heater kit
Spare anode rods or drain plugs
Keep one spare for a Suburban heater, two if you full-time or camp where the water is hard or full of iron. Suburban notes that water with high levels of iron or sulfate speeds up how quickly the rod wears. For a Dometic or Atwood heater, keep a pair of the plastic plugs that match your heater. They are cheap, and an old one that has gone brittle, cloudy or rounded at the hex should not go back in.
The 1-1/16-inch socket and something to turn it
A Suburban rod comes out with a 1-1/16-inch socket, and Suburban specifies a thin-wall socket because the hex sits close to the panel. RV Education 101’s tool list adds a ratchet and an extension. A rod that has been in for a year can be tight, so many owners keep a short breaker bar in the same bin. Owners of Dometic and Atwood heaters often report a 15/16-inch socket for the plug; check yours before you buy.
Thread-seal tape rated for drinking water
Suburban says to put a pipe thread sealant approved for potable water, such as Teflon tape, on the threads of a new rod to prevent leaks. Keep a roll that is labeled for potable water in the kit bin so nobody grabs the gas-line tape or the pipe dope from the plumbing drawer.
The tank rinser wand
A tank rinser goes into the drain opening once the rod or plug is out and sprays fresh water around the bottom of the tank to lift the sediment that a simple drain leaves behind. Dometic’s manual says about two quarts of water stay in the bottom of the tank after draining and that this water holds most of the harmful particles, so it recommends a commercially available flushing tool. The wand is the longest item in the kit, which is why it gets hooks rather than a bin.
The small supporting bits
RV Education 101 lists a small wire brush for the drain port threads and mineral oil to coat them before the new rod goes in. Add a pair of gloves, safety glasses for the moment the rod lets go, a flashlight for the access door, a rag and a small drain bucket or pan. A pencil and a few blank tags let you record the date and what you found each time.
A copy of the steps
Print the draining and anode steps from your heater’s manual, slip them into a plastic sleeve and keep them in the kit bin. The order matters, and a printed page beats a phone with wet hands at the access door.
Before the rod comes out: the safe order
Turn off the power and the gas
Turn off the electric element at its switch, and at the breaker if your rig has one, and turn off the gas side of the heater. An electric element that heats an empty tank, even for a moment, can burn out, so the power stays off until the tank is full again.
Let the water cool completely
Never pull a rod or a plug from a hot tank. RV Education 101 warns never to drain the water heater tank when it is hot or under pressure. Plan the job for the morning after the heater was last used, or switch it off several hours ahead and check that the water from a hot tap runs cold.
Shut off the water and open the taps
Turn off the water pump and disconnect or close the city water supply. Then open a hot and a cold faucet inside the rig to release the pressure in the lines. Camco’s instructions for its tank rinser give the same order: power off, water off, a hot faucet open, then the drain plug.
Lift the relief valve
Open the pressure and temperature relief valve on the outside of the heater by lifting its lever. Heartland’s guide is blunt about why: if you skip cooling the tank and lifting the relief valve, you can be scalded, and water pressure can push the anode rod out at high speed. Opening the valve also lets air in so the tank drains in a steady stream instead of glugging.
Stand to one side and turn
Put the bucket or pan under the drain, stand to the side of the opening rather than in front of it, and turn the socket counterclockwise. Expect a gush of water once the threads let go. Wear the gloves and glasses from the kit bin; the water may be cool, but it carries sediment.
Refill before power goes back on
After the new rod or plug is in, close the relief valve, turn the water back on, and open a hot tap until it runs in a steady stream with no spitting air. Only then turn the gas or electric side back on. Suburban’s manual makes the same point: fill the tank completely and purge the air before turning on the electric element.
Inspect, flush and refit
How often to check the rod
Suburban’s FAQ says to check the anode rod every 6 to 12 months and replace it when more than 75 percent is consumed or only 25 percent remains. Many owners make it part of every spring fill and fall drain. Write the date and an estimate of what is left on a tag after each check; two or three entries tell you how fast your water eats a rod.
What a worn rod looks like
A new rod is a smooth, even cylinder. A worn one is pitted, thin and lumpy, and once the steel core wire in the middle shows through in places, the rod has little left to give. Brush off loose scale so you can see the metal, compare it with the spare in the bin, and replace it if in doubt. A spare costs far less than a tank.
Flush with the wand until it runs clear
With the rod or plug out and the tank empty, connect a garden hose to the wand, put the tip into the drain opening facing down and open the valve. Camco’s instructions say to move the nozzle slowly around inside the tank and keep going for two or three minutes, or until the water coming out is clear. Use a clean garden hose for this, never the black tank rinse hose.
How often to flush
Dometic’s manual for its 6- and 10-gallon gas heaters gives a schedule: full-time RVers every 60 days, or every 30 days in the Southwest, and part-time RVers at least twice a year, or every 90 days in the Southwest. Suburban recommends draining the tank whenever the RV is not being used, which also extends rod life. Hard-water owners will see the difference in what comes out of the drain.
Clean, tape and refit
RV Education 101 says to clean the drain port threads with a small wire brush, coat them with a little mineral oil, wrap the new rod’s threads with tape or sealant approved for drinking water, and start the rod by hand so it does not cross-thread before finishing with the socket. RV LIFE’s tech tips note that Camco recommends one and a half turns of tape on its rods. Snug is enough; the tape does the sealing. On a Dometic or Atwood heater, the plastic plug only needs to be snug as well, and a stripped aluminum thread is an expensive repair.
Eight ways to store the kit under $50
A short rail with labeled bins
This is the best home for most kits. Screw a short bin rail to two studs and hang three open-front bins: rods or plugs, socket and tape, and small extras. Label each bin, tape the heater tag above them, and the whole kit is visible, complete and easy to lift down.
A slim lidded bin or tube for rods
A Suburban rod is about 9-1/2 inches long, so it needs a bin at least that long inside or a clear tube with a cap. Lay each rod in its own zip bag with a small desiccant pack, write the material, thread and length on the bag, and keep the lid closed.
Two hooks for the wand
Two small screw-in hooks, a pair of spring tool clips or two pegboard hooks hold the wand level, or one hook through the hose fitting lets it hang tip down. Either way it drains, stays straight and is easy to see. Put the hooks beside the bins, not near the sewer gear.
A magnetic socket rail
Unlike brass fittings, steel sockets and ratchets stick to a magnet. A short magnetic socket rail holds the 1-1/16-inch socket, the extension and a spare socket for the plug, and a label on the rail keeps them from wandering into the main toolbox.
A small divided parts box
A small divided box holds plastic drain plugs, the tape, the wire brush, a tube of mineral oil and spare tags. It sits inside the second bin or on a short shelf above the rail.
A hook for the drain bucket
A heavy-duty utility hook low on the wall holds the drain bucket upside down so it stays dry and clean. Rags and gloves can live inside it, and it goes out to the rig with everything else.
Clear zip pouches on one hook
On a tight budget, put the rods or plugs in one clear pouch and the socket and tape in another, label both and hang them from one stud hook. A second hook takes the wand. It is not elegant, but every part is visible and it costs very little.
A travel pouch that clips to the rail
A small zip pouch with one spare rod or plug, a short roll of tape and the socket can clip to the rail at home and ride in the rig on long trips. Restock it from the main bins whenever you use something.
Mounting it in a garage
Pick a dry, clean wall
Choose a stretch of wall away from the floor drain, the workbench grinder and wherever the sewer hose is rinsed and stored. Chest height keeps the bins dry, visible and easy to lift, and a wall next to the rest of the fresh-water gear keeps the RV kit together.
Screw the rail into studs
A rail with spare rods, a socket set and a bucket on the hook below is heavier than it looks. Find two studs, mark them level, and screw the rail into both with the screws the maker supplies. Adhesive hooks are for light items only: Command’s Jumbo Utility Hook, for example, is rated at 7.5 pounds.
Leave room for the wand
Leave a clear space about the length of the wand beside or below the bins so it can hang without touching the wall, the bins or anything wet, and so the hose end is easy to reach when you take it down.
Keep the kit out of the damp
Do not hang the rod bin directly above the drain bucket, a floor drain, a utility sink or a dehumidifier outlet. Spare magnesium and aluminum rods last longest dry, so a sealed bag and a dry wall do most of the work.
Storing spare rods so they are ready when you need them
Keep the packaging
Leave a new rod in its original packaging as long as possible; the label shows the material, thread and length. If the packaging falls apart, move the rod into a zip bag and copy that information onto it with a marker.
Label by heater, not just by size
Write which rig and which heater the spare is for, especially if you own two rigs or help a friend with theirs. A Suburban rod and an Atwood-style rod look similar in a dark bin, and the thread sizes are different.
If the water smells
A rotten-egg smell from the hot water is a common complaint with magnesium rods in some water. Suburban says its heaters are protected by a magnesium or aluminum anode, so the rod material is one of the things owners change; ask the heater maker or your dealer which rod suits your water before you buy, and label the bin so the right material goes back in.
Record what you took out
Before the old rod goes in the recycling, take a quick photo of it next to the new one and write the date and percentage left on the tag in the kit bin. Next year’s check will tell you whether the rod lasted longer or shorter than last season, and whether a spare needs to be ordered sooner.
In the RV: what travels and what stays home
A small kit for long trips
On long trips or full-time travel, a pouch with one spare rod or plug, the socket and the tape lets you deal with a leaking plug or a worn rod at a campground. Keep it in a dry, clean compartment of the rig, not the wet bay.
The wand can stay home
Most part-time owners flush at home before and after the season, so the wand can live on its hooks in the garage. Full-timers who follow Dometic’s 60-day schedule will want it along; carry it in a clean bag or tube with the fresh-water gear.
Never in the sewer bay
The water heater kit does not ride in the same bay, tote or bucket as the sewer hose, the sewer fittings or the black tank wand. If space forces a shared bay, use a lidded tote marked water heater and keep it on the opposite side from anything that has touched waste.
Winter storage
When the rig is winterized, the heater is usually drained and bypassed. Many owners leave the rod or plug out over winter so the last of the water can drain, which means it spends the winter out of the tank. Put it back in the kit bin, labeled, rather than leaving it loose in the access door. Our guide to RV winterizing kit storage covers the antifreeze and bypass side.
A season-by-season routine
Spring: refit and fill
In spring, fit the rod or plug with fresh tape, close the relief valve, switch the bypass back to normal and fill the tank before any power goes on. Check the drain for drips once the system is under pressure.
Mid-season: a quick look
For heavy users and hard-water areas, a mid-season drain and flush keeps sediment from building up. Suburban’s 6-to-12-month inspection window means many owners check the rod at the same time.
Fall: drain, flush and inspect
At the end of the season, drain the tank, flush it with the wand until it runs clear, inspect the rod and record what is left. Order a spare now if the rod is near the 75 percent mark, so it is in the bin before spring.
Put the kit back the same day
Rinse the wand, hang it tip down, brush the socket dry, check the tape roll and put every part back in its labeled bin before the garage door closes. The next service day starts with a complete kit.
Three rigs, three setups
Travel trailer with a Suburban heater
A couple with a travel trailer and a 6-gallon Suburban keep two spare magnesium rods in sealed bags in a slim bin, the 1-1/16-inch socket and a short extension on a magnetic rail, and the tape and brush in a divided box. The wand hangs tip down on two hooks beside them, and the tag on the rail records each spring and fall check.
Class C with a Dometic heater
A family with a Class C and a Dometic heater keep two spare plastic drain plugs, a 15/16-inch socket and a roll of tape in one clear zip pouch on a stud hook, the wand on a second hook and a printed copy of Dometic’s flushing schedule in the pouch. There is no anode in the bin on purpose, and the tag says so.
Full-timers with hard water
Full-timers who travel through hard-water country flush every 60 days, so their kit travels: a lidded tote marked water heater holds the wand in a tube, a spare rod, the socket, tape and gloves, and rides in the clean front compartment. In the off-season the tote hangs on a heavy-duty hook in the garage.
Set it up in an afternoon
- Read the rating plate inside the water heater access door and write the brand, model and tank size on a tag.
- Note the part that fits: anode rod material, thread and length for a Suburban, or the plastic plug for a Dometic or Atwood.
- Gather every water heater tool you own: spare rods or plugs, the socket, a ratchet, tape, brush, wand and bucket.
- Move anything that has touched the sewer side, including the black tank wand, to the sewer kit for good.
- Choose a dry wall at chest height away from the floor drain and sewer gear, find two studs and screw a short rail to them.
- Hang three labeled bins: rods or plugs sealed in bags, socket and tape, and small extras.
- Fit two hooks or clips for the wand beside the bins so it hangs level or tip down, and a low hook for the bucket.
- Tape the heater tag and a printed copy of the manual’s draining steps above the rail.
- Add the next inspection date to the tag and to your calendar.
Mistakes to avoid
- Fitting an anode rod into a Dometic or Atwood aluminum tank that the heater maker says does not use one.
- Pulling the rod or plug while the water is hot or the system is still under pressure.
- Turning the electric element on before the tank is full and the air is purged.
- Storing the water heater wand in the same tote or bay as the black tank wand and sewer hose.
- Keeping spare magnesium rods loose in a damp bucket or on the garage floor.
- Buying a spare by guesswork instead of reading the rating plate and the rod’s thread and length.
- Using gas-line tape or pipe dope that is not rated for drinking water on the rod threads.
- Letting the 1-1/16-inch socket drift back into the main toolbox so it is missing on service day.
Related guides
Browse the hub: RV & camping storage under $50 - all guides
- Best RV Winterizing Kit Wall Storage Under $50 (Antifreeze, Blowout Plug & Bypass Hoses)
- Best RV Water Pressure Regulator & Hose Fitting Wall Organizers Under $50 (Regulators, Elbows, Washers & Quick-Connects)
- Best RV Fresh Water Hose Wall Holders Under $50
- Best RV Black Tank Rinse Hose Wall Holders Under $50
- Best RV Water Filter Cartridge Wall Holders Under $50
- Best Magnetic Socket Rail Organizers Under $50 for Garage Walls
- Best Clear Storage Bins for Garage Organization Under $50
- Best Hardware Organizers Under $30 for Screws, Nuts and Bolts
- How to Mount Hooks in an RV Without Damaging Walls Under $50
- Best RV Slide-Out Seal Conditioner & Roof Care Wall Organizers Under $50
FAQ
Does every RV water heater have an anode rod?
No. Suburban tank heaters use an anode rod that also serves as the drain plug. Dometic says its Dometic and Atwood water heaters do not use anode rods, because the aluminum tank has a protective clad lining, and it tells owners not to use aftermarket anode rods. Check the rating plate inside the access door before you buy a spare.
How often should I replace an RV anode rod?
Suburban recommends checking the rod every 6 to 12 months and replacing it when more than 75 percent has been consumed or only 25 percent remains. Water with a lot of iron or sulfate wears rods faster, and draining the tank when the RV is not in use helps them last.
What size socket removes an RV anode rod?
Suburban and RV Education 101 both call for a 1-1/16-inch socket, and Suburban specifies a thin-wall socket. Many owners of Dometic and Atwood heaters report a 15/16-inch socket for the plastic drain plug, but check yours before buying. Store the socket with the spare rods so it is there on service day.
Do I need to depressurize the water heater before removing the anode rod?
Yes. Turn off the power and gas, let the water cool, turn off the pump and city water, open a hot and a cold faucet, and lift the pressure relief valve before loosening the rod. Heartland’s guide warns that skipping these steps can lead to scalding and can let water pressure push the rod out at high speed.
How do I use a water heater flush wand?
With the heater off, cool and drained and the rod or plug out, connect a clean garden hose to the wand, put the tip in the drain opening facing down and open the valve. Camco’s instructions say to move it slowly around inside the tank for two or three minutes, or until the water runs clear. Then close the valve, remove the wand and refit the rod or plug.
Where should I store the anode rod and flush wand?
On a dry garage wall, in labeled bins on a stud-mounted rail, with spare rods sealed in bags, the socket and tape in the same kit, and the wand hanging level or tip down from two hooks so it drains. Keep the whole kit apart from the black tank wand and sewer gear.
Bottom line
The best RV water heater storage starts with knowing your heater: a Suburban gets spare anode rods, a Dometic or Atwood gets spare plastic plugs and no rod. Keep those spares sealed and labeled in a bin on a stud-mounted rail, the 1-1/16-inch socket and potable-water tape beside them, and the tank rinser hanging tip down on two hooks so it drains, all well away from the sewer tools. On service day, turn off the power and gas, let the tank cool, release the pressure and refill before the power goes back on. Check your heater’s manual, the bin sizes and the hook ratings, and compare the current price on the listing before you buy.