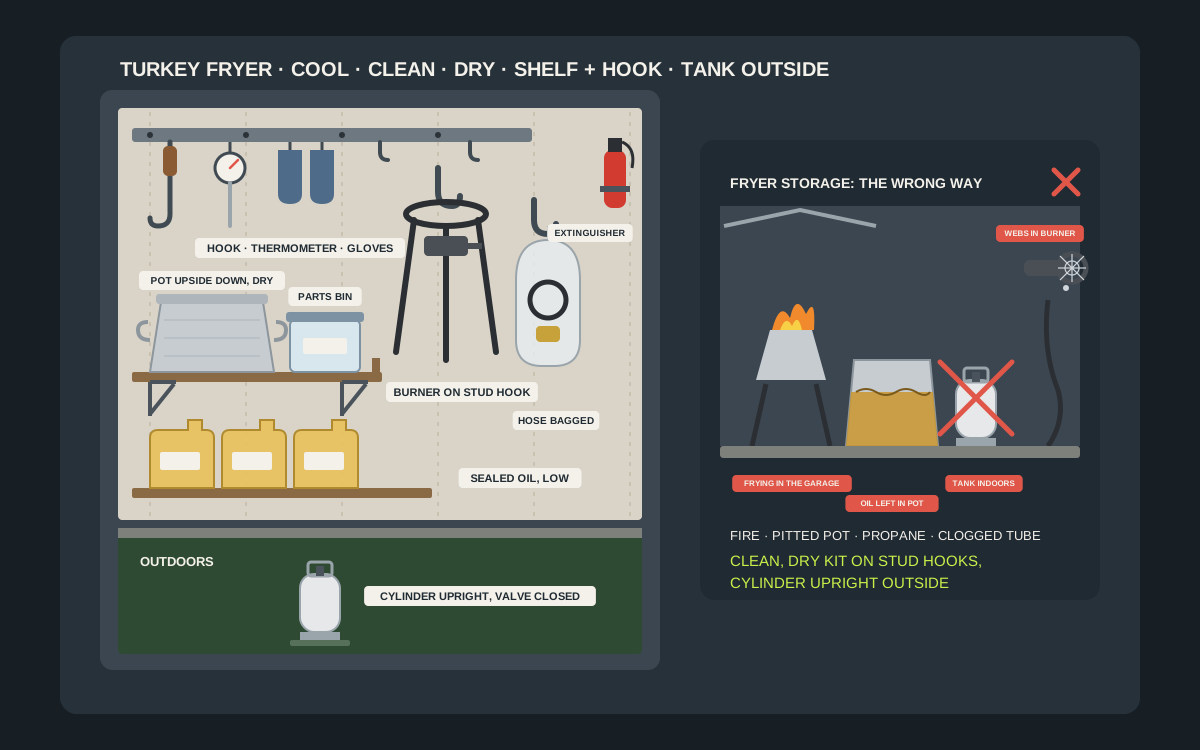
A turkey fryer is one of those things that works hard for one afternoon a year and then spends the other 364 days in the way. After Thanksgiving the kit is scattered across the driveway: a tall aluminum pot, a basket or poultry rack, a lifting hook, a long thermometer, a burner stand with its hose and regulator, a box of gloves and injectors, several gallons of cooling oil and a propane cylinder. Most of it ends up shoved into a corner of the garage, still greasy, where it collects dust, attracts mice and spiders, and turns up next November with a pitted pot and a burner that will not light properly. Storing the kit well is cheap and quick. A sturdy shelf for the pot, a deep hook for the burner stand, a short rail for the tools, one labeled bin for the small parts and a low shelf for sealed oil will keep the whole fryer together, off the floor and ready for next year, usually for well under $50 in hardware. This guide covers how to clean and dry each part before it goes on the wall, which hooks and shelves suit which pieces, where in the garage the kit should live, what to do with the oil and the two safety rules that matter most: the fryer is never used in the garage, and the propane cylinder is never stored there.
Shop heavy-duty garage wall shelves on Amazon
Who this is for
- Anyone who fried a turkey for Thanksgiving and now has a pot, a burner and a pile of accessories to put away
- Owners of outdoor propane burners and stockpots used for crawfish boils, seafood boils, home brewing or canning
- People who opened the fryer box last year to find a pitted pot, a missing thermometer or spider webs in the burner
- Households with a small garage who want the whole kit on one stretch of wall instead of across three shelves
Quick answer
For most garages, the best under-$50 setup is one stretch of inside wall with a heavy-duty bracket shelf screwed into the studs for the pot, and a deep utility hook beside it for the burner stand. Store the pot clean, dry and upside down, or with its lid off, with the basket and poultry rack nested inside. Hang the burner stand by its frame with the hose and regulator wrapped in a bag, and put the lifting hook, thermometer and gloves on a short rail or a few tool hooks above it. Keep the injector, seasoning, drip tray and instructions in one labeled lidded bin, and keep sealed oil jugs on a low, sturdy shelf, never in the pot. The propane cylinder stays outdoors, upright, with the valve closed. Check hook ratings, shelf depths and current prices on the listing before you buy.
Quick comparison
| Storage piece | Best for | How it holds | Trade-off |
|---|---|---|---|
| Heavy-duty bracket shelf in the studs | The fryer pot with basket and rack nested inside | Pot sits upside down or lidless on a deep shelf with a lip | Needs studs; check shelf depth against the pot |
| Deep vinyl-coated utility hook | The burner stand or tripod frame | Hook takes a frame leg or ring; stand hangs flat to the wall | Check the stand weight against the hook rating |
| Short track rail with tool hooks | Lifting hook, thermometer and gloves | Small tools hang in a row above the pot and burner | Rail costs more than single hooks |
| Plastic bag and hook-and-loop strap | Hose and regulator | Loose coil, strapped and bagged, hung beside the burner | Must be dry before bagging |
| Clear latching lidded bin | Injector, seasoning, drip tray, timer, manual | Small parts stay together on the shelf | Takes shelf space |
| Low sturdy shelf or cabinet | Sealed jugs of strained or new oil | Heavy jugs stay near the floor, upright and labeled | Takes floor-level space |
| Large mesh or canvas bag on a hook | A compact fryer kit or a seafood boil pot | Whole pot and parts hang in one breathable bag | Bulky; heavier pots need a shelf |
| Wall-mounted fire extinguisher bracket | An extinguisher by the door you carry the kit through | Extinguisher hangs where you can grab it on frying day | Choose and service the extinguisher separately |
Heavy-duty stud-mounted utility hooksGarage track rail and tool hook kitsClear lidded storage bins with latches
What to look for
A shelf deep and strong enough for the pot
Turkey fryer pots are tall and wide. Many outdoor fryer kits come with a pot of around 30 quarts, and seafood boil and brewing pots can be larger. An empty aluminum pot is light, but a pot with the basket, poultry rack and lid inside is bulky and awkward to lift down from a height. Look for a bracket shelf or a wire shelf at least as deep as the pot is wide, with brackets screwed into studs, and set it at a height where you can lift the pot down with both hands without a step stool. A lip or a short rail on the front stops a round pot from rolling off.
A hook that fits the burner frame
Outdoor propane burner stands come in two broad shapes: a short, wide three- or four-legged stand, and a taller tripod frame with a windscreen. Both have open steel frames that hang well from a deep, vinyl-coated utility hook or a bike-style hook screwed into a stud. The hook needs to be deep enough to take a frame leg or ring without the stand tipping off, and strong enough for a cast-iron burner and steel frame. Check the weight of your stand against the hook rating before you buy, and leave a margin.
Somewhere for the hose and regulator to stay clean
The hose and regulator are the parts that matter most next year, and the parts most often left trailing on the floor. Some burners have a wire hook on the frame for hanging the regulator when it is disconnected from the cylinder. For long-term storage, Bayou Classic’s cooker manuals recommend covering the burner and the hose and regulator assembly with a plastic bag. A storage plan that keeps the hose coiled loosely, off the floor and bagged, rather than kinked behind a shelf, is worth more than any extra hook.
Small-parts storage that keeps the kit together
A frying kit has a surprising number of small pieces: the lifting hook, the thermometer and its clip, the marinade injector, the drip tray or grab hook, the burner’s timer, spare igniter batteries, the manual and sometimes a separate lid. Most of them are the things that go missing between one November and the next. A single labeled, latching bin or a mesh bag on a hook keeps them in one place. Clear bins are best, because you can see at a glance whether the thermometer is there.
A safe, low place for the oil
Several gallons of frying oil are heavy. The Spruce Eats points out that 10 gallons of oil weighs around 80 pounds, and even a typical three-gallon fill is more than 20 pounds. Oil jugs belong on a low, sturdy shelf or a floor-level cabinet, not on a high wall shelf, and never in the fryer pot. Bayou Classic says to store cooking oil in its original container in a dark, cool place, and not in the cooking pot or in metal containers.
Distance from heat, fuel and the car
Fryer gear is greasy and some of it is flammable. Choose a stretch of wall away from the water heater, furnace, space heater and workbench, and away from the shelf where you keep gasoline and solvents. It also needs to be clear of car doors and bumpers, because a pot knocked off a shelf by a door is a dented pot, and a burner stand that falls onto a car leaves a mark.
Know what is in the kit
The pot, basket and poultry rack
The pot is usually aluminum or stainless steel, with a basket or a vertical poultry rack that the turkey sits on, and sometimes a lid and a separate fry basket for fish or wings. Aluminum is light and heats quickly but dents and pits more easily; stainless is heavier and more resistant to stains. Either way, it is the largest item in the kit and the one that decides how much shelf space you need.
The burner stand, hose and regulator
The outdoor burner is a cast-iron or steel burner mounted in a low steel stand, connected to the propane cylinder by a hose and regulator. Some kits add a timer or an automatic shut-off on the gas line. The frame is sturdy and does not mind cold, but the burner tube and the small air shutter at its base are exactly where insects like to nest, and the hose and regulator must stay clean and undamaged.
The tools
A lifting hook or grab hook for raising and lowering the rack, a long thermometer that clips to the side of the pot, heat-resistant gloves, an injector for marinade and sometimes a drip tray. These are the pieces that get lost, because they are small and get put down wherever there is space on Thanksgiving afternoon.
The oil and the fuel
Several gallons of peanut, canola or other high-smoke-point oil, and a propane cylinder. The oil can be stored in the garage if it is sealed and kept low and away from heat; the cylinder cannot be stored in the garage at all, as explained below.
Never fry in the garage
The fryer is used outdoors, away from the house
Before storage, one rule about use, because the garage is often where people are tempted to set up on a cold or wet Thanksgiving. The U.S. Consumer Product Safety Commission advises never using a turkey fryer in, on or under a garage, breezeway, carport, porch or any structure that can catch fire, and placing the fryer in an open area away from walls, fences and other structures. The U.S. Fire Administration says the fryer should be at least 10 feet from your home and not under the roof eaves.
Why fire services take it so seriously
The National Fire Protection Association discourages the use of outdoor gas-fueled turkey fryers altogether, and the National Park Service, summarizing NFPA and UL guidance, notes that fryers tip easily, are often overfilled, can overheat oil when there is no thermostat, and splatter when rain or snow falls into the oil. The USFA also suggests considering an electric fryer or an air fryer instead. If you do fry outdoors, a fire extinguisher kept near the door you carry the kit through is a sensible part of the storage wall.
Let everything cool where it stands
The oil stays dangerously hot for hours after the turkey comes out. Bayou Classic advises allowing two hours or more for the oil to cool, with the lid on the pot, and waiting until it is at or below 115 degrees Fahrenheit before pouring it into a plastic container, because hot oil can melt plastic and cause severe burns. Nothing goes back into the garage until it is cold to the touch.
Clean and dry each part before it goes on the wall
Drain the oil first, never store it in the pot
Once the oil has cooled, ladle or pour it out of the pot into its original container. Bayou Classic suggests dipping a large measuring cup or other pour-spout container into the clean upper layer of the oil, using a funnel, and either discarding the residue at the bottom or straining it through cheesecloth. Its manuals are clear that cooking oil should not be stored inside the pot, because salt and seasonings settle to the bottom and can pit the metal.
Wash the pot, basket and rack properly
Bayou Classic advises letting pots and lids cool gradually, never pouring cold water into a hot pot, and washing them thoroughly in hot, soapy water after every use to remove all traces of food, salt and grease. Scouring pads and aluminum cleaners are fine inside an aluminum pot but will scratch the outside, and polished aluminum will tarnish and dull with normal use, which is cosmetic. Salt water and seasoned oil left to sit are what cause pitting, so do not leave the cleaning for the weekend.
Dry everything completely
Towel-dry the pot, basket, rack, lid, hook and thermometer stem, then leave them open in a dry, warm place for a few hours. A pot that goes onto the shelf damp, with the lid on, can corrode and smell musty by spring. Storing the pot upside down, or with the lid off and leaning, lets any remaining moisture escape.
Clean and protect the burner stand
Bayou Classic’s cooker instructions recommend cleaning the cooker after each use and before storing it, spraying the frame with a hose and wiping it with a soft cloth if needed, and allowing it to dry fully. Its cast-iron burner manuals also suggest a light spray of a water-displacing lubricant on the burner grid once it has cooled, and touching up paint on rusty areas of the frame now and then. Let the stand dry overnight before it is hung.
The propane cylinder stays outside
What the fryer makers say
Bayou Classic’s cooker manuals say that storing the appliance indoors is permissible only if the cylinder is disconnected, that you should detach the cylinder and leave it outdoors, and that LP cylinders must not be stored in a building, garage or any other enclosed area. Close the cylinder valve first, then disconnect the hose and regulator from the cylinder before you move or store the burner.
What the propane industry says
The Propane Education & Research Council says never to use or store a portable cylinder in an enclosed area such as a basement, garage, shed or tent, and warns that even an empty cylinder may contain enough propane to be hazardous. Store the cylinder upright, outdoors, in a well-ventilated spot, with the valve closed, away from heat and out of reach of children. Cold weather does not harm a propane cylinder.
Where the burner and the cylinder meet next year
Because the burner lives inside and the cylinder lives outside, the hose and regulator should stay with the burner, bagged and hung on the same hook. Next year, check the hose for cracks, kinks or damage before connecting it, and perform a leak test as your burner’s manual describes. If the regulator or hose looks worn, replace it with the correct part for your burner.
Choosing the shelves, hooks and bins
Heavy-duty bracket shelves
A bracket shelf is the best home for the pot. Screw the standards or brackets into studs, and choose a board or wire shelf deep enough for the pot’s diameter plus a little room. A shelf with a front lip, or a small strip of wood screwed along the front edge, stops a round pot from rolling. Storing the pot upside down sheds dust, and nesting the basket, rack and lid inside saves space.
Deep utility and bike-style hooks
For the burner stand, use a deep, vinyl-coated utility hook or a bike-style hook screwed into a stud. Hang the stand by a frame leg or ring so it lies flat against the wall rather than swinging. Many three-legged stands also hang well upside down across two hooks. Rubbermaid, for example, lists its FastTrack hooks at 25 or 50 pounds depending on the model, which is enough for most burner stands as long as the rail or hook is screwed into studs. Check the rating against your stand.
Track rails and tool hooks
A short track rail above the pot and burner is the neatest place for the lifting hook, thermometer and gloves. Hang the hook by its handle, clip the thermometer to a small hook with its stem pointing down so it is not bent, and hang the gloves by a clip. A rail lets you add hooks for a seafood boil paddle, a skimmer or a brewing spoon if the same burner does double duty in summer.
Bins and bags
A clear latching bin keeps the injector, drip tray, timer, spare batteries, seasoning and manual together, and keeps out mice. A large breathable mesh or canvas bag on a stud hook suits a compact fryer kit or a lighter pot, but heavier pots, cast-iron pieces and pots with lids belong on a shelf. Label the bin and bag with the date you last cleaned the kit and anything you need to buy before next year, such as a new thermometer battery.
What not to use
Adhesive hooks and light pegboard hooks are the wrong tools for a fryer kit. Command lists its indoor products for roughly 50 to 105 degrees Fahrenheit and its outdoor line for roughly minus 20 to 125 degrees, and every adhesive hook has a weight limit far below a stud-mounted hook. In a cold garage, a burner stand on an adhesive hook is a burner stand on the floor.
Storing the oil safely
Strain, seal and label
If you plan to reuse the oil, strain it once it has cooled and pour it back into its original container with a tight lid. Write the date and the number of frying sessions on the jug. Newport News, Virginia, which publishes turkey frying guidance for its residents, says oil can be kept for up to six months and reused for up to six hours of frying time, and that a container with a tight-fitting lid works best.
Keep it low, cool and dark
Bayou Classic recommends storing oil in its original container in a dark, cool place, and not in the cooking pot or in metal containers. In a garage, that means a low, sturdy shelf or cabinet on an inside wall, away from heaters and direct sun, and well away from the car. Oil that gets very cold turns cloudy and thick; let it come back to room temperature before it goes into the pot next time.
Know when to throw it out
Discard oil that smells sour or rancid, foams heavily, looks very dark or has separated. Never pour it down a sink, toilet or storm drain, where it can clog pipes and septic systems. Newport News suggests sealing it in its container and disposing of it in the trash, solidifying it with sand, sawdust or unscented cat litter first, or taking it to a local recycling or household chemical collection site. Check what your own local authority accepts.
Spiders, mice and the cold garage
Keep insects out of the burner
Spiders and small insects like to build webs and nests inside burner and venturi tubes, and Bayou Classic warns that a clogged venturi can interfere with the flow of air and gas and may result in a fire beneath the appliance. Bagging the burner and hose for long-term storage keeps most of them out. Before you light the burner next year, inspect the tube and clear any obstruction with a narrow bottle brush or a stiff wire as your manual describes.
Do not feed the mice
Greasy pots, seasoning packets and open oil jugs are an invitation to mice looking for winter shelter. A clean, dry pot stored upside down, seasoning in a latching bin and oil in sealed jugs give them little reason to visit. Check the kit once in midwinter for droppings or chewed packaging.
Avoid damp and corrosive spots
Bayou Classic advises against storing its cookers in corrosive environments such as damp areas or salt air. In a garage, that means keeping the kit away from the wall that sweats in winter, from the floor where snowmelt and road salt drip off the car, and from open bags of ice melt or pool chemicals.
Where the kit belongs in the garage
Near the door you carry it through
Put the fryer wall near the door you use to reach the driveway or the yard where you fry. On frying day, everything comes off the wall and goes outside in two or three trips, and after cleaning it comes back the same way. A fire extinguisher on a bracket beside that door is a sensible addition; our guide to fire extinguisher wall mounts covers how to choose and place one.
Heavy and bulky low, small and light high
Oil jugs go lowest, on a floor-level shelf or cabinet. The pot goes on a shelf at about waist to chest height, where you can lift it with both hands. The burner stand hangs at chest height on its hook, and the small tools go on a rail at eye level where you can see them. Nothing heavy should be above head height.
With the rest of the holiday and outdoor cooking gear
If you also store a cooler, grill covers or holiday decorations in the garage, keep the outdoor cooking gear together on one wall. Our guides to cooler wall mounts and to grill and patio furniture cover hooks cover the other big items that come in from the patio in autumn, and our holiday light and decoration storage guide covers the boxes that come out as the fryer goes away.
Mounting it so it stays up
Find and use the studs
Garage walls are usually framed with studs about 16 inches apart. Screw shelf standards, brackets, utility hooks and track rails into the studs. On concrete or block walls, use masonry anchors rated for the load. Our comparison of adhesive and screw-in hooks for garage walls explains which fixing suits which load.
Check the clearances
Leave enough height above the shelf to lift the pot off without hitting the rail, and enough space beside the burner hook that the stand does not swing into the pot. Keep the whole station clear of car doors, the garage door track and any light switch or outlet you need to reach.
Leave room to grow
Many people who buy a turkey fryer later use the same burner for seafood boils, home brewing or canning in summer. A rail with a few spare hooks and a shelf with a little extra width make it easy to add a larger pot, a paddle or a second basket later.
Getting the kit out again next November
Inspect before you plan the menu
Take the kit down a week or two before Thanksgiving, not on the morning itself. Check the pot for pits, dents or a warped base, the basket and rack for bent wires, the thermometer for a cracked lens or a dead battery, and the gloves for holes or stiff, cracked spots. Replacing a thermometer or a pair of gloves in mid-November is easy; finding one on Thanksgiving Day is not.
Check the burner, hose and regulator
Unbag the burner and look through the tube and air shutter for webs, nests and rust flakes, and clear them as your manual describes. Run your fingers along the hose for cracks, stiffness or abrasion, check that the regulator fitting is clean and undamaged, and do a leak test once it is connected to the cylinder outdoors. If any part of the gas line looks doubtful, replace it with the correct part for your burner before you use it.
Test the oil you kept
Open the jug you saved, smell it and look at it. If it is clear, smells normal and has not separated, it can be reused within its limits; if it smells sour, has darkened a lot or has grown cloudy at room temperature, dispose of it and start with fresh oil. Measure how much oil the pot needs with the water method the U.S. Fire Administration and the Consumer Product Safety Commission describe, with the thawed turkey in the pot, rather than guessing from last year.
Consider an electric or oil-less fryer
If you are replacing an old kit, the USFA suggests considering an electric fryer or an air fryer instead of a propane fryer. They still need a stable surface, careful handling and their manufacturer’s instructions, and their storage is simpler: no cylinder, no hose and no burner tube for spiders. The same shelf-and-bin approach works for the base, the basket and the cord.
Three sample setups
Two-car garage, full 30-quart kit
A 36-inch bracket shelf screwed into two studs at chest height holds the pot upside down with the basket and poultry rack inside. A deep utility hook beside it holds the burner stand, with the hose and regulator coiled, strapped and bagged on the same hook. A short track rail above holds the lifting hook, thermometer and gloves, and a clear latching bin on the shelf holds the injector, timer and manual. Two sealed oil jugs sit on a low cabinet, and a fire extinguisher hangs by the door. The cylinder stands upright outdoors.
Single garage, compact fryer and no shelf space
A compact aluminum fryer kit lives in a large mesh bag hung from one stud-mounted hook, pot inside, basket and hook nested in it, thermometer in a small zip pouch. The burner stand hangs on a second hook beside it with its hose bagged. Oil is not reused, so there are no jugs to store; it goes to the local collection site the weekend after Thanksgiving.
Seafood boil and brewing burner, used all year
A larger stockpot and a tall burner frame get used in summer too, so they live on a track rail system near the side door. The pot sits on a heavy-duty shelf at waist height, the burner frame hangs on a bike-style hook, and the rail carries a paddle, a skimmer, the lifting hook and the thermometer. One latching bin holds seasonings and spare parts, and the burner is bagged only for the long winter gap.
How to set it up in an afternoon
- Wait until the oil and the burner are completely cold, then drain the oil into its original container and close the cylinder valve.
- Disconnect the hose and regulator from the cylinder and stand the cylinder upright outdoors, away from the house.
- Wash the pot, basket, rack and lid in hot, soapy water, rinse and dry them completely, inside and out.
- Hose down and dry the burner stand, then coil the hose loosely and bag the burner and the hose and regulator.
- Pick an inside wall near the door you carry the kit through, away from heaters, fuel and the car bays.
- Find the studs, then mount a heavy-duty bracket shelf for the pot and a deep utility hook for the burner stand.
- Add a short rail or a few tool hooks for the lifting hook, thermometer and gloves, and a labeled bin for the small parts.
- Put sealed, labeled oil jugs on a low shelf, hang a fire extinguisher by the door and check the kit once in midwinter.
Mistakes to avoid
- Setting up the fryer inside the garage, or under a carport or porch roof, on a cold or wet day.
- Leaving used oil in the pot, or storing oil in a metal container.
- Putting the pot away before it is completely dry, with the lid clamped on.
- Storing the propane cylinder in the garage with the burner, even when it seems empty.
- Leaving the hose and regulator on the floor, kinked or unbagged.
- Lighting the burner next year without checking the tube for spider webs and nests.
- Hanging the burner stand or the pot on adhesive or light pegboard hooks.
- Storing heavy oil jugs on a high shelf where they are hard to lift down.
Related guides
Browse the hub: Garage wall storage under $50 - all guides
- Best Grill & Patio Furniture Cover Wall Hooks Under $50 for Garage (Winter Off-Season)
- Best Fire Extinguisher Wall Mounts Under $50 for Garage
- Best Cooler Wall Mounts Under $50 for Garage
- Best Holiday Light & Decorations Garage Storage Under $50
- How to Do a Fall Garage Cleanout with Wall Racks Under $50
- Best Portable Camping Stove Wall Mounts Under $50
- Best Affordable Garage Track Rail Hooks Under $50
- Best Narrow Garage Shelving Under $50 for Tight Spaces
- Adhesive Hooks vs Screw-In Hooks for Garage Walls Under $50
FAQ
How do you store a turkey fryer after Thanksgiving?
Let the oil cool completely, drain it into its original container, then wash the pot, basket and rack in hot, soapy water and dry them thoroughly. Store the pot upside down on a stud-mounted shelf with the parts nested inside, hang the burner stand on a deep utility hook with the hose and regulator bagged, and keep the small tools in a rail or a labeled bin. The propane cylinder stays outdoors.
Can I keep the propane tank for my turkey fryer in the garage?
No. Bayou Classic’s manuals say the cylinder must be disconnected and left outdoors if the cooker is stored indoors, and that LP cylinders must not be stored in a building, garage or other enclosed area. The Propane Education & Research Council gives the same advice, even for cylinders that seem empty.
Can I leave the oil in the turkey fryer pot?
No. Bayou Classic advises against storing cooking oil inside the pot, because salt and seasonings settle and can pit the metal. Once the oil has cooled, pour it into its original container with a tight lid, label it and store it in a cool, dark place, or dispose of it properly.
How long can I keep used turkey fryer oil?
Newport News, Virginia, says strained frying oil can be kept for up to six months and reused for up to six hours of frying time, in a container with a tight-fitting lid. Discard it sooner if it smells rancid, foams heavily, darkens a lot or separates.
Is it safe to use a turkey fryer in the garage if the door is open?
No. The Consumer Product Safety Commission advises never using a turkey fryer in, on or under a garage, breezeway, carport, porch or any structure that can catch fire, and the U.S. Fire Administration says to keep it at least 10 feet from your home and out from under the eaves.
How do you keep spiders out of a propane burner in storage?
Clean and dry the burner, then cover the burner and the hose and regulator assembly with a plastic bag for long-term storage, as Bayou Classic suggests. Before the next use, inspect the burner tube and clear any webs or nests with a narrow bottle brush or a stiff wire.
Bottom line
The best turkey fryer storage is one short stretch of garage wall set aside for the whole kit before the oil is even cold. For most homes that is a heavy-duty shelf in the studs for the clean, dry pot with its basket and rack nested inside, a deep utility hook for the burner stand with the hose and regulator bagged, a rail for the hook, thermometer and gloves, one labeled bin for the small parts and a low shelf for sealed oil. Never fry in the garage, never store oil in the pot and leave the propane cylinder upright outdoors. Check hook ratings, shelf depths and current prices on the listing before you buy.