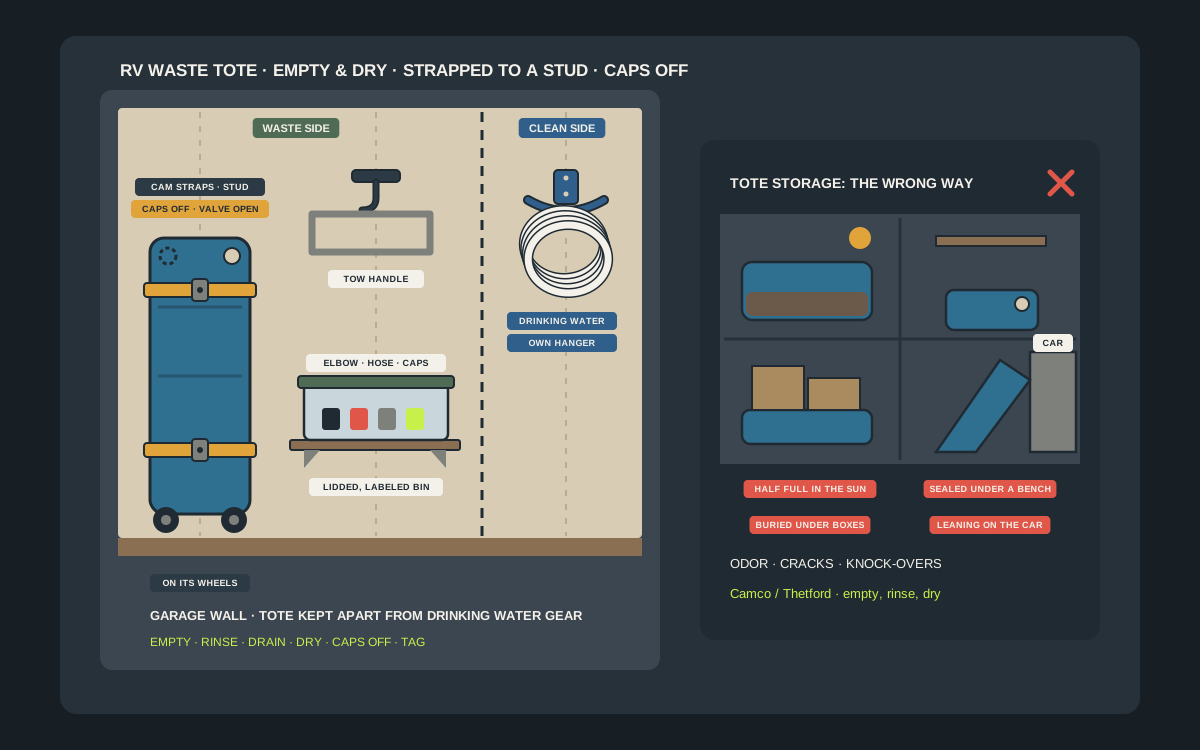
A portable waste tote is the one piece of RV gear that is both large and unpleasant. It is a long, blow-molded tank on wheels, often a couple of feet wide and close to four feet long, and between trips it ends up wherever the garage has a gap: behind the lawn mower, under the workbench, leaning on the car door. That is where the trouble starts. A tote that goes into storage with a little water left in it, caps screwed tight, smells within weeks and can take that smell into everything nearby. A tote that leans loose on a wall gets knocked over, cracks a fitting or scratches a car. A good wall setup costs well under $50 and solves all of it: an empty, rinsed and dry tote, standing on its wheels or lying on a low shelf, held by a strap or a pair of brackets screwed into studs, with its caps off and its fittings in a labeled bin right beside it. This guide covers how big these totes really are, what to hold them with, where on the garage wall they belong, how to empty, rinse and dry one for storage, and how to keep the waste side of the wall apart from the drinking water side.
Shop heavy-duty cam straps for garage wall storage on Amazon
Who this is for
- RV, trailer and camper owners with a portable waste tote who need a clean, safe off-season spot for it in the garage
- Anyone who has found a smelly tote with the caps still on in the corner of the garage in spring
- Owners of 15 to 42 gallon totes who want the floor space back for the car, the mower and the bikes
- Families winterizing the RV who want every piece of waste gear emptied, dried and put away in one place before the first freeze
Quick answer
For most garages, the best under-$50 setup is a pair of heavy-duty cam-buckle straps looped through two anchor screws driven into a wall stud, holding the empty tote upright on its wheels against the wall in the waste-side zone. Before it goes up, empty the tote completely at a dump station, rinse it with the built-in rinser, let it drain and dry with the caps off and the valve open, then tag it. Keep the clear elbow, short sewer hose and caps in a lidded, labeled bin on a stud shelf beside it, and keep the whole zone well away from the drinking water hose and its fittings. Never store a tote that is still holding waste, never store it with the caps tight, and never hang it from a hook that is not rated for its empty weight.
Quick picks
- Best overall: a pair of heavy-duty cam-buckle straps looped through two stud-mounted anchor points, holding the empty tote upright on its wheels against the wall. It costs a few dollars, takes up almost no wall, and works for every model from a 15-gallon Camco Rhino to a 42-gallon Barker.
- Best for a smaller tote: two heavy-duty shelf brackets screwed into studs, forming a low shelf for a 15 or 21 gallon tote laid on its side. Camco lists its Rhino totes at 31.5 to 45 lb empty, so the brackets need a real rating, not a decorative one.
- Best for the accessories: a lidded, labeled bin on a stud shelf for the clear elbow, the short sewer hose, the caps and a pair of gloves, so the fittings are always next to the tote and never in the glovebox of the truck.
- Best for the tow handle: one wide utility hook or a short hose hanger beside the tote, so the removable steel tow bar or the extendable handle hangs where you can see it instead of rattling in the bottom of a bin.
- Best for a tight garage: a wall-mounted vertical rack or a pair of rubber-coated utility hooks that let you stand a small tote on its end, with its wheels in a corner, to free a car-width of floor.
- Best for a full waste-side wall: a short section of rail or pegboard with a strap anchor for the tote, a hanger for the gray hose, a cradle for the sewer hose and a bin for the fittings, labeled and kept apart from the drinking water wall.
Quick comparison
| Storage method | Best for | How it holds the tote | Trade-off |
|---|---|---|---|
| Heavy-duty cam strap on a stud anchor | Any size, standing upright | Strap holds the tote against the wall on its wheels | Needs floor space for the wheels |
| Two stud-mounted anchor points | Totes of 15 to 42 gallons | Two straps at chest and knee height | Two screws into framing, not drywall |
| Pair of heavy-duty shelf brackets | Shorter 15 and 21 gallon totes | Tote lies on its side on a board | Takes more wall length and weight |
| Plywood shelf board with rubber liner | Protecting the shell and holding the tote still | Tote rests on a non-slip liner | Needs proper bracket spacing |
| Rubber-coated utility hooks | Tow handle and light parts | Parts hang on coated hooks in a stud | Not for the whole tote |
| Corner standing strap | Tight garages with a small tote | Tote stands on its end in a corner | Check it is stable on its end |
| Lidded bin on a shelf | Elbow, short hose, caps, gloves | Closed, labeled container | Not for the tote itself |
| Pegboard or rail section | A full waste-side station | Mix of hooks, strap, hanger and bin on one panel | More setup; keep it apart from fresh gear |
Heavy-duty cam strapsStud-mount heavy-duty shelf bracketsLidded storage bins for the fittings
What to look for
Know the size before you buy anything
These tanks are bigger than most people remember. Camco lists its Rhino totes at 13 to 15.5 in high, 20.5 to 25 in wide and 32.25 to 46 in long, depending on whether it is the 15, 21, 28 or 36 gallon model, and Thetford sells its SmartTote2 LX in 18, 27 and 35 gallon sizes. Measure your tote before you pick a method. A strap holds any size standing on end, while a shelf has to be long enough to carry the whole tank.
Empty weight, not full weight
A tote on the wall should always be empty, so the number that matters is the empty weight. Camco lists its Rhino models at about 31.5 lb for the 15 gallon to 45 lb for the 36 gallon, with the full weight of the largest model around 345 lb. Choose brackets, anchors and straps with ratings comfortably above the empty weight, and confirm the rating on the product page.
A sound fixing into framing
A tote is heavy, awkward and long, so the anchors take real force every time it is lifted on or off. Screw the brackets or strap anchors into wall studs, or into a plywood backer that is itself screwed into studs, using the screws the maker specifies. Drywall alone is never enough.
Wide, flat contact points
A blow-molded tank is rigid but not indestructible. A narrow bracket or a thin hook can leave a dent or a stress mark in the shell over a long winter. Look for flat, rounded or padded contact points and straps with a wide web, and keep any sharp bracket edge away from the plastic.
A way to let it breathe
The tote has to air out, so a method that wraps it in a sealed bag or leans it face-first against a wall is the wrong answer. Pick a holder that leaves the caps off, the valve open and air moving through the tank, and keep the tote clear of the wall enough that the outlet can drain.
Easy-wipe surfaces and clear labeling
Anything that touches a waste tote will eventually need wiping down. Choose steel, powder-coated, vinyl-coated or plastic parts you can clean with a disinfecting cleaner, avoid carpeted pads that soak up drips, and put a tag on the tote and a label on the bin so everyone in the house knows this is waste gear.
What counts as portable waste tote gear
The tote itself
Portable waste tanks, also called tote tanks, waste wagons or blue boys, carry waste from the RV to a dump station when the camper cannot reach it directly. Camco’s Rhino line runs from 15 to 36 gallons, Thetford’s SmartTote2 LX from 18 to 35 gallons and Barker offers a 42 gallon four-wheel model. A tote that has carried black or gray water is waste gear from then on.
The clear elbow and the short hose
Most totes ship with a short heavy-duty sewer hose and a clear elbow that adapts the tote’s inlet to the dump station. Camco’s Rhino kit, for example, includes a 3 ft sewer hose with swivel fittings, a clear elbow with a 4-in-1 adapter, a clear double bayonet elbow and several storage caps. All of that is waste gear, and it lives with the tote.
Caps and the rinse connection
Camco’s tote has an integrated tank rinser with a backflow stopper and a second water inlet, and Thetford’s SmartTote2 LX has a rinse port next to its level gauge. The caps for these ports are small, easy to lose, and worth a spot in the bin.
The tow handle or tow bar
Camco ships its tote with a removable steel tow adapter, and Thetford’s four-wheel model has an extendable handle that hooks to a trailer hitch. Both are bulky, and both need a hook of their own beside the tote.
What does not belong here
The drinking water hose, the pressure regulator and the water filter are fresh-water gear and live on a different wall. The gray drain hose and the sewer hose are waste gear too, but each has its own holder and its own guide.
Why a wall beats the floor
It gets the tote off the concrete
A tote lying on a garage floor collects dust, spilled oil and moisture under its belly, and a tote with a slow drip leaves a stain that is hard to remove. A strap on the wall or a bracket shelf keeps the tank clear of all of that.
It saves a car-width of floor
A 21 gallon tote is 40 in long. Stood on end against the wall, it takes about 20 in of floor. For a one-car garage that is the difference between parking inside and parking outside.
It stops knock-overs
A tote leaning loose on a wall gets bumped by cars, bikes and bins, and a tipped tank can crack a fitting. A strap anchored in a stud makes the tote part of the wall.
It is easier to see and to inspect
A tote on the wall at a visible height gets inspected, rinsed and aired out. A tote under the workbench gets forgotten.
Cam straps: the cheapest sound option
How the strap setup works
Two anchor points are screwed into a stud, one around chest height and one about knee height. A heavy-duty cam-buckle strap loops through each and around the tote, so it stands on its wheels and presses lightly against the wall. Total hardware is two anchors and one or two straps.
What to look for in a strap
Choose a wide-web strap with a metal cam buckle, a published working-load rating well above the tote’s empty weight and a smooth finish that will not scuff the shell. A strap with rubber-coated hooks or soft loops is kinder to the plastic than a bare metal hook.
Why it suits most totes
A strap does not care whether the tote is a 15 gallon or a 42 gallon. It also lets the tote stand on its own wheels, which means the strap holds position, not weight.
Use the tote’s own tie-down points
Camco notes that the bottom of its tote has tie-down grooves and an integrated ladder hook, designed for tying the tank down or hanging it on an RV ladder. Those same tie-down grooves are a good place to seat a strap, so check your tote’s manual and run the strap through them.
Shelf brackets: the low-shelf option
When a shelf makes sense
A tote that is shorter, like a 15 or 21 gallon model, can lie on its side on a low wall shelf. Two heavy-duty brackets into studs, with a plywood or heavy-duty shelf board across them, make a platform that holds the tank at a safe height.
Spacing and length
Brackets should sit on studs and span at least two thirds of the tank’s length. A 40 in tote on a shelf with brackets 16 in apart is well supported. A longer tote may need three brackets or a deeper shelf.
Let it drain
Tilt the tote slightly toward its outlet or leave the valve open and the caps off, so any last drops run out. A flat, level shelf with a closed tote is where smells start.
Protect the shell
Put a strip of a non-slip rubber shelf liner on the board so the tote cannot slide and the plastic is not rubbing on bare wood.
Utility hooks and vertical racks for tight spaces
Two rubber-coated hooks
Coated utility hooks, two studs apart, can hold a small tote on its side or hold its tow handle. Choose hooks with a load rating well above the weight of what hangs on them.
Standing it on its end
A small tote can stand on its end in a corner if it is strapped to the wall. This takes the least floor of any layout, but check that the tote is stable on its end and that the strap grips the middle of the tank.
Do not hang it by its wheel axle
The wheel axle and the handle brackets are designed for rolling and towing, not for hanging the whole tote’s weight on a hook. Use a strap or a shelf, and a hook only for light parts.
The fittings bin
One bin, one label
The clear elbow, the short sewer hose, the caps with their lanyards, the rinse hose adapter and a pair of gloves can all live in one lidded bin labeled GRAY AND BLACK WASTE. Put it on a stud shelf right beside the tote, so the kit leaves the garage together.
Keep a spare washer or two
Gasket washers are cheap and they fail at the worst moment. A small bag of spares in the bin saves a trip to the store at the campground.
Clean the bin as well
Wipe or wash the bin once a year with a disinfecting cleaner and let it dry before you repack it. A bin that smells is a bin that was packed damp.
Add a checklist card
Tape a card inside the lid: empty, rinse, drain, dry, caps off, tag. In spring the same card reminds you what to check before the first trip.
Getting the tote ready for storage
Empty it completely at a dump station
Never take a tote into storage with waste still inside. Empty it at a dump station using the short hose and the elbow, with the vent cap open so air can get in and the tank drains fully.
Rinse it with the built-in rinser
Both Camco and Thetford build a rinse connection into the top of their totes. Connect a non-potable rinse hose, never your drinking water hose, and rinse the walls until the water runs clear. Camco notes its rinser has a backflow stopper to keep contaminated water out of the hose.
Drain it and let it dry open
Stand the tote on its end, or lay it so the drain is low, with the valve open and the caps off. Let it air-dry for a day or two. Camco says its tote has a low drain hole and a sloped interior so that it empties completely, and that is exactly what you want to take advantage of.
Clean the outside and the wheels
Wipe the shell, wheels and handle with a disinfecting cleaner. Grit in the wheels and the axle is worth knocking off now, not in spring.
Inspect before it goes up
Look at the valve, the gasket, the cap seals and the shell. A cracked cap or a worn gasket is a five-minute fix in autumn and a messy surprise in July.
Tag it
Tie a tag to the handle that says GRAY AND BLACK WASTE, or add colored tape. It tells everyone in the household what the tote is, including the person who borrows it for a water fight.
Where to put it on the garage wall
Away from the drinking water gear
RV owners are told over and over to keep drinking water and waste gear apart. Put the tote and its bin on one end of the wall and the drinking water hose, regulator and filter on the other, with a few feet and a visible label between them.
Out of direct sun and away from heat
Blow-molded plastic stays stronger away from sunny windows, the water heater and the dryer vent. The tote does not need to be warm, it needs to be dry.
Near the door or the floor drain
A tote that has to go out to the RV, and sometimes comes back with a few drops in it, is best near the garage door or a floor drain, where a spill is easy to deal with.
Not above or beside the car
A tote can drip and a strap can fail. Mount it where a drip cannot reach the paint and where a door cannot hit the tank.
At a height you can lift from
Even an empty tote is 30 to 45 lb in Camco’s range. Choose a height where you can lift it on and off with a straight back, not above shoulder height.
Winter and off-season care
A dry tote in a cold garage
A completely drained and dry tote is fine in an unheated garage. What causes trouble is leftover water, which can freeze in the valve, the gasket and the outlet. If in doubt, tip the tote one more time before the first hard freeze.
Check it once in midwinter
Take a quick look once during the winter for mildew inside the outlet, pests in the bin or a strap that has slipped. It takes a minute.
Plastic gets stiff in the cold
Rubber gaskets and plastic caps stiffen in the cold. Handle them gently the first time you use them in spring, and let the tote warm up before you open a stiff valve.
Keep pests out
Mice like dark spaces, and a tote is a dark space. Leaving the caps off lets air in but can also let a mouse in. A small mesh cover or a loose breathable bag over the outlet keeps them out without trapping moisture.
Spring check before the first trip
Inspect the tank
Look over the shell for cracks, dents and stress marks. Flex the handle and check the wheels spin freely. Replace anything that is cracked or worn.
Test the valve and the caps
Open and close the valve, check that each cap threads on smoothly and replace any gasket that has flattened or cracked.
Restock the bin
Top up gloves and wipes, check the short sewer hose for cracks and make sure the elbow and caps are all there.
Test with clean water only
If you want to check for leaks, run clean water into the tote at home and let it drain into a proper drain, not the garden or the lawn. Never use the drinking water hose for this.
Keeping the holder clean
Wipe the strap and anchors
At the end of each season, wipe the strap web, the buckle and the anchors with a disinfecting cleaner, and let them dry. Replace a strap that is frayed, stiff or stained.
Wash the shelf liner and the bin
Wash the liner and the bin in a utility sink with hot soapy water, and let them dry before you reassemble.
Watch the wall below
A dark mark or a damp patch on the wall or floor under the tote means a drip. Find the cause, dry the tote properly and clean the area before mildew sets in.
Kids, pets and shared garages
Mount it where small hands cannot reach
A strap with a cam buckle is easy for a curious child or a dog to release. Keep the buckle out of reach, and mount the tote where nobody has to squeeze past it.
Keep pet supplies elsewhere
Do not store pet bowls, pet food or a pet water fountain on the waste side of the wall. Give them their own shelf on the clean side of the garage.
Tell the household
A short note on the bin and a word with anyone who uses the garage goes a long way. The goal is that nobody ever uses the tote, its hose or its elbow for anything else.
Shared or rented storage
If the RV and its gear live in a storage unit or a shared garage, the tote can still go on a strap and the bin can still go on a shelf, but add a label and check the unit’s rules on waste gear before you leave anything there.
Three sample setups
The weekend trailer
One 15 gallon tote standing on its wheels against a stud, held by a single cam strap through an anchor screw, a small lidded bin with the clear elbow, the short hose, the caps and gloves on a shelf beside it, and the drinking water hose on its own hanger on the opposite wall.
The motorhome with a four-wheel tote
A 35 gallon four-wheel tote parked on its wheels in the corner, held by two cam straps into two studs, with its extendable handle hung on a hook beside it, and a bin of fittings on a shelf at chest height. The gray hose and the black tank rinse hose hang beside it on their own hangers.
The van with a small tote
A 15 or 21 gallon tote on a shelf made of two heavy-duty brackets and a board with a rubber liner, valve open and caps off, with a small bin of fittings beside it and a tag on the handle.
Strap or shelf: how to choose
Choose the strap if the tote has wheels
Most totes are built to stand on their wheels, and a strap simply keeps them there. It is the cheapest option, it suits every size from 15 to 42 gallons and it leaves the wall free above and beside the tote for hooks and a shelf.
Choose the shelf if the tote is short and the floor is busy
A 15 or 21 gallon tote is short enough to lie on a low shelf, which clears the whole floor beneath it for a mower or a bin. The price is more hardware, a real bracket rating and a lift to shelf height.
Choose both on a shared wall
In a busy garage, a strap holds the big four-wheel tote on the floor while a shelf above carries the fittings bin, the tow handle and the spare caps. The two cost very little together and take one afternoon.
Measure twice
Hold a tape measure against the tote, not against the brochure. A strap needs a clear patch of wall about as wide as the tank, and a shelf needs a clear run as long as the tank. Allow a few inches either side so the tote lifts on and off without scraping the wall or the car.
Where the $50 goes
Straps and anchors
A pair of heavy-duty cam straps and two stud anchors come to a small part of the budget. Prices move, so check the current listing.
Brackets and board, if you go with a shelf
A pair of heavy-duty shelf brackets and a board take most of the rest, and they are the better choice if you want to store more than the tote.
Bin, labels and spares
A clear lidded bin, a roll of colored tape, a tag and a bag of gasket washers finish the setup for a few dollars more.
What a wall holder will not fix
A cracked tote or a leaking valve
Storage keeps a good tote good, but it will not repair a cracked shell or a valve that drips. Replace or repair it.
A tote that is too heavy for you to lift
A wall strap cannot help with a tote that you cannot lift. If lifting an empty tote onto the wall is a problem, store it on the floor on its wheels in the waste zone, with a strap to stop it rolling.
Local rules
Where and how you can dump waste is set by campgrounds, parks and local rules, not by your storage setup. Always use a proper dump station.
How to set it up in an afternoon
- Gather every tote item: the tank, elbow, short hose, caps, tow handle, gloves and tag.
- Empty the tote at a dump station, rinse it with the built-in rinser and let it drain.
- Clean the shell, wheels and handle with a disinfecting cleaner and let everything dry open.
- Pick the waste-side wall, away from the drinking water gear, the car and any sunny window.
- Find a stud with a stud finder and screw in the two anchor points, or mount the brackets.
- Stand the tote on its wheels against the wall, or lay it on the shelf, and tighten the strap.
- Leave the valve open and the caps off, or fit a breathable cover on the outlet.
- Put the elbow, short hose and caps in a lidded bin, label it and put it on a shelf beside the tote.
- Hang the tow handle on a hook and tag the tote.
- Check the drinking water hose and its fittings are well away on the clean side.
Mistakes to avoid
- Storing the tote with waste still inside.
- Putting the caps on tight and sealing the tank, so odors stay in and the inside never dries.
- Leaning the tote loose against a wall or a car door.
- Hanging the tote from its wheel axle or its handle brackets.
- Mounting brackets or anchors into drywall alone.
- Storing it by a sunny window, the water heater or the dryer vent.
- Rinsing it with the drinking water hose.
- Stacking heavy boxes on top of a tote lying on the floor.
- Leaving the elbow and caps loose in the garage, where they get lost.
- Forgetting the label, so someone borrows the tote or its hose for something else.
Related guides
Browse the hub: RV & camping storage under $50 - all guides
- Best RV Gray Water Hose Wall Holders Under $50 for Garage (Off-Season)
- Best RV Sewer Hose Support Wall Storage Under $50
- Best RV Black Tank Rinse Hose Wall Holders Under $50
- Best RV Sewer Cap & Fitting Wall Organizers Under $50
- Best RV Winterizing Kit Wall Storage Under $50
- Best RV Holding Tank Treatment Wall Organizers Under $50
FAQ
Should I store my RV waste tote empty or with a little water in it?
Empty. Dump it completely, rinse it with the built-in rinser, drain it and let it air-dry with the valve open and the caps off. Camco’s Rhino has a low drain hole and a sloped interior so the tank empties fully, and Thetford’s SmartTote2 LX has a rinse port beside its level gauge.
How heavy is a portable waste tote when it is empty?
It depends on the size. Camco lists its Rhino totes at about 31.5 lb for the 15 gallon to 45 lb for the 36 gallon, so choose straps and brackets with ratings well above that and mount them into studs.
Can I hang a waste tote on a wall hook?
Not by itself. A tote is long, heavy and awkward, and its wheel axle and handle brackets are not designed to hang the whole tank. Hold it with a strap anchored into a stud or rest it on a pair of heavy-duty brackets, and use hooks only for the tow handle and light parts.
Is it OK to store a waste tote in an unheated garage?
Yes, if it is completely drained and dry. Trapped water is what causes trouble in a freeze, so tip it one more time before the first hard freeze.
Where should the tote go in the garage?
On the waste side of the wall, well away from the drinking water hose, regulator and filter, out of direct sun and away from the car. Label the zone so everyone in the house knows what it is.
Should I leave the caps on?
No. Leave the valve open and the caps off, or fit a breathable cover over the outlet, so air can move through the tank. Keep the caps in the labeled bin next to the tote.
Bottom line
A portable waste tote is easy to hide in a corner and easy to regret. Give it a home: a heavy-duty strap anchored into a stud, or a pair of sturdy brackets, on the waste side of the garage wall, with a lidded bin for the elbow, short hose and caps beside it and a clear label on everything. Empty, rinse, drain and dry the tote before it goes up, keep the valve open and the caps off, keep it well away from the drinking water hose, and check it once in spring. That is all it takes to start the next season with a clean, dry, ready tote and a fresh water side you can trust.
Shop heavy-duty cam straps for garage wall storage on Amazon