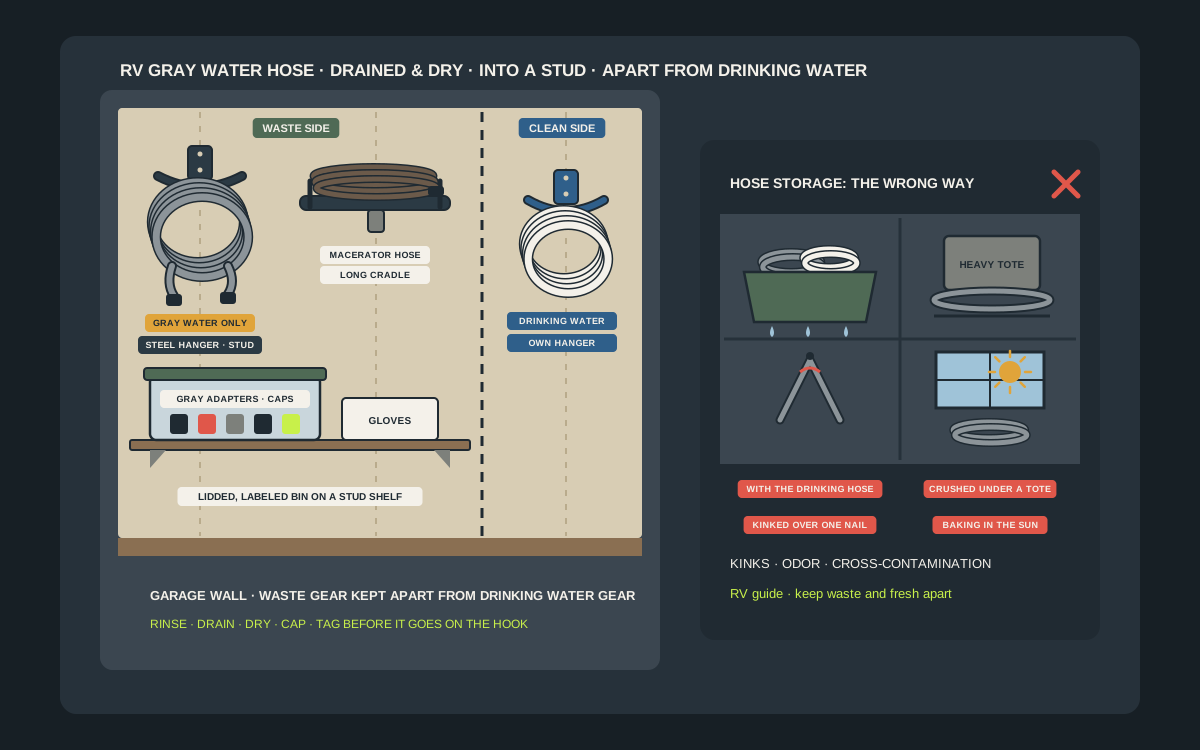
Most RV owners think about the big three-inch sewer hose and forget the gray water gear until it is stuffed in a bucket in the corner of the garage, still damp and smelling of dish soap. Yet a lot of rigs come with a second waste line: a garden-style drain hose that clips to a gray-water adapter, a narrow macerator discharge hose, or a short dedicated hose for a separate gray outlet on a trailer, van or teardrop. Between trips and over the winter that hose needs a home that is dry, off the floor, clearly labeled and well away from the drinking water hose. A good wall holder does all of that for well under $50. This guide covers which hoses count as gray-water gear, what to hang them on, where on the garage wall they belong, how to clean and dry them before storage, and how to set up a waste-side wall that keeps the fresh water side clean.
Shop heavy-duty hose hangers for the garage on Amazon
Who this is for
- RV owners with a dedicated gray water drain hose, a garden-hose drain adapter or a macerator pump who need an off-season spot in the garage
- Owners of trailers, vans and teardrops with a separate gray outlet and its own small hose and fittings
- Anyone who has found a damp, smelly hose in the bottom of a tote with the drinking water gear
- Families getting the RV ready for winter storage who want every hose drained, labeled and hung before the first freeze
Quick answer
For most garages, the best under-$50 setup is a heavy-duty hose hanger with a wide, rounded saddle, screwed into a stud on a waste-only section of the wall, with a lidded bin for adapters and caps on a shelf below. Rinse the hose where the dump station allows, let it drain completely, cap or bag the ends, coil it loosely and tag it GRAY WATER ONLY before it goes on the hook. Keep it on a different wall or clearly separated zone from the drinking water hose, out of direct sun and off the floor. A macerator discharge hose wants a long cradle or two wide hooks rather than a tight coil, and the small fittings belong in a closed container, not loose in the loops.
Quick picks
- Best overall: a heavy-duty steel or stainless hose hanger with a wide, rounded saddle, screwed into a stud on the waste side of the garage wall. Liberty Garden rates its 681 stainless and 691-B steel hangers for 125 ft of 5/8 in garden hose, far more than any gray drain hose, so the coil hangs loose instead of kinking.
- Best budget pick: a resin J-hook hose hanger such as Suncast’s 100 ft J-Hook model, which is about 6 in wide and 12.5 in tall and is a tidy fit for a 15 to 25 ft gray drain hose or a dedicated garden-style waste hose.
- Best for macerator hoses: a long padded cradle or a pair of rubber-coated utility hooks two studs apart, so a 1-1/2 in discharge hose like Thetford’s 21 ft Sani-Con hose can rest in wide loops instead of a tight coil.
- Best for adapters and small parts: a lidded, labeled bin on a stud-mounted shelf for gray-water drain adapters, hose thread caps, spare washers, gloves and a wipe bottle, so nothing small rides loose in the coil.
- Best for tight garages: a single deep stud hook holding the hose in a breathable mesh or vinyl storage bag with a handle. The bag keeps drips and grit contained and lifts off in one move on trip day.
- Best for a full waste-side wall: a short run of rail or pegboard on the waste side with one hanger for the gray hose, one for the black tank rinse hose, a cradle for the main sewer hose and a bin for fittings, all labeled and kept away from the drinking water wall.
Quick comparison
| Holder style | Best for | How it holds the hose | Trade-off |
|---|---|---|---|
| Heavy-duty steel hose hanger | Most gray drain hoses | Loose coil in a wide saddle on a stud | Heavier; needs proper screws |
| Stainless hose hanger | Damp garages and coastal climates | Loose coil in a rust-resistant saddle | Costs a little more |
| Resin J-hook hanger | Short, light gray hoses | Coil over a molded hook with nozzle hook | Less rigid under heavy loads |
| Long cradle | Macerator discharge hoses | Wide loops resting along a long support | Takes more wall length |
| Two rubber-coated utility hooks | Stiff or bulky hoses | Loops spread across two studs | Hose can slide if bumped |
| Hose bag on a deep hook | Hoses that also travel in the RV | Coil zipped in a bag hung by its handle | Bag needs washing; must breathe |
| Lidded bin on a shelf | Adapters, caps, washers, gloves | Closed, labeled container | Not for the hose itself |
| Pegboard or rail section | A full waste-side station | Mix of hooks, cradle and bin on one panel | More setup; keep it apart from fresh gear |
Stud-mount hose hangersGray water drain adaptersLidded storage bins for the shelf
What to look for
A wide, rounded saddle
A hose stored for months on a narrow nail or a thin wire hook takes a set where it bends. Look for a hanger with a broad, curved saddle at least a few inches deep, so the coil rests in a gentle arc. Powder-coated steel, stainless or thick resin hangers all work; the shape matters more than the material. For a macerator hose, two wide hooks or a long cradle spread the loops even further.
More capacity than you need
Hose hangers are rated by how much garden hose they hold, and the ratings are generous. Liberty Garden lists its 681 stainless and 691-B steel hangers at 125 ft of 5/8 in garden hose, and Suncast lists its J-Hook hanger at 100 ft of 5/8 in expandable hose. A 15 to 25 ft gray drain hose fills a fraction of that, which is exactly what you want: room to coil loosely and hang a small bag of caps beside it.
A sound fixing into framing
A drained hose is light, but a hanger also takes a yank every time the coil comes off. Screw the hanger into a wall stud with the screws the maker specifies, or into a plywood backer that is itself screwed into studs. Some hangers ship without hardware; Liberty Garden notes that its hangers have 1/2 in mounting holes and that hardware is not included, so check before you start.
Easy-wipe contact points
Anything that touches a waste hose will eventually need cleaning. Choose a powder-coated, stainless or plastic surface that you can wipe down with a disinfecting cleaner, and avoid carpeted or fabric-lined holders that soak up drips. A lidded plastic bin for adapters can go straight into a utility sink.
A place for the fittings
Gray-water gear is mostly small parts: drain adapters, thread caps, spare washers, a swivel connector, a 90-degree elbow. A hanger with a built-in nozzle hook or a small shelf helps, but the best answer is a closed, labeled bin on the waste side, so nothing small rides loose in the coil or drops behind the shelving.
Clear labeling
Every guide to RV hoses comes back to one rule: keep drinking water gear and waste gear apart. A tag on the coil, colored tape on each end and a label on the bin make the split obvious to everyone in the house, including the person who borrows the hose in July to water the garden.
What counts as gray water hose gear
Garden-style gray drain hoses
The most common setup is a garden-thread hose used to drain the gray tank through an adapter. Valterra’s Gray Water Drain Adapter, for example, fits bayonet sewer fittings, works with 1/2 in or 5/8 in waste water hose and has a 3/4 in garden hose connection with a plug. Camco’s Easy Slip Grey Water Drain Adapter does a similar job and also lets you attach a garden hose to rinse the sewer hose. Whatever hose you use this way is waste gear from then on.
Separate gray outlets and drain connectors
Some trailers, vans and teardrops have a separate gray outlet with its own valve. Valterra’s 1-1/2 in x 3/4 in Drain Connector, which has 1-1/2 in female pipe threads on one end and a 3/4 in garden hose thread on the other, is one example of the fittings used to drain such an outlet into a hose. That connector, its 90-degree version and the hose they feed all belong on the waste side of the wall.
Macerator discharge hoses
A macerator pump pushes tank contents through a narrow hose. Thetford’s Sani-Con Turbo systems, for example, use a 1-1/2 in diameter hose that extends to 21 ft, with a nozzle that fits several dump station inlet sizes and caps for the nozzle. That hose usually carries both gray and black water, so treat it as fully contaminated and store it the same way.
Short dedicated gray sewer hoses
Some owners keep a short length of standard RV sewer hose only for the gray tank, for example to dump gray water at a full-hookup site while leaving the main hose stowed. It still carries waste water and still needs the same rinse, drain, cap and label routine. If it is the full-size 3 in style, the storage advice in our sewer hose guide applies as well.
What does not belong here
The drinking water hose, the pressure regulator and the water filter are fresh-water gear and live on a different wall. The black tank rinse hose is also waste-side gear, but it has its own holder and its own guide. A portable waste tote is waste-side gear too, but it is far bulkier than a hose and needs its own spot on the waste side, emptied, rinsed and dry, never hung on a hose hanger.
Why gray water gear needs its own spot
Gray water is still waste water
Gray water from sinks and showers carries soap, food residue, grease and bacteria. It is cleaner than black water, but it is not clean, and a hose that has carried it is not suitable for drinking water or for filling a fresh tank. Campgrounds treat it as waste too: Bryce Canyon National Park, for example, tells campers to dispose of gray water and sewage at the dump station or outside the park.
Cross-contamination is the real risk
The danger in the garage is not the gray hose itself, it is the gray hose touching the drinking water hose, the fresh-water fittings or the filter. RVshare warns that once hoses are stored together, cross-contamination becomes a serious concern, and Poulsbo RV advises storing fresh water hoses separately from sewer hoses. A dedicated holder on its own section of the wall is the simplest way to make that separation permanent.
Mix-ups happen in summer
Off the RV, a garden-thread gray hose looks like any other garden hose. Someone grabs it to fill a kiddie pool or water the vegetable bed, or it ends up on the drinking water hanger after a trip. A clear tag, colored ends and a separate hanger stop that from happening.
Damp hoses smell and degrade
A hose that goes into storage with water in it grows odor and mildew, and in an unheated garage leftover water can freeze. Hanging the hose open and loose lets it finish drying, and a wall spot keeps it off a cold, damp floor.
Holder styles that fit a $50 budget
Steel or stainless hose hangers
A heavy-duty hose hanger is the workhorse of this setup. It screws into a stud, takes a loose coil in a wide saddle and costs well under $50. Stainless steel suits a damp garage; powder-coated steel is fine indoors. Look for a model with a lip at the front to keep the coil from sliding off when you brush past it.
Resin J-hook hangers
Resin hangers are light, cheap and easy to wipe. Suncast’s J-Hook hanger, for example, is about 6 in wide, 5 in deep and 12.5 in tall with a nozzle hook, which is plenty for a short gray drain hose. They are less forgiving of a heavy load than steel, so keep them for light hoses and screw them into framing.
Long cradles and paired utility hooks
A stiff or bulky hose, such as a macerator discharge hose or a short 3 in sewer hose, stores better in a long cradle or across two rubber-coated utility hooks set two studs apart. The hose rests in wide loops with no tight bends, and you can lift it off without uncoiling.
Hose storage bags on a deep hook
A mesh or vinyl hose bag with handles is a good fit if the hose has to travel in the RV during the season and live in the garage in winter. The coil goes in the bag, the bag goes on a single deep stud hook, and drips and grit stay inside. Choose a bag that you can wash and that breathes, so trapped moisture can escape.
Lidded bins on a stud-mounted shelf
The small parts need a closed container. A clear, lidded plastic bin on a shelf below the hanger holds adapters, caps, washers, gloves and a wipe bottle. Clear sides let you see what is inside, and the lid keeps dust and pests out over the winter.
Where to put it in the garage
Build a waste side and a clean side
The rvwaterfilterstore guide to campsite hoses describes two working zones: a clean side for the drinking water hose, regulator, filter and fresh-water fittings, and a service side for the sewer hose, flush equipment, gray-water hose, rinse tools and gloves. Copy that in the garage. Put the gray hose holder on the service side, ideally on a different wall from the drinking water hose, or at least a few feet away with a clear gap.
Near a drain or a utility sink
If the garage has a floor drain, a utility sink or a hose bib, mount the waste-side wall nearby. That makes the final rinse and the spring check easier and keeps any drips away from the parts of the garage where you store food, pet supplies or the drinking water gear.
Out of the sun and away from heat
Vinyl and rubber hoses age faster in sunlight and heat. Keep the hanger away from a south-facing window, the water heater and any space heater, and do not mount it above the car where it can drip on the paint.
At a height you can reach with gloves on
Mount the hanger at about shoulder height, so you can lift the coil off with both gloved hands without a step stool. The bin shelf can sit just below, around chest height, where you can read the labels.
Getting the hose ready for storage
Rinse where it is allowed
After the last dump of the season, rinse the gray hose with your non-potable rinse hose at the dump station, if the station allows it, and let it drain into the station inlet. Do not rinse waste gear at a drinking water tap or in the kitchen sink at home.
Drain it completely
Lift one end and walk the hose up, so the last of the water runs out. A hose that looks empty can still hold water in its low loops. If the garage freezes, trapped water can split a fitting or crack a hose.
Clean and disinfect the ends
Wear gloves. Wipe the adapter, the hose ends and any caps with a disinfecting cleaner, then let them air-dry. Inspect the washers and seals while you are at it and replace any that are cracked or flattened.
Let it finish drying in the open
Hang the coil loosely on its holder with the ends open for a day or two before you cap or bag them. Air movement through the hose does more for odor than any spray.
Cap, bag and tag
Once it is dry, thread on hose caps or slip a zip bag over each end, and tie on a tag that says GRAY WATER ONLY. A strip of colored tape at each end makes the hose easy to recognize in any light.
How to coil and hang without kinks
Coil loosely
Make loops at least as wide as the hanger saddle and do not pull them tight. A loose coil keeps the hose round and the walls of the hose free of creases.
Follow the hose’s natural curve
Coil in the direction the hose wants to go. Forcing a twist into each loop makes the hose fight you every time you unroll it.
Support the loops in more than one place
For a long or stiff hose, use two hooks or a long cradle so the weight is spread across the loops, not hanging from a single point.
Keep the fittings off the floor
Let the capped ends tuck into the coil or hang in a small bag on the hanger’s nozzle hook, not dangle down the wall where they collect grit.
Macerator and discharge hoses
Treat it as black water gear
A macerator hose usually carries black and gray water, so it gets the strictest handling: rinse, drain, disinfect the nozzle, cap it and keep it with the sewer gear, never near the drinking water side.
Store the hose and nozzle together
Thetford’s Sani-Con Turbo kits come with nozzle caps; use them. Hang the hose in a long cradle and keep the nozzle and its caps in a labeled bag on the same hook, so the set leaves the garage together.
Check the manual for winter care
Pumps and hoses differ. Follow your macerator’s manual for draining and any winter preparation, and do not leave water in the pump or hose over a freeze.
Mind the length
A 21 ft hose is long for one small hanger. Give it a hanger with plenty of saddle depth or split the loops across two hooks.
Adapters, caps and the small parts
One bin, one label
Gray-water adapters, thread caps, spare washers, a swivel connector and an elbow can all live in one small, lidded bin labeled GRAY WATER. That keeps them away from the fresh-water fittings bin, which should be labeled and stored on the clean side.
Gloves and a wipe bottle
Keep a box of disposable gloves and a bottle of disinfecting wipes or spray in the same bin, so they go out to the RV with the hose and come back with it.
Spare washers
Hose washers are cheap and they fail at the worst moment. A small bag of spares in the bin saves a trip to the store at the campground.
A checklist card
Tape a short card to the inside of the lid: rinse, drain, disinfect, dry, cap, tag. In spring, the same card reminds you what to check before the first trip.
Fresh water gear stays on the other wall
Separate hangers, separate bins
The drinking water hose gets its own hanger, ideally a different color, and its fittings get their own bin. Our fresh water hose guide covers that side of the wall in detail.
Never share a hook
Do not hang the gray hose and the drinking water hose on the same hanger, even for a day. A drip from a capped end is enough to contaminate a potable hose fitting.
Wash your hands between jobs
If you handle the gray hose and then the drinking water hose, wash your hands or change gloves in between. It is a small habit that matters.
Label both sides
A WASTE sign over the service side and a DRINKING WATER sign over the clean side may feel like overkill, but it helps anyone else in the house put things back in the right place.
How to mount the holder so it stays put
- Pick the spot on the waste side of the wall, away from the drinking water gear, windows, the water heater and the car.
- Find a stud with a stud finder and mark its center. Most garage walls have studs about 16 in apart.
- Hold the hanger at about shoulder height, check it with a level and mark the screw holes.
- Drill pilot holes into the stud. If the screw holes do not line up with a stud, screw a plywood backer into two studs first and mount the hanger on the backer.
- Drive the screws the maker specifies, or exterior-grade wood screws sized to the hanger’s holes if hardware is not included.
- Tug firmly on the hanger. It should not move.
- Mount the shelf for the bin below the hanger, into studs, at a height where you can read the label.
- Hang the drained, dry, capped hose loosely and put the tagged bin on the shelf.
- Label the zone and check the clean side is at least a few feet away.
- Take a photo of the setup for next autumn.
Winter and off-season care
A dry hose in a cold garage
A completely drained and dry hose is fine in an unheated garage. What causes trouble is leftover water, which can freeze in a low loop or a fitting. If in doubt, walk the hose up again before the first hard freeze.
Check it once in midwinter
Take a quick look once during the winter for mildew at the ends, pests in the bin or a coil that has slipped off. It takes a minute.
Plastic gets stiff in the cold
Vinyl and plastic hoses stiffen in the cold. Coil the hose while it is warm in autumn and let it warm up in spring before you unroll it, so it does not crack.
Keep pests out
Mice like quiet garage corners. Caps or bags on the hose ends and a lid on the bin keep them out of the fittings.
Spring check before the first trip
Inspect the hose
Unroll it and look for cracks, splits, soft spots and worn fittings. Flex it gently along its length. Replace a hose that has cracked or gone brittle.
Replace washers and check caps
Swap any flattened or cracked washers and make sure each cap still threads on smoothly.
Restock the bin
Top up gloves and wipes, and make sure every adapter you need for your rig is in the bin.
Test at home only with clean water
If you want to check for leaks, use the hose bib and clean water on the waste side, and let the water run into a drain, not the garden or the lawn.
Keeping the holder clean
Wipe it at the end of each season
Once the hose is off for the first trip in spring, wipe the hanger saddle, the cradle and the shelf with a disinfecting cleaner and let them dry. Any residue from the last coil comes off in a minute while the wall is empty.
Wash the bin and the bag
Empty the small-parts bin, wash it in a utility sink with hot soapy water and let it dry before you repack it. A mesh or vinyl hose bag can usually be hosed out on the waste side and hung to dry; check the care label.
Watch the wall below
A dark mark or a damp patch under the hanger means the hose went up wet or a cap is dripping. Find the cause, dry the hose properly and clean the wall before mildew sets in.
Kids, pets and shared garages
Hang it high enough
Mount the gray hose and its bin above the reach of small children and dogs, who are curious about anything that smells interesting. A shelf at chest height and a hanger at shoulder height keep the waste side out of easy reach.
Keep pet supplies elsewhere
Do not store pet bowls, pet food or the pet water fountain on the waste-side wall. Give them their own shelf on the clean side of the garage.
Tell the household
A short note on the bin and a word with anyone who uses the garage goes a long way. The goal is that nobody ever grabs the gray hose for the garden, the car wash or a water fight.
Shared or rented storage
If the RV and its gear live in a storage unit or a shared garage, a closed, labeled tote for the hose and fittings is a better choice than an open hanger. It keeps the waste gear contained and makes it obvious what it is.
Three sample setups
The weekend trailer
One resin J-hook hanger on a stud for a 15 ft garden-style gray hose, a small lidded bin with the Valterra-style drain adapter, caps and gloves on a shelf below, and the drinking water hose on its own hanger on the opposite wall.
The motorhome with a macerator
A long cradle for the macerator discharge hose, a labeled bag for the nozzle and caps on the same hook, a steel hanger beside it for the black tank rinse hose and a bin of fittings, all on the service side by the floor drain.
The van with a separate gray outlet
A stainless hanger for the dedicated gray hose, a bin with the 1-1/2 in drain connector, its 90-degree version, thread caps and spare washers, and a tag on the coil. The whole kit lifts off in one trip and rides in a sealed bin in the van.
Where the $50 goes
Hanger
A good steel, stainless or resin hose hanger takes the first part of the budget. Prices move, so check the current listing, but a sturdy single hanger is usually well under half of $50.
Bin and shelf
A clear lidded bin and a simple stud-mounted shelf bracket pair take most of the rest.
Labels, caps and spares
A roll of colored tape, a tag, hose caps and a bag of washers finish the setup for a few dollars more.
What a wall holder will not fix
A cracked or brittle hose
Storage keeps a good hose good, but it will not save a hose that has split or gone stiff. Replace it.
A leaking valve
If the gray valve on the RV drips, that is a repair job, not a storage job. A wall holder only deals with what happens after the hose is off the rig.
Local rules
Where and how you can dump gray water is set by campgrounds, parks and local rules, not by your hose setup. Many campgrounds and parks, including national parks, require gray water to go to the dump station.
How to set it up in an afternoon
- Gather every gray-water item: hoses, adapters, connectors, caps, washers, gloves.
- Rinse and drain the hose where allowed, disinfect the ends and let everything dry.
- Pick the waste-side wall away from the drinking water gear.
- Mount the hanger into a stud and the shelf below it.
- Coil the hose loosely and hang it.
- Cap or bag the ends and tag the coil GRAY WATER ONLY.
- Pack the small parts in a lidded bin and label it.
- Check that the drinking water hose and its fittings are well away on the clean side.
Mistakes to avoid
- Storing the gray hose in the same tote or on the same hanger as the drinking water hose.
- Hanging the hose wet, with water left in the low loops.
- Coiling it tight on a narrow nail, which kinks and creases the hose.
- Leaving the ends open, so dust, insects and mice get in.
- Forgetting the label, so someone uses it as a garden hose in summer.
- Using the gray hose to fill a kiddie pool, a pet bowl or the fresh tank.
- Mounting the hanger into drywall alone.
- Storing the hose by a sunny window or the water heater.
- Piling heavy totes on top of a coiled hose on the floor.
- Throwing small adapters loose in the coil, where they fall out and get lost.
Related guides
Browse the hub: RV & camping storage under $50 - all guides
- Best RV Sewer Hose Support Wall Storage Under $50
- Best RV Black Tank Rinse Hose Wall Holders Under $50
- Best RV Sewer Cap & Fitting Wall Organizers Under $50
- Best RV Fresh Water Hose Wall Holders Under $50
- Best RV Winterizing Kit Wall Storage Under $50
- Best RV Holding Tank Treatment Wall Organizers Under $50
- Best RV Portable Waste Tote Wall Storage Under $50 for Garage (Off-Season)
FAQ
Can I store my gray water hose with my drinking water hose?
No. Keep them on separate hangers, ideally on different walls. A hose that has carried gray water is waste gear, and RV guides from RVshare to Poulsbo RV advise storing waste and fresh water hoses separately to avoid cross-contamination.
Can I use a regular garden hose to drain my gray tank?
Many owners do, using an adapter such as Valterra’s Gray Water Drain Adapter, which has a 3/4 in garden hose connection. Once a hose has been used for gray water, mark it and keep it for waste use only.
Should I store a gray water hose wet or dry?
Dry. Rinse it where allowed, drain it completely, let it air-dry with the ends open, then cap or bag the ends before long storage.
Is it OK to keep a gray water hose in an unheated garage?
Yes, if it is fully drained and dry. Trapped water is what causes problems in a freeze. Coil it while it is warm and let it warm up in spring before you unroll it.
What kind of wall holder works best?
A heavy-duty hose hanger with a wide, rounded saddle, screwed into a stud, suits most gray drain hoses. A long cradle or two wide hooks suit a macerator hose, and a lidded bin is best for adapters and caps.
Can I dump gray water on the ground?
Often not. Campgrounds and parks set their own rules, and many, including Bryce Canyon National Park, require gray water to go to the dump station. Check the rules wherever you camp.
Bottom line
Gray water gear is easy to forget and easy to get wrong. Give it a home: a sturdy hose hanger in a stud on the waste side of the garage, a lidded bin for the adapters and caps, and a clear label on everything. Rinse, drain, dry, cap and tag the hose before it goes up, keep it well away from the drinking water hose, and check it once in spring. That is all it takes to start the next season with a clean, dry, working hose and a fresh water side you can trust.