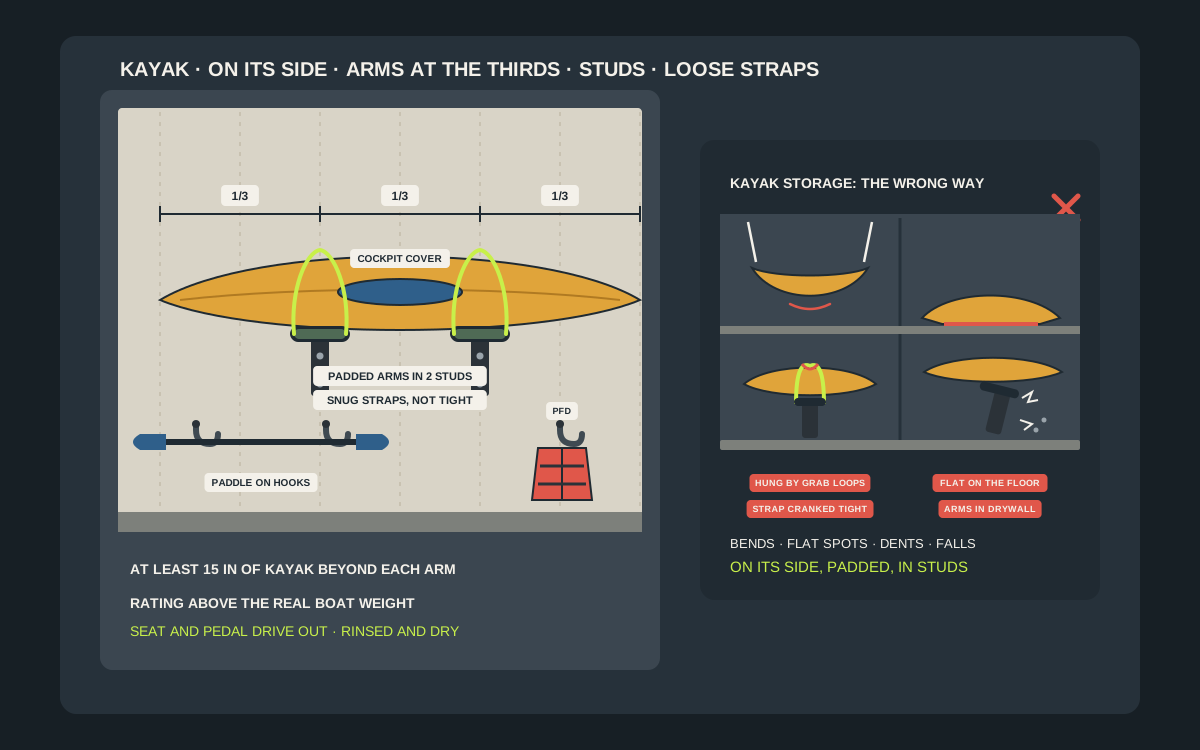
A kayak is the most awkward thing most people try to store in a garage. A recreational boat is ten feet long and nearly two and a half feet wide, a fishing kayak can top 100 pounds once its pedal drive is fitted, and on the floor it takes a strip of concrete that could hold a bike, the mower or half a car door’s swing. Worse, the floor is not good for it. Kayak makers and paddling retailers warn that a polyethylene hull left resting on a hard, flat surface for months can develop a flat spot or a dent that changes how the boat tracks and turns. A pair of padded wall arms fixes both problems for well under $50. The kayak rests on its side, which Suspenz describes as the strongest part of the boat, about one-third of the way in from each end, a couple of feet off the floor or above head height, and the floor underneath is free again. The details are what keep the hull straight: where the arms go, how far apart they are, how tight the straps are and whether the screws are in studs. This guide covers which way a kayak should sit on the wall, what kayaks actually weigh, the setups that work under $50, how to space and fix the arms, and how to prepare the boat before it goes up for winter.
Shop kayak wall mounts on Amazon
Who this is for
- Owners of a sit-inside recreational kayak or a sit-on-top fishing kayak that currently lives on the garage floor
- Anyone with a long touring or sea kayak that needs wide-spaced supports
- Households with two kayaks and one stretch of free wall
- Anyone who wants to store a kayak for the winter without denting or bending the hull
Quick answer
For most garages, the best under-$50 kayak wall mount is a pair of foam-padded steel arms screwed into two studs, with the kayak resting on its side. Set the arms at the same height, about one-third of the boat’s length in from each end, so there are at least 15 inches of kayak beyond each arm. On 16-inch stud spacing that usually means 32 or 48 inches apart for a 10-to-12-foot boat, and wider for a touring kayak. Check the published rating against the real weight of your kayak, take out the seat and any pedal drive, and use any safety strap only to stop the boat sliding, never cranked down. Never hang a kayak by its grab loops, carry handles or scupper holes, and do not leave it resting on its hull on the floor all winter. Check ratings, fit and current prices on the listing before you buy.
Quick picks
- Best overall: a pair of foam-padded steel kayak arms lag-screwed into two studs, with a loose safety strap on each arm, so the kayak rests on its side, which is the strongest part of the hull. Look for a published rating of at least 100 pounds for the pair.
- Best for heavy fishing kayaks: a larger padded arm pair with deeper cradles and a higher published rating, such as 125 or 150 pounds, so a sit-on-top angler kayak sits securely with its seat and pedal drive taken out.
- Best for long touring kayaks: an arm pair you can space six to seven feet apart on studs, so a 14-to-17-foot boat has its supports at about one-third of its length and at least 15 inches of hull beyond each arm.
- Best for protecting the hull: a wall-mounted webbing sling or an arm pair with wall straps that carry part of the weight, so the boat hangs in soft, wide straps that follow the curve of the hull instead of resting on two hard points.
- Best for two kayaks: a stacking arm set with two levels on the same pair of studs, rated per level, with the heavier boat on the bottom. Check the price on the listing, because two-level sets can cost more than a single pair.
- Best add-on: a cockpit cover for a sit-inside kayak, plus two coated hooks beside the rack for the paddle and the life jacket, so the whole kit lives on one stretch of wall.
Quick comparison
| Setup | Best for | How it holds | Trade-off |
|---|---|---|---|
| Padded steel arm pair | Most recreational and fishing kayaks | Kayak rests on its side on two foam-covered arms in two studs | Projects about 16 to 28 in from the wall |
| Large-cradle arm pair | Wide sit-on-top and pedal fishing kayaks | Deeper arms with a higher published rating | Deeper again; check the rating on the listing |
| Arm pair with wall straps | Long-term storage and houses with children | Straps from the wall carry part of the weight and lock the boat in | More holes; straps need adjusting |
| Wall webbing sling | Composite and thin-walled boats | Wide UV-resistant webbing follows the curve of the hull | Boat can swing if not tied back |
| Two-level stacking arms | Two kayaks on one wall | Two pairs of arms on the same uprights, rated per level | Can cost more than a single pair |
| Ceiling pulley hoist | Garages with no free wall | Straps lift the boat up to a joist bay | Clearance and ratings to check; many cost more |
| Coated utility hooks | Paddle, life jacket and spray skirt | Small kit hangs beside the kayak | Not for the boat itself |
| Cockpit cover | Sit-inside kayaks | Keeps dust, leaves and critters out of the cockpit | Needs the boat dry first |
Padded kayak wall racksKayak wall storage strapsKayak cockpit covers
What to look for
A rating above the real weight of the boat
Kayaks vary far more than most people expect. Pelican lists its 10-foot Maxim 100X Angler at 38 pounds, Old Town lists its Vapor 10 Angler at 49 pounds, Perception’s 12-foot Pescador Pro is listed at 64 pounds, and Old Town’s Sportsman PDL 106 pedal kayak has an assembled weight of 107 pounds. StoreYourBoard rates its Roanoke arm pair at 100 pounds in total and 50 pounds per arm, Malone’s wall holders carry a 100-pound maximum, and Suspenz rates its EZ Rack at 125 pounds. Pick a pair whose published rating clears the boat you actually own, with room to spare.
Padding that spreads the load
Bare steel or narrow plastic arms put the whole weight of the boat onto a few square inches of hull. Look for wide arms wrapped in thick foam and a tough cover; StoreYourBoard and Suspenz both cover theirs in foam padding with a 600D nylon sleeve. REI’s storage advice is to support the hull with padded cradles or wide nylon straps that match its curve.
Arms that hold the boat on its side
Most wall arms are shaped like an L or a shallow J so the kayak rests on its side, deck against the wall and hull facing out, or the other way round. That uses the strongest part of the hull and keeps the boat to the depth of the arms. Suspenz says its EZ Rack extends 20 inches from the wall, and StoreYourBoard’s larger marine-grade rack extends 21 or 28 inches depending on size.
Mounting into framing
Every maker in this category says the same thing: screw the arms into studs or solid masonry. StoreYourBoard says the Roanoke rack must be mounted to studs to achieve its advertised weight, and Malone says not to mount its holders into unsupported drywall, sheet-rock or paneling. Masonry anchors are usually sold separately for concrete or block walls.
Adjustable spacing
Because each arm is a separate piece, you choose the gap. That matters: the supports should sit about one-third of the way in from each end, and Boreal Design asks for at least 15 inches of kayak extending beyond each support. Racks that come as one fixed bar can put the supports too close to the middle of a long boat.
A strap that holds, not squeezes
A safety strap over each arm stops the kayak being knocked off by a car door, a ladder or a child. Suspenz includes them with its EZ Rack and suggests safety straps over the top of the kayak. Wilderness Systems and REI both warn against leaving straps tightly wound around the hull for long periods, because the pressure can deform it. Snug is enough.
Which way should a kayak sit on the wall?
On its side, at the strongest part
The simplest and most common answer is on its side. Suspenz’s storage advice calls the side of the kayak the strongest part of the boat and the best way to avoid hull damage, and Old Town’s owner’s manual says kayaks should be stored on their sides or standing on one end if possible. On a pair of wall arms, the kayak rests on its edge with the hull facing out and the deck against the wall, or the deck facing out, whichever fits the arms better.
Hull up, if the rack is built for it
Wilderness Systems’ owner’s manual also describes storing a kayak hull up on parallel bars with the weight spread along its length. For a recreational boat with a big cockpit, it suggests placing the bars so the cockpit rim rests on them; for a smaller cockpit, on the deck between the cockpit and the hatches. That is a ceiling or overhead-shelf arrangement more than a wall one, but it is a good option for a garage with no free wall.
On its side for the long term, with care
Not every maker treats every position the same. Wilderness Systems says a kayak may be stored on its side or vertically for a short time, but that long periods in those positions can flatten or deform the side of the hull, and recommends web straps at about one-third of the length for long-term side storage. The practical rule: if your kayak will sit on its side all winter, use wide, padded arms or soft slings, keep the straps loose and check the hull once a month.
Never on the hull, never by the handles
Old Town’s manual says not to store a kayak on its hull and not to hang it by the strap eyes, carrying handles or scupper holes. Wilderness Systems warns that hanging a kayak by its grab loops can distort the hull over time, and Suspenz says never to support a kayak from its ends only. Handles are for carrying a boat a few yards, not for holding it up for months.
What kayaks actually weigh
Light recreational kayaks, about 35 to 50 pounds
Ten-foot sit-inside boats are the lightest common kayaks. Pelican lists its Maxim 100X Angler at 38 pounds and Old Town lists its Vapor 10 Angler at 49 pounds. Almost any well-made padded arm pair rated at 100 pounds handles these comfortably.
Sit-on-top fishing kayaks, about 60 to 80 pounds
Wider sit-on-top boats carry more plastic. Perception lists its 12-foot Pescador Pro at 64 pounds. These still fit a 100-pound pair, but there is less margin, and a heavy boat is harder to lift onto the arms safely.
Pedal kayaks, often 100 pounds or more
Old Town lists its Sportsman PDL 106 at 107 pounds assembled, which includes an 18-pound pedal console and a 6-pound removable seat, leaving a hull of about 83 pounds. Take the drive and seat out before the boat goes up, and use arms with a published rating of 125 or 150 pounds rather than a 100-pound pair.
Why the weight matters twice
The rating matters for the hardware, but the weight also decides how high you can safely lift the boat. A 40-pound kayak can go up to shoulder height. An 80-pound hull is a two-person lift, and it belongs on arms set between waist and chest height, not above your head.
The setups that work under $50
A padded steel arm pair
This is the default. Two separate arms, each with two lag screws into a stud, foam padding and often a safety strap. StoreYourBoard’s Roanoke rack is a typical example: 100 pounds in total, 50 pounds per arm, solid powder-coated steel, sized for one kayak, and intended for indoor use. You choose the spacing, so one pair suits a 9-foot boat or a 14-foot one.
Arms with a strap that shares the load
Some arm pairs add wall straps. StoreYourBoard’s Pro version mounts a strap bracket on the same stud a few inches above the kayak; you buckle the strap around each end and pull until the strap carries part of the weight. The maker says this spreads the load over more of the hull and reduces the chance of distortion, and it also locks the boat in place in a busy garage.
A webbing sling on the wall
Suspenz’s view is that wide, UV-resistant webbing is the ideal support because it conforms to the curve of the hull and prevents flat spots. Wall-mounted sling kits hang two loops of webbing from brackets in the studs, and the kayak sits in them on its side. They are gentle on thin-walled and composite boats, but the boat can swing, so tie it back to the wall.
A ceiling hoist, when the walls are full
If there is no free wall, a pulley hoist can lift the kayak hull up into a joist bay above the car. Kayak-rated hoists often cost more than $50, and the ceiling must clear the garage door track and opener. Our comparison of bike ceiling hoists and wall hooks explains the clearance checks, the joist fixing and the rope rules that apply to any hoist.
How far apart to set the arms
About one-third in from each end
REI’s advice is to support the boat about one-third of the way in from each end, and Wilderness Systems’ manual says the same for straps. Suspenz warns that supports placed too close to the center or too close to the ends strain the boat, leaving it looking like a banana.
At least 15 inches of kayak beyond each arm
Boreal Design’s wall rack guidance asks for a minimum of 15 inches of kayak extending over each support, and suggests finding studs six to seven feet apart for its long sea kayaks. For a typical recreational or fishing boat, that leaves a wide window.
Using 16-inch stud spacing
Studs are usually 16 inches on center, so the gaps you can actually use are 32, 48, 64 or 80 inches. Malone advises placing its holders 32 or 48 inches apart depending on the length of the kayak, and StoreYourBoard’s Roanoke instructions assume 32 inches unless your studs differ. As a guide, 32 inches suits a 9-to-10-foot boat, 48 inches a 10-to-13-foot boat, and 64 to 80 inches a 14-to-17-foot touring kayak.
Find the balance point first
A fishing kayak with a heavy stern well or a touring kayak with a long bow may not balance in the middle. Before you drill, stand the boat on its side on two padded sawhorses and move them until it sits level with roughly equal overhang, then measure. That measurement is your arm spacing.
Mounting the arms so they stay put
Studs, the right pilot holes, the right lags
Find the studs with a stud finder and mark the centers. StoreYourBoard’s Roanoke instructions call for 3/16-inch pilot holes and 1/4-inch lag screws with washers, two per arm, with the holes lined up vertically with a level. Malone’s instructions also call for a 3/16-inch bit, with the holders bolted to the wall studs.
Both arms at exactly the same height
Mark the top hole of the first arm, measure from the floor, and mark the second arm at the same height on the next chosen stud. A level across both marks, or a long straight board with a level on it, catches a sloping floor. Uneven arms put more weight on one side and can let the boat slide.
A height you can load safely
StoreYourBoard suggests placing the top hole anywhere from about 24 to 72 inches above the floor. Lower is easier and safer to load, especially with a heavy boat; higher frees the floor for bikes or bins. Suspenz’s advice is to mount racks at a height that lets you load and unload without straining your back.
Concrete and block walls
On a concrete or block wall, use masonry anchors rated for the load; most kayak arms ship with wood-stud screws only. Our comparison of adhesive and screw-in hooks for garage walls explains why adhesive hooks and hollow-wall anchors are no use for a boat that can be bumped.
Matching the mount to the kayak
Sit-inside recreational kayaks
A standard padded arm pair is ideal. Rest the boat on its side, deck to the wall, and fit a cockpit cover; Old Town recommends one to keep dust and critters out.
Sit-on-top fishing kayaks
Take out the seat, rod holders and any crate first. Wider hulls need deeper arms, so check the arm depth against the beam of the boat on the listing. Never thread a rope through the scupper holes to hang one; Old Town specifically says not to.
Pedal and motor kayaks
Remove the pedal drive or motor and store it separately, on a shelf or a dedicated stand. On the Old Town Sportsman PDL 106, that takes 24 pounds off the boat before it goes on the wall.
Long touring and composite kayaks
Space the arms widely, use the softest padding or a sling, and keep straps loose. Wilderness Systems notes that composite boats are best transported on their bottom in cradles to prevent deformation, and recommends parallel bars or web slings for storage, so a sling is a sensible choice for a glass or carbon boat.
Preparing the kayak before it goes up
Empty it, rinse it, dry it
Wilderness Systems says to empty all water and rinse the kayak with fresh water, especially after salt water or mud. REI adds the rudder, rudder cables and footbraces to the rinse list, suggests a wash with mild soap a couple of times a year, and says to let the boat air out and dry before stowing it.
Take the extras out
REI recommends removing the paddle, spray skirt, float bags and bilge pump for long-term storage, rinsing them and drying them before they are stored indoors. Hang them on hooks beside the kayak so the kit stays together.
Protect it from sun
Wilderness Systems warns that UV exposure can shorten the life of any kayak and degrade its finish, and recommends indoor storage out of direct sunlight. REI suggests a UV-protective spray for hard-shell boats. In a garage, that means keeping the kayak away from a sunny window.
Keep it away from heat
Wilderness Systems notes that polyethylene becomes more flexible in warm conditions. A kayak pressed against a hot wall, a water heater flue or a south-facing window is more likely to take a dent at the support points.
Straps, covers and checking the hull
Snug, never cranked down
A safety strap is there to stop the boat sliding or being knocked off. REI says not to strap a stored kayak down tightly the way you would on a car, because long-term strap pressure can deform the body, and Wilderness Systems warns against leaving straps or ropes tightly wound around the hull for long periods.
A cockpit cover, not a tarp
Old Town recommends a cockpit cover to keep dust and critters out. If the kayak ever has to live outside, Old Town warns against laying a tarp directly on it, because the sun can create an oven under the tarp that damages, distorts or discolors the hull.
If the hull does dent
Old Town says a hull distorted by storage or transport can often recover with brief exposure to the warmth of the sun, or with gentle low heat such as a low-wattage bulb or a hair dryer, then hand-shaping. It cautions that overheating can burn you or damage the hull, so go slowly.
Where it belongs in the garage
Along a long wall, clear of the car
A kayak on arms takes a strip of wall as long as the boat and projects up to about two feet. Put it on a side wall where the car door does not swing, or high on the back wall above the car’s hood line if the ceiling allows it.
Beside the rest of the paddling gear
Hang the paddle on its own hooks, the life jacket on a hanger and the roof rack pads and straps nearby, so loading the car for a trip happens in one spot. Our guides to kayak paddle hangers, life jacket racks and roof rack accessory hooks cover those pieces.
Out of the bike and ladder path
The bow and stern stick out past the arms. Keep them out of the path you use to wheel bikes or carry ladders, or a passing handlebar will knock the boat every week.
Two kayaks on one wall
Stack them on one pair of studs
Two-level arm sets fix two pairs of arms to the same uprights. StoreYourBoard’s outdoor double rack, for example, rates each arm at 50 pounds, each level at 100 pounds and the whole rack at 200 pounds. Two-level sets can cost more than a single pair, so check the current price on the listing.
Heavier boat at the bottom
Put the heavier kayak on the lower level so you are not lifting it overhead, and leave enough vertical gap that you can slide the top boat out without hitting the bottom one.
Getting the kayak on and off the wall safely
Set the height for the person who lifts it
Suspenz advises mounting the rack at a height that makes loading and unloading easy, to avoid back strain. For most people that means the arms sit somewhere between waist and chest height, not overhead. A boat you can roll on from waist height gets used; one you have to wrestle down from above your head stays on the wall all summer.
Lift it with two people or in two stages
With a heavier fishing kayak, carry it to the wall with a partner, one at each end, and set both ends down on the arms at the same time. Alone, rest one end on the near arm first, then walk the other end up onto the far arm, keeping your back straight and the weight close to your body.
Load it the same way every time
Put the boat on with the deck facing the same direction each time, so the arms always meet the same part of the side. Mark the arm positions on the hull with a small piece of tape if it helps, then check the boat sits level before you fit the safety straps.
Checks through the winter and before spring
A quick look once a month
Walk past the boat once a month and look along the hull at each arm. A slight shadow or flat area where the arm meets the side is the early sign of a dent; loosen the strap a little or move the boat a few inches along the arms so the pressure lands somewhere new.
Check the screws as well as the boat
Give each arm a firm tug. It should not move or creak at all. If a lag screw has started to back out, take the kayak down before tightening it, and never add weight such as a crate or a bag of gear to an arm that is already carrying a boat.
Before the first trip of the year
Take the boat down, look over the hull, rudder and hatches, refit the seat and pedal drive, and leave the empty arms and straps in place, ready for autumn. The paddle, life jacket and spray skirt are already beside it, so the car is loaded in minutes.
Three sample setups
Single garage, one 10-foot recreational kayak
A 38-pound sit-inside kayak rests on its side on a padded arm pair lagged into studs 48 inches apart, top holes about 60 inches off the floor, with a cockpit cover fitted and a loose safety strap over each arm. A paddle hanger and a life jacket hook sit on the same wall.
Two-car garage, one 12-foot fishing kayak
A 64-pound sit-on-top kayak sits on deeper padded arms rated well above its weight, set 48 inches apart at waist height so one person can roll it on. The seat and crate live on a shelf above, and the rods hang on a fishing rod rack beside the bow.
Long garage, a 16-foot touring kayak
A touring kayak rests in two wall slings 80 inches apart, so the bow and stern overhang roughly equally and each sling sits about one-third in from its end. The straps are snug, not tight, and the spray skirt and float bags hang dry on hooks beside it.
How to set it up in an afternoon
- Weigh the kayak or look up its listed weight, and remove the seat, pedal drive, rod holders and anything loose.
- Pick a wall that clears the car doors, bikes and ladders, away from sunny windows and heat sources.
- Balance the boat on its side on two padded sawhorses to find the spacing that gives roughly one-third support and at least 15 inches of overhang at each end.
- Find and mark the studs closest to that spacing, usually 32 or 48 inches apart for a recreational boat.
- Mark the first arm at a height you can load safely, then mark the second at the same height with a level.
- Drill pilot holes of the size the instructions give and drive the lag screws fully into the studs, or use rated masonry anchors on concrete.
- Rinse and dry the kayak, fit a cockpit cover, and rest it on its side on the arms.
- Fit the safety straps snugly, not tightly, and check that the boat sits level and evenly on both arms.
- Hang the paddle and life jacket nearby, and check the hull and the screws once a month through the winter.
Mistakes to avoid
- Hanging the kayak by its grab loops, carrying handles, strap eyes or scupper holes.
- Leaving the boat resting on its hull on the concrete floor all winter.
- Setting the arms close together in the middle of the boat, or right out at the ends.
- Screwing the arms into drywall or paneling instead of studs or rated masonry anchors.
- Choosing a pair whose published rating is barely above, or below, the real weight of the kayak.
- Cranking the safety straps down as tightly as you would on a roof rack.
- Storing the kayak wet, salty or muddy, or with the pedal drive and seat still fitted.
- Putting it beside a sunny window or a water heater, where heat and UV soften and fade the plastic.
Related guides
Browse the hub: Garage wall storage under $50 - all guides
- Best Kayak Paddle Wall Hangers for Garages Under $50
- Best Life Jacket Wall Racks Under $50 for Garage & Boat Storage
- Best Roof Rack Accessory Wall Hooks Under $50 for Garage
- Bike Ceiling Hoist vs Wall Hook: Which Under-$50 Option Saves More Garage Space?
- Best Fishing Rod Racks for Garage Walls Under $50
- Best Ski and Snowboard Wall Racks for Garages Under $50
- Adhesive Hooks vs Screw-In Hooks for Garage Walls Under $50
- Best Affordable Garage Track Rail Hooks Under $50
- How to Do a Fall Garage Cleanout with Wall Racks Under $50
- Best Paddle Board (SUP) Wall Racks Under $50 for Garage
FAQ
What is the best way to store a kayak on a garage wall?
On its side, on two padded arms or wide webbing slings screwed into studs, about one-third of the way in from each end. Suspenz describes the side as the strongest part of the boat, and REI and Wilderness Systems both recommend supports at about one-third of the length. Keep any straps snug rather than tight.
How far apart should kayak wall mounts be?
Far enough that each support sits about one-third in from its end, with at least 15 inches of kayak beyond each one, as Boreal Design recommends. On studs 16 inches apart, that is usually 32 or 48 inches for a 10-to-12-foot kayak, as Malone advises, and wider for a long touring boat.
Can you hang a kayak by its handles?
No. Old Town says not to hang a kayak by its strap eyes, carrying handles or scupper holes, and Wilderness Systems warns that hanging it by the grab loops can distort the hull over time. Use arms or wide straps around the body of the boat.
Is it bad to store a kayak on the floor?
For a long time, yes. Old Town says not to store a kayak on its hull, and REI says long periods on the floor can deform the hull and expose the boat to moisture and dirt. A few days on a padded surface is fine; a whole winter on concrete is not.
Will kayak wall mounts work on drywall?
Not on drywall alone. StoreYourBoard says its Roanoke rack must be mounted to studs to achieve its advertised weight, and Malone says not to mount into unsupported drywall, sheet-rock or paneling. Use studs, or rated masonry anchors on concrete or block.
How much weight do kayak wall racks hold?
It varies by model, so check the listing. StoreYourBoard rates its Roanoke pair at 100 pounds in total and 50 pounds per arm, Malone’s holders carry 100 pounds, and Suspenz rates its EZ Rack at 125 pounds. Compare that with your kayak’s listed weight, which ranges from under 40 pounds for a small recreational boat to over 100 pounds for a pedal kayak.
Bottom line
The best kayak wall mount under $50 is a pair of foam-padded arms lag-screwed into two studs, holding the kayak on its side about one-third of the way in from each end. Match the published rating to the real weight of your boat, take out the seat and any pedal drive, space the arms so at least 15 inches of kayak sits beyond each one, and keep the safety straps snug, not tight. Never hang a kayak by its handles or leave it on its hull on the floor all winter, rinse and dry it before it goes up, and keep it out of the sun. Check ratings, fit and current prices on the listing before you buy.