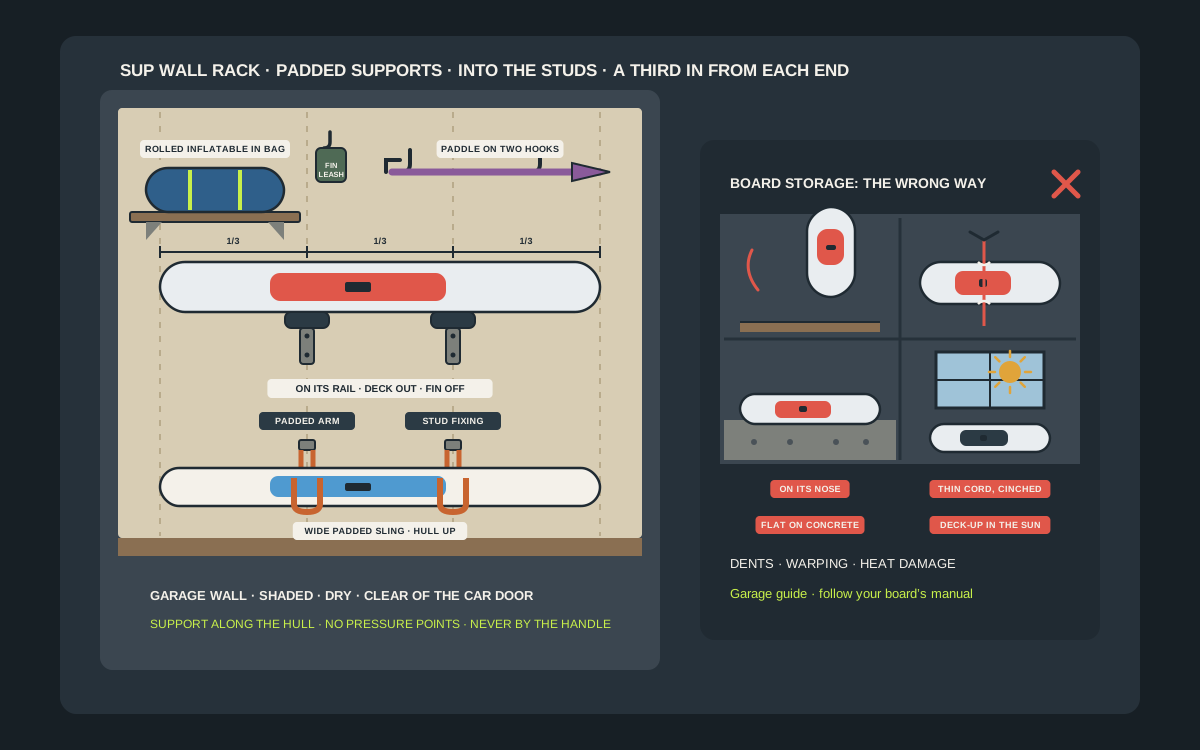
A paddle board is the awkward guest of the garage. It is ten to twelve feet long, about two and a half feet wide, light enough to carry and big enough to knock over the rake, the mower handle and a shelf of paint. Left on the floor it gets stepped on and scratched. Leaned in a corner it slides. Lashed to the rafters with thin rope it picks up dents where the cord bites. A proper wall rack solves all of that for well under $50 if you know what to look for: wide padded supports, a sound fixing into the studs, the right spacing along the board and a spot out of the sun. This guide covers how hard and inflatable boards each want to be stored, where to mount the rack and how to spread the weight, what the board makers and retailers like REI say about pressure points and temperature, and how to build a setup for one board, a family fleet or a winter in the garage.
Shop padded paddle board wall racks on Amazon
Who this is for
- Paddlers with a hard epoxy or composite board who want it off the floor and out of the way of the car
- Owners of inflatable boards who are deciding between a rack, a shelf and the bag in the corner
- Families with two to four boards, kids’ boards and a stack of paddles and life jackets
- Anyone getting a board ready for winter in an unheated garage or a shared shed
Quick answer
For most garages, the best under-$50 setup is a pair of foam-padded arms or slings fixed into wall studs, set about a third of the board’s length in from each end. Rest a hard board on its rail with the deck facing out, or hang it deck-side down with the hull toward the ceiling, and never by the handle, the fin or the nose. Keep the board dry, out of direct sun and out of extreme heat and cold, take off the fin and leash, and give each board its own supports instead of stacking one on top of another. For an inflatable, either keep it on a padded rack at reduced pressure or deflate it, roll it loosely and shelve it in its bag.
Quick picks
- Best overall: a pair of padded steel arms screwed into two wall studs, set roughly a third of the board’s length in from each end, with the board resting on its rail and the deck facing out. Check each arm’s published weight rating against your board before you buy.
- Best for a second board: a wide, foam-padded strap sling from a stud-mounted base. Two slings spread the weight along the hull, hold the board with no hard contact points and cost less than a second pair of arms.
- Best for hard boards on a budget: two heavy-duty padded hooks or J-cradles with foam sleeves, spaced to match the board, for an all-around or touring board in the usual 25 to 35 lb range.
- Best for inflatables: a single padded cradle rack for a board kept inflated at reduced pressure, or a high shelf for the rolled board in its bag, with the valve, pump and fin stored together.
- Best for small spaces: a folding arm rack that tucks flat against the wall when the board is out on the water, so the arms are not sticking out where you walk.
- Best for paddles and fins: two paddle hooks and a labeled zip bag for the fin, screw and leash, hung right beside the board so the whole kit leaves the garage in one trip.
Quick comparison
| Rack style | Best for | How it holds the board | Trade-off |
|---|---|---|---|
| Padded steel arms on two studs | One or two hard boards | Board rests on its rail on foam-covered arms | Check the arm rating and depth; some racks list above $50 |
| Foam-padded strap sling | Hard boards, second boards | Wide webbing cradles the hull on the wall | Board hangs deck-down; needs two slings |
| Heavy-duty padded hooks | Light boards on a tight budget | Two foam-sleeved J-hooks take the rail | Rated for a light load; not for heavy fishing boards |
| Folding arm rack | Garages where you walk past | Arms fold flat when the board is out | Arms are shorter; check board thickness |
| DIY 2x4 and foam cradle | Anyone with basic tools | Pipe insulation over a screwed wood arm | Needs careful stud fixing and sanded edges |
| High shelf with the rolled inflatable | Inflatable boards | Deflated board rolled loosely in its bag | Not for a board you ride every week |
| Padded wall cradle for an inflated board | Frequent inflatable use | Board kept at reduced pressure on the wall | Needs a temperate garage |
| Paddle hooks and a fin bag | Complete kits | Paddle on two hooks; fin and leash in a labeled bag | Needs a spot next to the board |
Padded SUP wall armsFoam-padded strap slingsPaddle and fin wall hooks
What to look for
Wide, padded supports
The board’s weight has to be spread along the hull, not concentrated on a bare steel tube. REI advises supporting a SUP at points along its length with a padded rack or wide nylon straps, and Taiga Board warns that long-term pressure can distort a board. Look for foam or rubber sleeves on the arms, or flat webbing at least a couple of inches wide, never bare wire, chain or thin cord.
A real weight rating
A hard all-around board commonly weighs 24 to 28 lb and a touring board 28 to 32 lb, according to Glide’s weight guide, while a 10 ft 6 in inflatable is usually 18 to 22 lb. That is not heavy, but it is awkward weight at the end of a lever. StoreYourBoard lists its XSR arms at 50 lb per level and its Kona rack at 100 lb per level, so even the lighter rating clears a typical board. Choose a rack with a published rating that is well above the board, and confirm it on the product page.
Arms that are long enough for the board’s width
A board is roughly 30 to 34 inches wide and 4.5 to 6 inches thick. Arms that are too short let the board tip out. StoreYourBoard’s SUP Stash, for example, has a 7 in slot and extends about 10 in from the wall, while its Kona arms are 27 in long. Measure your board’s thickness and width and compare them with the arm opening and depth.
Fixing into studs, not drywall
The board is a long lever that gets bumped and lifted in and out. Both StoreYourBoard racks mount to wood studs with adjustable track spacing or to concrete with masonry anchors, and the same logic applies to a DIY rack. Screws into studs, or proper masonry anchors in concrete block, will not pull out. Drywall anchors alone are not a good plan for something this size.
Spacing you can adjust
Studs sit about 16 inches apart in most homes, but boards vary in length. A rack with adjustable arm spacing, or individual arms that mount separately, lets you hit the support points you want rather than where the studs happen to fall.
A rustproof finish for a damp garage
Garages hold wet boards, wet paddles and wet air. Powder-coated or galvanized steel and stainless fasteners hold up better than bare zinc screws. Marine-grade racks exist, but a dry garage does not need them.
Know your board first
Hard board or inflatable
The two kinds of paddle board want different things. A hard board, usually foam wrapped in epoxy and fiberglass or a composite, has to be supported along its length so the shell is never pinched or bent. An inflatable is a drop-stitch PVC shell that holds its shape because of air pressure, so it is supported lightly when inflated and happy to be rolled up when it is not. Decide which you own before you buy a single bracket.
How much it actually weighs
Glide’s weight guide puts short all-around inflatables at 18 to 22 lb and touring inflatables at 22 to 26 lb, with hard all-around boards at 24 to 28 lb and touring hard boards at 28 to 32 lb. Specific examples line up: Boardworks lists its 11 ft Kraken at 29 lb, and Helium lists its 11 ft 4 in Tidal epoxy at 30 lb. Fishing and expedition boards climb to 34 to 40 lb, which is where you need to look hard at the arm rating.
How big it really is
BOTE lists its 10 ft 6 in Breeze Aero at 34 inches wide and 6 inches thick, which is typical of an all-around inflatable. Many hard boards are closer to 32 inches wide and under 5 inches thick. Width matters for how far the board sticks out when it is on its rail, and thickness matters for how wide the arm slot has to be.
Fin and leash plug
Most boards have a fin box on the underside near the tail and a leash plug at the tail. Both are weak points in storage. If you rack the board deck-out with the hull against the wall, the fin has to come off or have room, which is why StoreYourBoard notes that its SUP Stash holds a board deck-out only if the fin is removed, while a hull-out layout needs no change.
Where it has lived so far
If the board has spent summers on a car roof or a sunny deck, the garage rack is a big upgrade, but check it for sun damage and soft spots before you tuck it away. If it is brand new, the rack is just the right habit to start with.
Wall rack styles that fit a $50 budget
Padded steel arms
The classic wall rack is a pair of steel arms, usually powder-coated and covered with foam or rubber, that bolt to the wall and cradle the board on its rail. It is quick to load, takes up a narrow strip of wall and holds the board securely. Many branded two-board versions list above $50 when we checked, including StoreYourBoard’s Kona and XSR racks, so watch the price and rating together and consider a single pair of arms for one board.
Foam-padded strap slings
A sling is a wide padded strap that loops under the board and hangs from a base on the wall. The strap spreads the weight across the hull, removes hard contact points and adjusts with a buckle. StoreYourBoard’s padded SUP hanger lists a 125 lb rating with foam-padded, UV-protected nylon straps and a stainless base with three mounting holes. It is a strong example of the style, and the same idea works at lower prices with simpler hardware.
Padded hooks and J-cradles
For a light hard board, two heavy-duty J-hooks with foam sleeves can take the rail. They cost the least and look the simplest, but the rating matters more than ever. A hook rated for a coat is not a rack, so confirm the rating and sleeve the steel properly so the rail never meets bare metal.
Folding arm racks
Some arms fold flat against the wall. StoreYourBoard describes its SUP Stash arms as folding up when the board is out, so nothing sticks out into the garage when the board is on the water. That is a real convenience in a narrow single-car garage.
DIY cradles
A pair of 2x4 arms, sanded smooth, fixed into studs with lag screws and wrapped in foam pipe insulation, makes a perfectly good cradle for a light board. It is the cheapest option, but the screws and the stud fixing are not the place to improvise. Use screws long enough to bite properly into the stud and keep the arms short enough to avoid levering the wall.
Where to put the rack
Out of the car’s path
A board on its rail sticks out about 6 inches from the wall, and arms that are 20 inches deep stick out further. Keep the rack on a side wall or the back wall rather than where you open a car door, and allow for the length of the board when you lift it down.
High enough to clear the hood, low enough to lift
The rack should be high enough that the lower board clears the floor and anything stacked under it, and low enough that you can lift the board off without a stepladder. Aim for the lowest arm a few inches above the tallest thing beneath it, and the top of the highest board within easy reach.
Out of direct sun
Garage windows and open doors let in more sun than you expect. Both REI and Glide stress keeping boards out of direct sunlight, which breaks down materials over time. Put the rack on a wall that stays shaded all day or cover the window.
Away from heat and damp
Keep the rack away from the water heater, a space heater, a dryer vent and a leaking hose bib. Paddle Board Nation quotes a storage range of about 40 to 110 F from ISLE, so a rack in the sunniest, hottest corner is the wrong spot.
Rail, deck or hull: which way does the board face
On its rail, deck out
The most common wall layout is the board on its rail, hull toward the wall and the deck facing out, supported on two arms. Paddle Board Nation lists this as the usual setup. It keeps the shape supported along the strongest edge and puts the soft deck pad where you can see it.
Deck-side against a rack
REI notes that where a rack runs across the width of the board, you should rack the SUP with the deck against the rack to protect the hull. This is how the strap sling and arms that run across the board are meant to be used.
Hull up when hanging
For a ceiling hoist or sling, REI advises hanging the board so the hull faces the ceiling, which keeps the more vulnerable underside from being squeezed by straps. The deck pad is tougher and sits on the strap.
Never on the nose, never upright on the tail
REI says to stand a board on its side or tail and never on its nose, and Paddle Board Nation repeats the point. Glide goes further for hard boards: do not store them upright on the tail, since it can cause pressure damage over time. A wall rack avoids both.
Spacing the supports along the board
The one-third rule
Paddle Board Nation recommends padded supports about a third of the way in from each end so the weight is spread out. On an 11 ft board, that puts the arms roughly 44 inches in from the nose and the tail, or about 44 inches apart. That is the same rule we use for kayak racks.
Match the studs
Studs in most homes run at 16 inches on center, so 48 inches, three stud bays, is a common spacing that suits a board around 11 to 12 ft. If your studs are 24 inches apart, a 48-inch spread still lands on a stud pair.
Avoid the very ends
Do not put the supports right at the nose and the tail. The ends overhang and tend to flex or droop over time, and the board becomes harder to balance when you load it.
Check it level
Hold a level on the top of the arms before you drive the final screws. An arm that tilts down lets the board slide out and an arm that tilts up pushes it into the wall.
Inflatable boards: rack, shelf or bag
Stored inflated
Glide’s support team says storing an inflatable inflated is completely fine and that it should ideally be off the ground on a rack or wall mount, out of direct sunlight and away from hot garages and extreme swings. For a board you use often, a padded wall cradle is the easy option.
Reduce the pressure
Glide’s winter guide suggests storing an inflated board at a reduced pressure, roughly 4 to 7 PSI, to reduce seam stress, then topping it up before paddling. BOTE lists optimal inflation for its boards at 10 to 15 PSI, so storage pressure sits well below riding pressure. Follow your own board’s manual.
Stored deflated
For long-term storage, Glide, Starboard and Canadian Board Co all recommend deflating, rolling loosely from the nose toward the valve and keeping the board in its bag. Avoid hard creases, vary the fold line from year to year and keep the board dry.
Shelf rather than wall rack for the rolled board
A rolled inflatable belongs on a shelf or in a bin, not hanging. Put it off the floor, with nothing stacked on top, and add a silica gel pack to the bag as Glide suggests. Do not vacuum-seal the bag.
Check it in spring
Glide advises inflating to full pressure, 15 to 20 PSI for its boards, and checking for leaks, seam separation or a hissing valve before the first paddle. Do that in the driveway and not at the put-in.
Fins, leash, pump and paddle
Fins out for storage
Starboard, Paddle Board Nation and Taiga Board all recommend removing the fin before storing the board, both to protect the fin and to stop it getting stuck in the box. Clear sand and grit from the fin box while you are there.
A labeled bag for the small parts
Put the fin, screw, plate and leash in a zip bag or small pouch and write the board’s name on it. Hang the bag on a hook beside the board so the next trip begins with one grab.
Pump and repair kit
An inflatable’s pump, valve wrench and repair kit belong in the board’s bag or on a hook next to it. If the pump is in another room, the board will not get used.
The paddle
Two wide hooks or a pair of slots take a paddle without bending the blade. Hang it handle-up or blade-up, rather than leaning it in a corner where it will slide and fall.
Garage temperature and sunlight
The manufacturers’ ranges
Paddle Board Nation cites ISLE’s recommended storage range of about 40 to 110 F. Glide suggests keeping inflatables at roughly 40 to 85 F for long-term storage. Canadian Board Co is stricter, tying its warranty to storage between about minus 5 and 27 C, or about 23 and 81 F. Check your own board’s warranty or manual for its number.
Cold makes foam brittle
Taiga Board explains that a hard board’s foam core is sensitive to thermal expansion and can become brittle when it gets very cold. A garage that hovers around freezing is not usually dramatic, but a deep-freeze unheated space is a reason to bring the board into a shed with insulation or the house.
Heat softens glue and PVC
Glide notes that extreme heat can soften the glue in an inflatable and that stable temperatures beat extremes. Paddle Board Nation adds that a dark deck pad absorbs heat and that, in extreme cases, heat can delaminate the deck. A hot, sunny garage wall in July is the wrong place.
Cover it, but let it breathe
A breathable board bag or cover keeps dust and scratches off. Glide’s hard-board guide suggests a bag or breathable fabric cover and, when covering outdoors, leaving one end slightly open for ventilation. Do not wrap a board in plastic.
How to mount the rack so it stays put
- Pick the wall and find the studs with a stud finder, then mark the center of each stud with a pencil and confirm it by tapping a finish nail through the spot where the arm will go.
- Decide the spacing: about a third of the board’s length in from each end, then adjust to land on studs. Write the numbers on a piece of tape on the wall.
- Set the height of the lowest arm so the board clears the floor and anything stored under it, and the top board is within easy reach.
- Hold the first arm or track against the wall and mark the screw holes. Use a level across both arms before drilling.
- Drill pilot holes slightly narrower than the screw shaft and drive in the screws or lags supplied with the rack, or in screws long enough to bite well into the stud.
- If the wall is concrete block, use masonry anchors rated for the load and the drill bit the anchor maker specifies, as StoreYourBoard’s racks suggest for concrete.
- Check that every screw is tight and the arm does not wobble or flex under a firm downward pull.
- Add the foam sleeve or pipe insulation if the arms are bare, and trim it so there is no bare metal where the rail touches.
- Lift the board into the rack with a friend the first time, rail down, and check it sits level and cannot rock out.
- Hang the paddle hooks and the fin bag beside the board, then stand back and check you can lift the board off without hitting the car, the door or the tools.
Loading and unloading safely
Lift with your legs and a partner
A 25 to 30 lb board is easy to carry but awkward to lift above shoulder height. Use two people for the first few loads. Hold the board by the center handle, lift to the level of the arm and slide it in rail first.
Mind the fin and the tail
If the board is loaded deck-out, the fin box is on the wall side. Watch the tail on the way past the car or a door frame, and keep the board away from the lawn mower and anything sharp.
Put the lower board on the lower arm first
In a two-board rack, load the lower level first so you are never reaching around a board above your head, and unload the upper board first when you take one down.
Never lean on the rack
Do not use an arm or a hook to pull yourself up or to hang a bag. The rating covers a board, not a person.
Two boards, kids’ boards and family fleets
Two boards on two levels
A two-level rack lets two boards share one wall strip. Leave enough vertical gap that you can slide the top board out without hitting the bottom one. StoreYourBoard’s Kona rack offers adjustable levels for that reason.
Heavier board on the bottom
If one board is a heavy fishing or touring board and the other is a light kid’s board, put the heavy one at the bottom so you are not lifting 35 lb overhead.
Kids’ boards and shorter boards
A short board needs the supports closer together. Do not use the same spacing for a 9 ft kid’s board as for an 11 ft adult board. Move the arms in to keep them about a third of the way in from each end.
Life jackets and paddles in the same zone
Give the fleet a station: boards on the wall, paddles on hooks and life jackets on their own hooks or a dedicated rack. Jackets need to dry fully, so hang them rather than stack them.
Winter and off-season care
Clean it and dry it
Rinse the board with fresh water, especially after salt water, and let it dry completely, including the fin box, the leash plug and the deck pad. Glide and Canadian Board Co both stress that storing a damp board leads to odors, mold and material breakdown.
Inspect before you store
Do the inspection while the board is clean. Look for dings, cracks in the rail, soft spots in a hard board and slow leaks or seam lifts in an inflatable. Fix small things while the repair glue can cure in a warm room.
Think about mice and sharp things
Canadian Board Co flags unheated garages and sheds as risky because of cold and rodents. Keep the board in its bag, off the floor and away from mower blades and tools, and check it periodically.
Use UV protection if the board lives in a bright garage
REI suggests a sun-protective spray for UV protection. A cover over a window that gets afternoon sun is the cheaper first step.
Three sample setups
The single hard board
Two padded arms into studs about 44 inches apart, board on its rail deck-out, a paddle on two hooks and the fin and leash in a labeled bag on a third hook. It fits in a 4 ft strip of wall and keeps everything for one trip together.
The family of three
One two-level rack or two pairs of arms stacked, with the heavier adult board on the bottom, a kid’s board above it, a row of paddle hooks and a life jacket rack alongside. Label each hook with a name.
The inflatable and a tight garage
A shelf at head height with the rolled boards in their bags, a hook for each pump, a wall-mounted fin bag and a paddle hook. If you ride weekly, add a single padded cradle for the board you use most.
Where the $50 goes
Under $20
A pair of heavy-duty padded hooks or a DIY 2x4 cradle with foam sleeves, screws and a few paddle hooks. This works for a single light board if you fix it into the studs properly.
Around $30 to $40
A single padded strap sling or a basic padded arm pair with a published rating, plus a labeled fin bag and a couple of hooks.
Close to $50
The best padded rack you can find with a clear weight rating and stud fixings, or two slings for two boards. Many branded two-board racks list above $50, so leave the pricey ones for if you need them.
Keeping the rack clean
Wipe the pads
Wipe the foam or rubber with a damp cloth when you wipe the board. Sand and grit on the pad act like sandpaper on the hull.
Check the fixings
Once a season, tighten the screws and check the arms for wobble, bends or rust. A little surface rust on a bolt is cosmetic. A loose arm is not.
Replace worn foam
Pipe insulation and rack pads compress and tear. Replace them when they flatten or split, since that is when the metal starts to touch the board.
What a wall rack will not fix
A board that is stored damp
A rack keeps the board off the floor, but it cannot dry a board. If the board goes up wet, it will still grow mildew and smell.
Sun and heat
A rack on a sunny wall of a hot garage does not protect the board. Put it in the shade and keep it in the temperature range its maker recommends.
A crowded garage
Racks free the floor, but they do not make a car-length board easy to move. If the board is hard to reach, it will not get used, and REI notes that ease of access matters.
How to set it up in an afternoon
- Measure the board’s length, width and thickness, and weigh it on a bathroom scale if you are not sure.
- Decide where the rack goes: on a shaded side wall, away from the car doors, the water heater and the sun.
- Find and mark the studs, then mark the arm positions about a third of the way in from each end of the board.
- Choose the rack or sling and confirm its rating against the board.
- Mount the arms or base into the studs, check they are level, and add padding where needed.
- Lift the board in and check it sits level and cannot slide out.
- Hang the paddle and fin bag nearby and label them.
- Take a photo of the finished wall so anyone else can put things back.
Mistakes to avoid
- Hanging a board by its handle, the fin or a leash plug, which are not made to carry the whole weight.
- Standing a board on its nose or leaving it upright on its tail for months.
- Using thin rope or a ratchet strap cinched tight, which creates pressure points and dents the rail.
- Screwing arms into drywall without finding the studs.
- Leaving bare steel arms where the rail touches the metal.
- Storing the board deck-up in a sunny window, where the dark deck pad soaks up heat.
- Stacking boards on top of each other, or heavy things on top of a board.
- Leaving the fin in when the board is racked hull-to-wall.
- Putting the rack right where the car door swings.
- Storing a damp board or a damp bag, and then wondering about the smell in spring.
Related guides
Browse the hub: Garage wall storage under $50 - all guides
- Best Kayak Wall Mounts Under $50 for Garage Storage
- Best Kayak Paddle Wall Hangers for Garages Under $50
- Best Life Jacket Wall Racks Under $50 for Garage Boat Storage
- Best Roof Rack Accessory Wall Hooks Under $50 for Garage
- Bike Ceiling Hoist vs Wall Hook: Which Under-$50 Option Saves More Garage Space?
- Best Ski & Snowboard Wall Racks Under $50
FAQ
What is the best way to store a paddle board in a garage?
Rest it on its rail, deck facing out, on two padded wall arms fixed into studs about a third of the way in from each end, or hang it from wide padded slings with the hull toward the ceiling. Keep it dry and out of direct sun, and take off the fin and leash.
Can I hang a paddle board from the handle?
No. The handle is meant for carrying, not for taking the whole weight in storage. Support the board along its length with padded arms or wide straps, as REI recommends.
Should I store a paddle board vertically?
Not on its nose. REI says never to stand a board on its nose, and Glide says not to store a hard board upright on its tail because of pressure damage. A wall rack that holds it on its rail avoids both problems.
Can I leave an inflatable paddle board inflated on the wall?
Yes, according to Glide, as long as it is off the ground, out of direct sun and away from extreme temperatures. Many makers suggest letting some air out for long storage. Check your board’s manual for the pressure.
Is it OK to store a paddle board in an unheated garage?
It depends on how cold and how long. Paddle Board Nation cites ISLE’s range of about 40 to 110 F, Glide recommends about 40 to 85 F for inflatables and Canadian Board Co ties its warranty to about minus 5 to 27 C. If your garage falls outside your board’s range, bring it inside.
How much weight should a paddle board rack hold?
Typical boards weigh about 18 to 35 lb, with fishing boards heavier. A rack rated at 50 lb per level clears most, and many arm pairs are rated at 100 lb per level. Confirm the rating on the product page and add a margin.
Bottom line
A paddle board does not need much: two padded supports in the studs, the right spacing and a shady, dry, temperate spot. Start with the board’s weight and thickness, choose padded arms or a wide sling with a published rating, mount into studs about a third of the way in from each end, and give the fin, leash and paddle hooks of their own. Do that and the board will be in the same shape next spring as it is today, and the garage floor will be clear for the car.