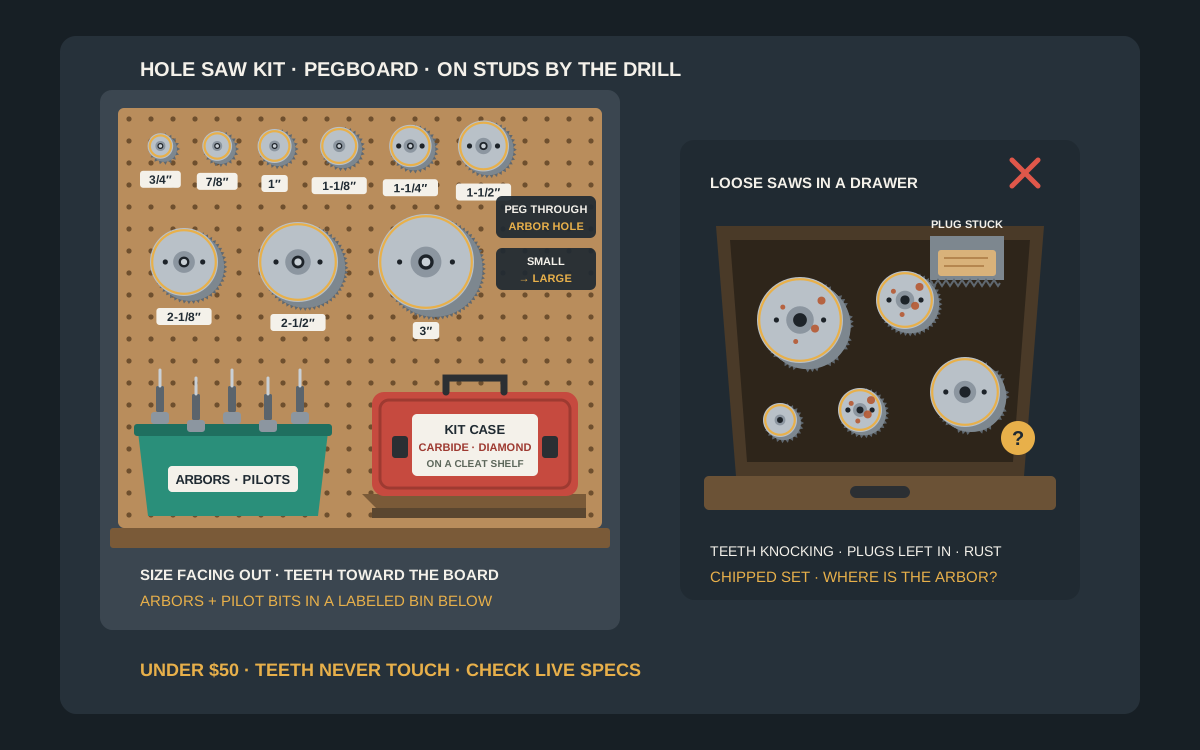
For most garages, the best under-$50 way to put a hole saw kit on the wall is to hang the saws you use often on 1/4-inch pegboard pegs or a dedicated hole saw rack, smallest to largest with the size facing out and the teeth toward the board, and to give the arbors, pilot bits and adapters their own labeled bin right below. Keep the original case on a narrow shelf or French cleat holder for carbide, diamond and rarely used sizes, use a magnetic bar only for two or three go-to steel saws, and mount the station on studs next to your drill and charger. Knock the plug out before a saw goes back, keep teeth from touching, and check the current dimensions and price on the listing before you buy.
Shop hole saw organizers on Amazon
Who this is for
- DIYers and trades who own a hole saw kit, or a growing pile of loose saws, and spend longer hunting for the 2-1/8-inch saw and the right arbor than cutting the hole
- Garage shops where hole saws live in a drawer or a bucket, tangled with stuck plugs, rust spots and the last pilot bit nobody can find
- Anyone choosing between pegboard pegs, a dedicated hole saw rack, a magnetic bar, a shelf for the kit case or a wall bin for arbors under $50
Quick answer
For most garages, the best under-$50 way to put a hole saw kit on the wall is to hang the saws you use often on 1/4-inch pegboard pegs or a dedicated hole saw rack, smallest to largest with the size facing out and the teeth toward the board, and to give the arbors, pilot bits and adapters their own labeled bin right below. Keep the original case on a narrow shelf or French cleat holder for carbide, diamond and rarely used sizes, use a magnetic bar only for two or three go-to steel saws, and mount the station on studs next to your drill and charger. Knock the plug out before a saw goes back, keep teeth from touching, and check the current dimensions and price on the listing before you buy.
Quick comparison
| Format | Best for | Typical price band | Why it wins |
|---|---|---|---|
| Pegboard straight pegs (1/4-in board) | Loose bi-metal saws you use every week | Often $10–$25 for a hook kit with locks | One size per peg through the arbor hole, sizes readable at a glance |
| Dedicated hole saw racks | A whole kit laid out smallest to largest | Often $15–$40 | Purpose-built spacing so rims and teeth never touch |
| Magnetic tool bars | Two or three go-to steel saws plus an arbor by the drill | Often $10–$25 | Fastest grab-and-go, no hooks to lift out |
| Shelf or French cleat holder for the kit case | Carbide, diamond and rarely used sizes kept as a set | Often $15–$40 | The molded case protects teeth and keeps every part together |
| Wall-mount small-parts bins | Arbors, pilot bits, drive pins and adapters | Often $15–$35 | The small parts that go missing get a labeled home |
Pegboard hook kitsMagnetic tool barsWall-mount parts bins
What to look for
Fits your real size range, with room to grow
Hole saw kits commonly run from about 3/4 inch to 2-1/2 inches, some go larger, and most garages add loose sizes over time: a 2-1/8-inch and a 1-inch saw for door locks, 7/8 inch and 1-1/8 inch for electrical knockouts (1/2- and 3/4-inch trade-size conduit), and bigger cups for dryer vents, recessed lights or pipe pass-throughs. Count what you actually own, add room for a handful more, and check the organizer’s spacing and depth against your biggest saw. A 4-inch saw hung on spacing meant for 1-inch cups will knock teeth with its neighbors every time you lift it.
Tooth protection and separation
Bi-metal teeth are hardened and set to cut a kerf wider than the cup wall. Banging them into each other, into a steel peg or onto a magnetic bar chips that set and dulls them faster than a day of cutting. Carbide-grit and diamond-edge saws are even less forgiving: the grit chips or rubs off. Look for spacing that keeps rims apart, coated pegs or hooks, and for carbide and diamond saws, the molded case or individual sleeves. Remember that a hole saw also cuts hands, so hang saws with the teeth facing the board, not you.
Somewhere for arbors, pilot bits and adapters
A hole saw is useless without the right arbor (mandrel) and pilot bit. Many kits split the job between a small arbor for saws under roughly 1-1/4 inches and a larger arbor with drive pins for the rest, plus spare pilot bits, adapters and sometimes a plug-removal tool, and quick-change systems add their own sleeves. Whatever system you have, the organizer needs a labeled bin or tray for those parts right beside the saws. Otherwise the whole setup fails the first time someone borrows the arbor and drops it in a different drawer.
Mounting strength and a sensible location
A full bi-metal kit in its case often weighs several pounds, and a rack of loose saws adds up quickly. Mount racks, bars and shelves on studs or a plywood backer, not drywall alone, and use hook locks on pegboard so a saw lifted off its peg does not take the hook with it. Put the station within reach of the drill and its charger, roughly chest to eye height, away from grinder sparks and out of the wet zone inside the garage door where rain and road salt come in.
Pegboard vs dedicated rack vs magnetic bar vs case shelf vs bins
When pegboard pegs win
Hole saws have a threaded center hole for the arbor, which makes them unusually easy to hang: a straight peg through that hole holds the saw flat against the board. On 1/4-inch-hole pegboard, a straight peg or a short double-prong hook handles most kit sizes, while 1/8-inch board and its thin wire hooks are better kept for one or two small saws. Slide each saw on with the back plate and its size marking facing you and the teeth toward the board, which protects both the teeth and your knuckles. Hang one size per peg, or two adjacent sizes on a longer peg, in a single run from small to large, so the layout itself shows you which saw is still out on a job. Pegboard also makes it easy to put the arbor bin directly below and the door-lock set beside it, and to rearrange everything when the collection grows.
When a dedicated hole saw rack makes sense
Purpose-built hole saw racks hold a whole kit on posts or in slots sized for the back plates, with spacing chosen so rims do not touch. They look tidy and read like an index. There are fewer listings than for drill bit cases, though, and some are benchtop stands rather than wall racks, so check for real mounting holes, compare the post diameter with your saws’ center holes, and confirm the largest saw size the rack is designed for before you buy. A shop-made rack is an easy weekend alternative: a strip of 3/4-inch plywood with hardwood dowels glued into holes drilled at a slight upward angle, spaced for each saw diameter plus a finger’s width, costs very little and fits any collection, including the oddball sizes no kit includes.
When a magnetic tool bar is enough
Bi-metal and most carbide-tipped hole saws have steel bodies, so they stick to a strong magnetic bar. A short bar beside the drill can hold two or three sizes you use constantly plus the arbor, and nothing is faster to grab. The drawbacks are real: the teeth or rim sit against a hard surface, the bar collects metal chips that migrate into the teeth, and a large saw can slide or fall if it is bumped. Use a bar for small, frequent sizes, mount it where shoulders and heads do not brush past, and keep diamond and carbide-grit saws off it.
When the kit case on a shelf or cleat is smarter
If your kit came in a decent blow-molded case, that case is the best tooth protection you own. A narrow wall shelf, or a French cleat holder that keeps the case upright with the latch facing out, turns the kit into wall storage without unpacking it. This is the right home for carbide-grit and diamond saws, for sizes you use twice a year, and for kits that ride to job sites. The trade-off is speed: you open a case every time instead of lifting a saw off a peg. Many garages end up with both, everyday sizes on pegs and the full kit in its case on a shelf above.
When small-parts bins earn their spot
Arbors, pilot bits, spare drive pins, adapters, quick-change sleeves and the occasional ejector spring are the pieces that disappear. A short row of wall-mount bins, or pegboard bins hung right under the saws, keeps them together. Label the bins by arbor size and thread so the small and large arbors never get mixed up, and keep spare pilot bits in their own cup so you can see when you are down to the last one before a job starts.
Organizing by size, material and job
Smallest to largest, size facing out
Most hole saws have the size stamped or printed on the back plate or side wall. Hang them in one run from small to large with that marking facing you, and stick a strip of label tape under each peg showing the inch size, plus the metric size if you mix brands. An empty peg then shows instantly which saw is missing, and a guest helper can put a saw back in the right spot without asking.
Separate bi-metal, carbide and diamond
Bi-metal saws are the general-purpose choice for wood, plastic, drywall and most metals. Carbide-grit or carbide-tipped saws are aimed at tile, fiber cement, masonry and other abrasive materials, and diamond saws at porcelain, glass and stone. From across the garage they look alike, and running one on the wrong material ruins it fast. Give each family its own zone, or a dab of colored paint or tape on the back plate, and keep the grit and diamond saws in the case or in sleeves.
Keep job sets together
A door-lock kit, usually a 2-1/8-inch saw and a 1-inch saw with a boring jig, works best stored as one set on one hook or in one bin. The same goes for the sizes you reach for when cutting electrical box and conduit holes, plumbing pass-throughs or vent pipe openings. Grouping by job means grabbing one set, not three separate saws and a guess about which arbor fits.
Build the station around the drill
Hole saws need a drill with enough torque, the right arbor and a charged battery, so their wall spot belongs next to your drill holder and charger rather than across the garage with the hand tools. Mount the arbor bin within arm’s reach of both, and keep a pair of safety glasses and work gloves on a hook nearby, since hole saws throw chips and bind hard when they catch.
Protecting teeth and preventing rust
Knock the plug out before storing
A wood or drywall plug left in the cup traps moisture against the steel and stops the saw from hanging flat. Push plugs out through the slots in the side wall with a screwdriver, or use the plug-ejection feature on arbors that have one, before a saw goes back on the wall. It is also easier to do while the plug is fresh than after it has swollen in a damp week.
Clean resin and chips
Resin from softwoods and melted plastic glaze the teeth and hold moisture against them. Brush chips out of the gullets, wipe resin off with a cleaner made for saw blades, and let saws that were cooled with water or used in wet material dry completely before they go back on a peg or into the case.
Light oil and dry air
In damp garages, a thin film of light machine oil or a rust-inhibiting spray on bi-metal saws and arbors stops the orange bloom that appears after a humid week. A reusable silica gel pack inside the kit case helps too. Keep the station off exterior walls that sweat in winter, and away from the garage door where rain, snowmelt and road salt come in.
Never let teeth touch
Spacing on a rack, a coated peg, or the molded slots of the case keep teeth from knocking together. Loose saws thrown into a drawer or a bucket is the fastest way to dull a set of bi-metal teeth and chip a carbide edge, and it is how plugs, rust and lost arbors start.
Installation that holds and stays safe
Find studs or add a backer
Screw racks, magnetic bars and case shelves into studs, commonly 16 inches on center and sometimes 24, or into a plywood backer fixed across two studs first. Pegboard needs furring strips or spacers behind it so the hooks can seat, and on poured concrete or block walls use masonry anchors sized for the load and installed per the anchor maker’s instructions.
Height and reach
Mount the rack roughly chest to eye height so you can read the sizes and lift a saw straight off its peg without reaching over a cluttered bench. Keep the bottom row above whatever piles up on the bench, and keep saws out of the walkway where shoulders and elbows brush the wall.
Lock the hooks
Pegboard hooks are designed to lift out, which is great for rearranging and bad when you pull a saw off in a hurry. Fit pegboard hook locks, clip-on retainers or a zip tie on each peg that holds a saw, so the hook stays put and the saw comes off alone.
Test the layout once
Hang everything, then take each saw down and put it back once, wearing gloves if the teeth are fresh. If a saw catches its neighbor, scrapes the board or drags its hook out, re-space it now. Ten minutes of testing beats discovering the problem with a 3-inch saw in one hand and a drill in the other.
Mistakes to avoid
- Storing hole saws loose in a drawer or bucket where the teeth knock together.
- Putting saws away with wood or drywall plugs still stuck inside the cup.
- Splitting the arbors and pilot bits from the saws, so the kit is useless when you need it.
- Hanging diamond or carbide-grit saws on a magnetic bar or a bare steel peg where the edge chips.
- Buying an organizer spaced for small cups and forcing a 4-inch saw onto it.
- Mounting a loaded rack or a kit shelf on drywall anchors alone instead of studs or a backer.
- Hanging saws teeth-out at the height where hands and shoulders brush past.
- Leaving wet, resin-glazed saws on the wall in a damp garage until they rust.
Related pick: Best Drill Bit Storage & Wall-Mount Organizers Under $50
Related guides
Browse the hub: Garage wall storage under $50 - all guides
- Best Drill Bit Organizers Wall Mount Under $50
- Best Router Bit Racks Under $50 for Garage Walls
- Best Circular Saw Blade Organizers Under $50 (Wall Mount)
- Best Cordless Drill Organizers for Garage Walls
- Best Screwdriver Wall Racks Under $50 for Garage Workshops
- Best Magnetic Tool Bars Under $40 for Garage Walls
- Pegboard vs French Cleat for Garage Walls: Which Under-$50 System Wins?
FAQ
What is the best way to store hole saws on a garage wall?
For most garages, hang everyday bi-metal saws on 1/4-inch pegboard pegs or a dedicated hole saw rack, smallest to largest with the size facing out and the teeth toward the board, with a labeled bin for arbors and pilot bits below. Keep carbide, diamond and rarely used sizes in the original case on a shelf or French cleat holder.
Can I hang hole saws on pegboard?
Yes. A straight peg through the saw’s threaded center hole holds it flat against the board, and 1/4-inch pegboard with straight or double-prong hooks suits most kit sizes. Use hook locks so the peg stays in the board when you lift a saw off, and give large saws enough spacing that rims do not touch.
Should I keep hole saws in the original case?
Keep the case if it is solid. It is the best protection for carbide and diamond saws and for kits that travel. Many garages put the full kit in its case on a wall shelf and move only the three or four sizes they use most onto pegs or a rack by the drill.
Where should I store hole saw arbors and pilot bits?
Right next to the saws, in a labeled wall bin or pegboard bin. Sort arbors by size and thread so the small and large arbors stay with the saws they fit, and keep spare pilot bits in their own cup so you notice when you are down to the last one.
How do I stop hole saws from rusting in the garage?
Push the plugs out before storing, clean off resin and chips, let wet saws dry fully, and wipe bi-metal saws and arbors with a thin film of light oil or rust inhibitor. A silica gel pack in the kit case and a station away from sweating exterior walls and the garage door help too.
Bottom line
Hole saw kit wall organizers under $50 work when every saw has its own spot, the teeth never touch, and the arbors and pilot bits live right beside the saws: pegboard pegs or a dedicated rack for everyday bi-metal sizes, a magnetic bar for two or three go-to saws by the drill, the original case on a shelf or cleat for carbide, diamond and rarely used sizes, and a labeled bin for the small parts. Hang saws size-out and teeth-in, knock plugs out before they go back, keep them dry and lightly oiled, and mount the station on studs next to the drill. Verify live dimensions, mounting hardware and price on the listing before you buy.