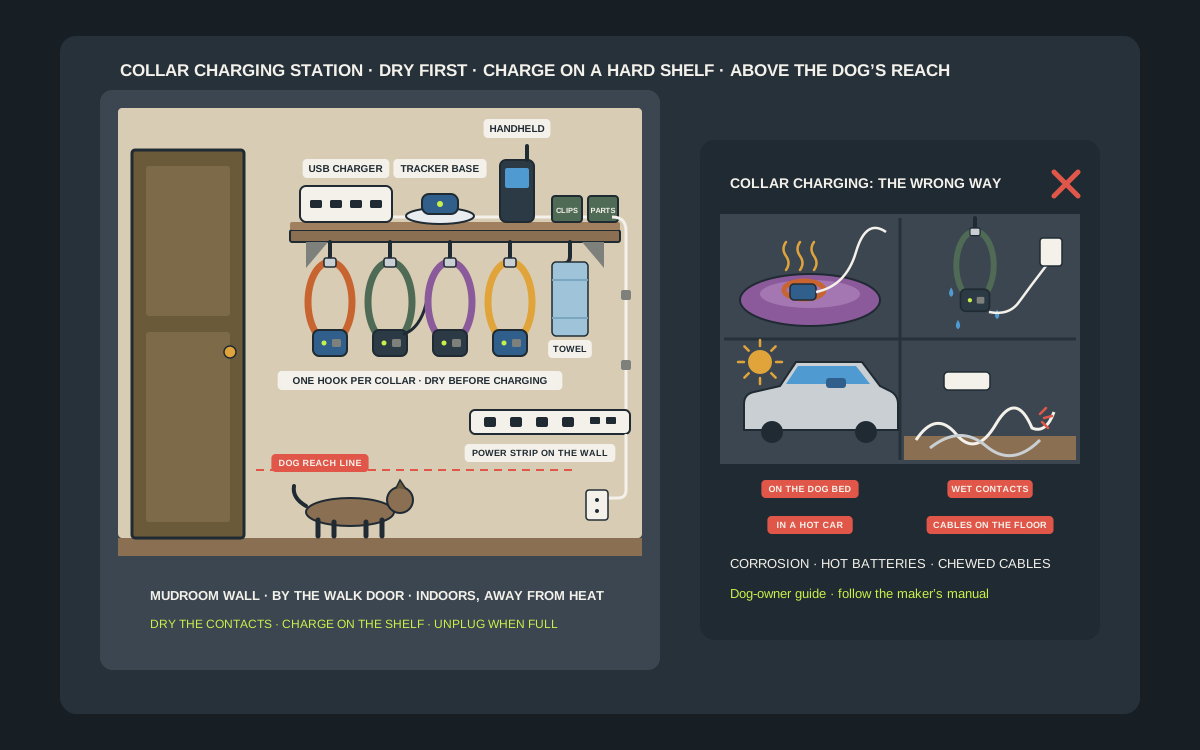
Smart collars have quietly turned the dog’s gear into a charging problem. The GPS tracker needs its base or clip, the bark collar has its own cradle, a hunting setup adds a handheld and a second collar, and every one of them uses a different cable that is never where you left it. The result is a collar charging on the kitchen counter, a charging clip lost in a drawer, a tracker at 5 percent on the morning of a long hike, and a collar that stays on the dog all night because nobody knows where else to put it. A small wall station fixes that for well under $50: one shelf, a few hooks, a decent USB charger and somewhere for the little parts. This guide covers what each popular collar actually needs to charge, where to put the station so the batteries stay in their comfort zone, how to keep collars dry and out of reach of the dog, and how to build a setup that works for one dog, a busy multi-dog home or a truck full of hunting dogs.
Shop wall charging shelves with hooks on Amazon
Who this is for
- Owners of GPS trackers and smart collars such as Fi, Tractive, Halo and Garmin who are tired of hunting for the charging base or clip
- Homes with bark collars or remote collars that need a dry, safe place to rest and charge when they are off the dog
- Multi-dog households where every collar, tracker and handheld needs its own labeled spot
- Hunters, trial handlers and hikers who need every collar charged and packed before a dawn start
Quick answer
For most homes, the best under-$50 setup is a stud-mounted shelf with hooks underneath, hung in the mudroom or by the door you use for walks, at a height the dog cannot reach. Put a multi-port USB charger with a recognized safety listing, the tracker base and any handheld on the shelf, hang each collar on its own hook to air out when it is off the dog, and keep charging clips and small parts in labeled bins. Dry the contacts before charging, charge on the hard shelf rather than on a dog bed or couch, keep the station indoors where the temperature stays within the maker’s charging range, and unplug devices once they are full.
Quick picks
- Best overall: a stud-mounted entryway shelf with four or five hooks underneath, hung in the mudroom or by the door you use for walks, with the USB charger and tracker base on top and each collar hanging on its own hook below while it is off the dog.
- Best charger for a multi-dog home: a multi-port USB wall charger from an established brand with a recognized safety listing, such as UL or ETL, with one port per collar or tracker so every device can charge at once from one outlet.
- Best for power: a wall-mounted power strip with built-in USB ports and keyhole slots on the back, screwed to the wall beside the shelf so the charger and cables never sit on the floor.
- Best no-drill option for renters: Command Medium Utility Hooks for the collars, rated by 3M at 3 lb each, plus a small adhesive shelf with a published weight limit for a single tracker base or charging clip.
- Best for small parts: a pair of small wall bins or a stick-on drawer for charging clips, spare contact points, the test light, a contact-point wrench and spare straps, labeled by dog or by collar.
- Best for hunting and field dogs: a short stud-mounted pegboard or slat strip with a hook for each GPS collar, a hook for the handheld on its lanyard, and a grab-and-go bag with the charging clips and a car USB charger.
Quick comparison
| Station type | Best for | How it works | Trade-off |
|---|---|---|---|
| Entryway shelf with hooks underneath | Most one- and two-dog homes | Chargers on top, collars hang below | Needs screws into a stud or rated anchors |
| Small adhesive shelf plus Command hooks | Renters with one tracker | Base on the shelf, collar on a 3 lb hook | Low load limit; no heavy chargers |
| Multi-port USB wall charger | Several collars at once | One outlet feeds every device | Pick a listed brand; cheap units run hot |
| Wall-mount power strip with USB | Keeping cables off the floor | Screws to the wall via keyhole slots | Do not daisy-chain strips |
| Stick-on pegboard or slat strip | Hunting and multi-dog setups | Hooks for collars, handheld and bags | Takes more wall space |
| Small wall bins or a stick-on drawer | Clips, contact points, test lights | Labeled bins by dog or by collar | Bins become junk drawers without labels |
| Adhesive cable clips or a raceway | Neat cable runs | Holds each cable at the shelf edge | Clips peel on textured walls |
| Freestanding charging box on a cabinet | Walls you cannot touch | A lidded box with a cable slot | Uses counter space; check ventilation |
Multi-port USB wall chargersWall-mount power strips with USBSmall wall bins and organizers
What to look for
A hard, ventilated surface for charging
The single most important part of the station is a hard, flat, open surface to charge on. The NFPA’s lithium-ion safety guidance tells people to charge devices on hard surfaces, not on beds, couches or under pillows, where heat can build up. Tractive’s safety sheet also says to charge its trackers in a well-ventilated, open area away from flammable materials. A wooden or metal shelf does that; a dog bed, a pile of towels or a fabric bin does not.
Height above the dog’s reach
Collars, trackers and especially cables are chew toys to a puppy or a bored adult dog. Mount the shelf and hooks high enough that the dog cannot reach them standing on its hind legs, and make sure no cable hangs below that height. For a large breed, that usually means the shelf sits at least at adult chest height.
A real weight rating and the right fixings
The load on a collar station is light, but the shelf will be bumped every day by people grabbing leashes. A shelf screwed into a stud, or into proper drywall anchors rated for the load, will not sag or pull out. If you rent and use adhesive, pick hooks and shelves with a stated weight limit and stay well under it.
One port and one hook per device
Count the devices: each GPS collar, each bark or remote collar, each handheld and the phone you use with the tracker app. A station that has one charger port and one hook for each means nothing has to wait its turn and nothing gets piled on top of something else. Leave one spare port for the device you will buy next year.
Room for the charging hardware
Collar chargers are not just cables. A Fi Series 3 tracker charges on its Fi Base, many Tractive trackers use a clip or magnetic charger, Garmin collars use a snap-on charging clip, and the SportDOG NoBark SBC-R uses a charging cradle. Measure the base or clip and make sure the shelf is deep enough to hold it flat, with the collar resting beside it and nothing hanging over the edge.
Near an outlet, away from water and heat
Put the station within reach of an outlet so no extension cord crosses the floor, and away from the sink, the dog’s water bowl, the washer and the boot tray. Keep it off the wall above a radiator, heater or sunny window. Lithium-ion batteries dislike heat, and most collar makers give a fairly narrow charging temperature range.
Know what your collar needs to charge
Fi Series 3 and Fi Ultra
Fi says its Series 2, Series 3 and Series 3+ trackers charge on a Fi Base, while the Fi Mini and Fi Ultra charge with a USB-C cable instead. A tracker typically takes around three hours to go from empty to full, and the Series 3 Base is powered by a standard USB cable. The base also does a second job: when the collar is near it, the tracker can save battery, and Fi suggests a second base for homes larger than about 3,000 square feet. That makes base placement part of the station plan, not an afterthought.
Tractive GPS trackers
Tractive’s current dog trackers charge with either a clip charger or a magnetic charger, depending on the model, and Tractive says a full charge takes about three hours. Tractive’s help pages say to use only 5V adapters, because higher-voltage chargers can damage the battery, and to use the cable that came with the tracker. The clip is small and easy to lose, which is exactly why it needs a labeled home on the wall.
Garmin Alpha and TT collars
Garmin’s TT 15 dog collar device charges with a snap-on charging clip and a USB cable. Garmin’s manual says to thoroughly dry the contacts on the collar and the surrounding area before connecting the clip, to prevent corrosion, and to remove the clip before the collar goes back on the dog, because a clip left on can come off and be lost in the field. Hunters often run two or three collars plus a handheld, so a Garmin setup needs more hooks and ports than most.
Halo and other GPS fence collars
GPS fence collars such as the Halo Collar charge with a magnetic charger and are built around a battery measured in hours of use rather than weeks. Halo’s help pages describe a charge of roughly two hours, which is why many Halo owners charge daily, often overnight or during a quiet part of the day. A daily habit needs a station that is quick to reach and right on the route the dog walks in and out.
SportDOG, PetSafe and other bark collars
Rechargeable bark collars usually charge through a cradle or clip that presses onto the receiver’s contacts. SportDOG’s guide for the NoBark SBC-R says the collar fully charges in about two hours through its charging cradle, should be kept in an open, well-ventilated area while it charges, and should be given a full charge every few months when it is stored for a long time. The cradle and its wall adapter are small, separate parts that are easy to lose between uses.
Where to put the charging station
The door you use for walks
The best spot is beside the door you actually use for walks, often a mudroom, back hall or the wall by the garage entry. Collars come off when the dog comes in, go on the hook or the charger, and go back on as the leash comes off its hook. If the station sits in a spare room upstairs, the collars will end up on the kitchen counter again within a week.
Inside the heated part of the house
Garmin’s TT 15 manual says the collar will not charge outside about 0 to 40 C, or 32 to 104 F, and lists a long-term storage range up to about 25 C, or 77 F. Tractive says not to charge its TG5 tracker below 0 C or above 45 C. A detached garage in January or a hot shed in July falls outside those ranges, so the station belongs in the heated, cooled part of the home, even if the leashes and crates live in the garage.
Not in the dog’s space
Do not put the station over the dog’s bed, crate or feeding area. The dog should not be able to reach the cables, and the station should not be the place where the dog sleeps next to a charging battery. A wall at the side of the entry, a few feet from the bowls and crate, works better than the wall right above them.
Central enough for a home base
If your tracker uses a home base or Wi-Fi to save battery, the station location also affects how well the collar connects at home. Fi recommends a second base for larger homes. If the mudroom is at the far end of a long house, consider putting the base on the station and adding a second base nearer the middle, or follow the maker’s own placement advice.
Choosing a shelf, hooks and bins
Wood, metal or plastic
Solid wood and powder-coated metal shelves look good in an entryway and handle daily bumps. Thin particleboard can sag and crumble around screws over time. Plastic shelves are light and easy to clean, which suits a muddy mudroom, but they can flex under a heavy charger.
A lip on the front edge
A small raised lip or rail on the front of the shelf stops a charger or base from sliding off when someone pulls a cable. If your shelf has none, a strip of non-slip drawer liner under the charger does the same job.
Hooks that hold a collar
Collars hang best from rounded J-hooks or double hooks with a smooth finish. Sharp-edged hooks scratch receivers and can fray nylon straps. Avoid tiny decorative hooks that let a heavy receiver slide off when the door slams.
Bins you can see into
Clear or open-front bins show at a glance whether the charging clip is there. Lidded bins are better for spare contact points and small parts if you have a puppy or a curious child, because they are small enough to swallow.
Dry first, then charge
Why wet contacts matter
Collars get wet on every rainy walk, every swim and every bath. Garmin says to dry the contacts on the collar and the surrounding area before you connect the charging clip, to prevent corrosion. Corroded contacts charge slowly or not at all, and a collar that will not charge is a collar that is dead on the morning you need it.
Give each collar a drying hook
This is the reason the hooks under the shelf matter. When a collar comes in wet, hang it by the strap on its own hook with the receiver or tracker hanging free so air can reach both sides. Wipe the contacts with a dry cloth, give it time to dry, and only then clip it onto the charger. A hook with a little space either side keeps one wet collar from dripping onto the next.
Keep a towel on the station
A small microfiber towel on its own hook beside the collars makes drying the contacts a five-second job. Use a separate towel from the one you use on the dog’s paws, so the collar towel stays clean and lint-free.
Wash the contacts on a schedule
PetSafe’s bark collar manuals tell owners to wash the dog’s neck area and the collar contacts weekly with a damp cloth. Put that on the same day you clean the water bowl, and let the contacts dry fully on the hook before they go back on the charger.
Collar off-time is part of the routine
Why the collar needs somewhere to rest
Electronic collars are not meant to be worn around the clock. PetSafe’s safety guidance advises avoiding leaving its collars on a pet for more than 12 hours a day, moving the collar every one to two hours when possible, and checking the contact area daily, because a collar worn too long or too tight can cause skin damage ranging from redness to pressure sores. A charging station gives the collar a natural home for the hours it is off the dog.
Check the neck when the collar comes off
The moment the collar goes on its hook is the easiest time to glance at the dog’s neck. If you see redness, a rash or a sore, follow the maker’s guidance: stop using the collar, keep the area clean and dry, and talk to your vet if it does not settle. PetSafe says to see a veterinarian if the condition persists beyond 48 hours.
Never clip the leash to the electronic collar
Bark collar makers such as PetSafe say never to attach a lead to the electronic collar, because the pull presses the contacts into the neck. Your leash and harness belong on their own hooks next to the station, ready to go on a separate collar or harness. Our harness and leash station guide covers that half of the wall.
Ask a professional about use
This guide is about storing and charging collars, not about whether or how to use a bark or remote collar. For questions about using one, talk to your vet or a qualified, certified trainer, and follow the maker’s instructions for your model.
Charging safely
Use the right charger and cable
Use the cable and charging clip that came with the collar, or a replacement from the same maker. Tractive specifically says to use only 5V adapters with its trackers. A multi-port USB charger from an established brand with a recognized safety listing, such as UL or ETL, is a better choice than an unbranded cube from a bargain bin, because the station will be charging several batteries at once in a busy room.
Unplug when it is full
Tractive’s safety sheet advises against leaving the battery connected to the charger for extended periods once it is full, and the NFPA also recommends unplugging devices once they are charged. Tractive’s help pages say the tracker stops charging when it is full, so overnight charging is fine for that model, but a simple charge-and-unplug habit satisfies every maker’s advice and keeps chargers from sitting warm all day.
Know the warning signs
Stop charging and disconnect any collar, tracker or handheld that gets very hot, swells, smells strange, leaks or makes popping or hissing sounds. That is the NFPA’s warning list for lithium-ion devices, and Tractive gives the same advice for excessive heat or swelling. Never put a damaged, chewed or swollen collar back on the charger; contact the maker.
Keep the floor clear
A charging cable across the floor is a trip hazard for people and a chew toy for the dog, and it is how collars get dragged off the shelf. Clip every cable to the edge of the shelf or run it in a short raceway to a power strip mounted on the wall, and keep the strip itself off the floor.
Do not overload the outlet
Plug the power strip directly into a wall outlet, not into another power strip or an extension cord, and do not hide it under a pile of coats. Collar chargers draw very little power, but a mudroom outlet often also serves a boot dryer or space heater, and those should not share the strip.
How to mount the station so it stays put
- Count every device that needs charging: GPS collars, bark or remote collars, handhelds, and spares.
- Measure the deepest charging base or cradle, and pick a shelf at least that deep, with room for a collar to rest beside it.
- Choose the spot: by the walk door, inside the heated part of the house, near an outlet, away from water bowls, heaters and the dog’s bed.
- Mark a height the dog cannot reach standing on its hind legs, and plan for every cable to stay above that line.
- Find a stud with a stud finder and mark it. If the shelf does not line up with a stud, use drywall anchors rated for well over the load.
- Level the shelf, pre-drill, and screw it in. Give it a firm downward push before you load it.
- Screw the power strip to the wall beside or under the shelf using its keyhole slots, with the cord running straight down to the outlet.
- Fit the USB charger, the tracker base and the handheld on the shelf, and clip each cable to the shelf edge with an adhesive cable clip.
- Hang each collar on its own hook, label the hooks and bins by dog, and put the charging clips in their bin.
- Test-charge every device once, check that nothing hangs below the dog’s reach line, and look again after a week of daily use.
Planning ports, hooks and bins
Do the count once
A one-dog home with a GPS tracker usually needs one base or clip, one hook and a phone charger. A two-dog home with a tracker and a bark collar per dog needs four charging spots. A hunting setup with three Garmin collars and a handheld needs four or five. Write the list down before you shop, and buy a charger with at least one spare port.
Charger output
Collar batteries are small and charge slowly by phone standards, so most multi-port USB chargers have plenty of output for several collars at once. What matters more is that every port is the right type for your cables, that the charger is from a listed brand, and that it sits on the hard shelf with air around it rather than wedged behind a bin.
Hooks with spacing
Space hooks about a hand-width apart so a wet collar does not drip on the next one and you can lift one collar off without unhooking its neighbor. Under a 24-inch shelf, four or five hooks is plenty; more than that and the collars start to tangle.
Bins for the little parts
Charging clips, cradles, spare contact points, the contact-point wrench, test lights, spare straps and the small adapters are the parts that disappear. Give each dog or each collar a small labeled bin. A bin also keeps those parts away from the dog; a charging clip or contact point is small enough to swallow.
Multi-dog homes, walkers and sitters
One color per dog
Give each dog a color and use it everywhere: a colored label on the hook, a colored dot on the charging clip and a colored bin. When the dog walker arrives, the right collar and the right clip are obvious, and so is the empty hook of the collar that never came back.
A card on the wall
Tape a small card inside the station or on the side of the shelf with the basics for each collar: which charger it uses, how long it takes to charge, and how to tell when it is full. Fi, Tractive, Garmin and SportDOG all use different lights and icons, and a sitter will not know them.
Add the sitter to the app
Fi recommends adding everyone in the household, plus walkers and sitters, to the app so the collar can connect through their phones. If someone else is caring for the dog while you travel, add them before you leave, show them the station, and make sure the base stays plugged in.
Keep the handheld with its collars
For Garmin and other handheld systems, the handheld lives on the same station as its collars, on a hook by its lanyard or flat on the shelf. A charged collar is no help if the handheld is in the truck at 10 percent.
Hunting season, trials and long hikes
A grab-and-go bag on a hook
Hang a small zip bag or pouch on the station for the field kit: the charging clips, a car USB charger, a short cable for each device and a spare strap. The night before an early start, charge everything on the shelf, then drop the clips into the bag. In the morning, the collars, the handheld and the bag come off their hooks together.
Charge in the house, not in the truck
Trucks and garages swing far outside the charging ranges collar makers give, both in winter and in summer. Garmin also warns that heat speeds up the normal long-term loss of battery capacity and says to store the collar out of direct sunlight. Charge in the house, and do not leave collars and handhelds on the dashboard between hunts.
Remove the clip before the collar goes on
Garmin says to remove the charging clip before you put the collar on the dog, because a clip left on can come off and be lost. Make it a rule that the clip goes in the bag the moment the collar comes off the charger, so you are not hunting for it in the field.
Back home: dry, check, charge
After a day in wet cover, hang every collar on its hook, wipe and dry the contacts, check each dog’s neck, and only then put the collars on charge. Keeping that order, every time, is what stops corrosion and dead batteries on the next trip.
Off-season and long-term storage
Store partly charged, cool and dry
Garmin’s manual says to store the collar in a cool, dry place at roughly household temperature and to fully recharge it after storage before use. It also lists a long-term storage range up to about 25 C, or 77 F. A shelf in the house is fine; a hot attic, a car or a cold garage is not.
Top up on a calendar
SportDOG’s operating guide says to give the NoBark SBC-R a full charge every three to four months when it is stored for long periods, and its support page suggests charging stored units monthly. Put a reminder in your phone for the first of every month during the off-season, and top up every stored collar and handheld on the station.
Remove batteries from handhelds
Garmin says that if you do not plan to use the handheld for several months, the battery should be removed, and stored data is not lost. Tape the battery to the handheld with a note, or keep both in the dog’s bin on the station.
Turn units off
SportDOG recommends turning the collar off when it is not in use to conserve the battery. Before a collar goes into storage, switch it off, so it is not quietly draining all winter on the hook.
Three sample setups
One dog, one GPS tracker, renter
Two Command Medium Utility Hooks by the door, one for the collar and one for the leash, and a small adhesive shelf with a published weight limit for the tracker base or charging clip. A short adhesive cable clip keeps the cable tidy down to the outlet. Nothing is drilled, and everything comes off by pulling the stretch tabs straight down at move-out.
Two dogs, tracker plus bark collar each
A 24-inch entryway shelf with five hooks screwed into a stud in the mudroom. A four-port USB charger and two tracker bases on the shelf, both bark collar cradles in a labeled bin, and the four collars on their own hooks below. A wall-mount power strip beside the shelf, and a towel hook at the end of the row. Comfortably under $50 for the shelf, charger, strip and clips at typical prices.
Hunting setup, three GPS collars and a handheld
A short stud-mounted slat strip or pegboard with a hook for each collar, a hook for the handheld, a hook for the field bag and a narrow shelf for a six-port charger. Spare contact points and the wrench live in a small drawer, and a printed card lists which collar belongs to which dog. Everything charges the night before and comes off the wall in one trip.
Where the $50 goes
Shelf and hooks
A basic wooden or metal entryway shelf with hooks usually costs less than half of the budget, and it does most of the work. Pick one with solid hooks and a lip on the front edge so a charger cannot slide off.
Charger and power
A multi-port USB charger from a known brand and a wall-mount power strip with USB ports are the next biggest items. If your collars already came with wall adapters, a power strip alone may be enough to start.
Clips, bins and labels
A pack of adhesive cable clips, two small wall bins and a label set round out the station for a few dollars each. Prices change often, so check the current price on each listing before you buy. Collar chargers, clips and replacement bases from the collar maker are a separate purchase and can cost more than the whole station.
Keeping the station clean
Dust and dog hair
A mudroom shelf collects dust, dog hair and grit, and that ends up in charging contacts and magnetic chargers. Wipe the shelf, the base and the clips with a dry cloth every week or two, and blow or brush out any hair from magnetic contacts before you charge.
Inspect cables and clips
Look at every cable and clip when you wipe the shelf. A frayed cable, a cracked clip or chew marks mean replace it, not tape it. Collar makers sell replacement clips and cables, and they cost less than a new collar.
Tidy the bins
Once a month, empty the small-parts bins, put back anything that wandered, and throw away packaging. A bin that turns into a junk drawer is the reason a charging clip goes missing again.
What a charging station will not fix
Battery wear
Every lithium-ion battery loses capacity with age and use, and Garmin notes that exposure to high temperatures speeds that up. A good station keeps collars cool, dry and charged, which helps, but it cannot make an old battery last like a new one. If a collar’s run time drops sharply, check the maker’s support pages about a replacement battery.
Coverage and connection
A charged tracker still needs a signal. Cellular trackers need coverage where you walk, and handheld systems need line of sight and range. A station can host a home base in a good spot, but it cannot fix weak coverage.
Fit and use
A station keeps the collar organized and gives it time off the dog. It does not replace correct fit, daily neck checks or the maker’s guidance, and it is not a substitute for advice from your vet or a certified trainer on whether a bark or remote collar suits your dog.
How to set it up in an afternoon
- Gather every collar, tracker, handheld, charging base, clip, cradle and cable in the house, and match each charger to its device.
- Throw out or recycle damaged cables, and order replacement clips for anything missing.
- Choose the wall by the walk door, inside the heated part of the house, near an outlet.
- Mount the shelf into a stud above the dog’s reach, then mount the power strip beside it.
- Put the USB charger and bases on the shelf and clip every cable to the shelf edge.
- Hang one collar per hook, add a towel hook, and put clips, contact points and spares in labeled bins.
- Charge every device once and note how long each takes and how it shows a full charge.
- Write a small card for walkers and sitters, add them to the tracker app, and take a photo of the finished wall.
Mistakes to avoid
- Charging a collar on a dog bed, couch, towel pile or inside a fabric bin.
- Clipping a wet collar straight onto the charger without drying the contacts.
- Mounting the station low enough for the dog to reach the cables or the collars.
- Putting the station in a detached garage, shed or truck that gets very cold or hot.
- Leaving the charging clip on the collar when it goes back on the dog.
- Using a high-voltage or unbranded charger when the maker specifies otherwise.
- Running an extension cord across the mudroom floor to reach the station.
- Plugging the station’s power strip into another power strip.
- Leaving an electronic collar on the dog around the clock because it has no home.
- Letting stored collars sit flat and switched on through the whole off-season.
Related guides
Browse the hub: Pet gear wall mounts under $50 - all guides
- Best Dog Whistle & Clicker Wall Organizers Under $50
- Best Dog Harness & Leash Combo Wall Stations Under $50
- Best Dog Cone & E-Collar Wall Hooks Under $50
- Best Dog Hiking Pack Wall Hooks Under $50
- Best Battery Charger Wall Mounts Under $50 (Charging Station Shelves)
- Best Adhesive Power Strip Wall Mounts for Apartments Under $50
FAQ
What is the best way to store a GPS dog collar when it is not on the dog?
Hang it on its own hook at a station by the walk door, indoors, above the dog’s reach, and charge it on a hard shelf when it needs it. Dry the contacts first if it is wet, keep the charging base or clip beside it, and keep it out of direct sun and away from heaters.
Can I charge a dog collar overnight?
Follow the maker’s advice for your model. Tractive says its trackers stop charging when they are full, so overnight is fine for them, while its safety sheet and the NFPA both recommend not leaving devices plugged in for long periods once they are full. Charging on a hard surface and unplugging in the morning works for every model.
Why should I dry my collar before charging it?
Wet contacts can corrode. Garmin says to thoroughly dry the contacts on its collars and the surrounding area before connecting the charging clip. Corroded contacts charge slowly or not at all, so hang wet collars to dry and wipe the contacts before charging.
Can I keep my dog’s GPS collar charger in the garage?
Only if the garage stays within the charging range for your collar. Garmin says the TT 15 will not charge outside about 32 to 104 F, and Tractive says not to charge its TG5 below 32 F or above 113 F. Many garages fall outside those ranges in winter or summer, so an indoor station is safer.
How long should a bark collar stay on a dog?
PetSafe advises avoiding leaving its collars on a pet for more than 12 hours a day, repositioning the collar every one to two hours when possible, and checking the contact area daily. A charging station gives the collar a place to rest when it is off. For questions about using a bark collar, talk to your vet or a certified trainer.
How do I keep track of charging clips and cradles?
Give each collar a small labeled bin on the station and put the clip or cradle back in it the moment charging is done. Garmin also says to remove the charging clip before the collar goes on the dog, so the bin habit protects you from losing the clip in the field.
Bottom line
The best under-$50 charging station for GPS and bark collars is simple: a stud-mounted shelf with hooks by the walk door, above the dog’s reach, inside the heated part of the house. Charge on the hard shelf with a listed multi-port USB charger, hang each collar on its own hook to dry and rest, keep clips and small parts in labeled bins, and run every cable up and away from the floor. Dry the contacts before charging, unplug when the device is full, and the collars will be charged, dry and ready every time the leash comes off its hook.