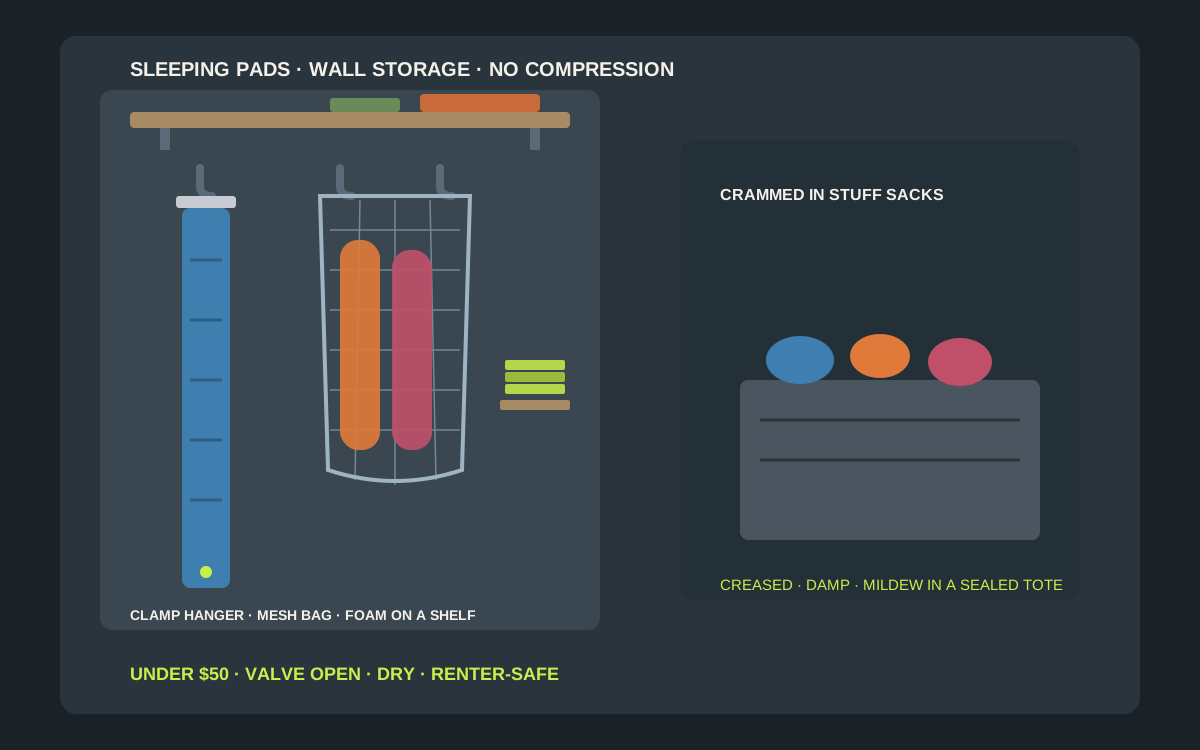
For most gear rooms, the best under-$50 way to store camping sleeping pads is off the floor and out of their stuff sacks: hang a self-inflating pad unrolled from a clamp-style hanger with the valve open, slide air pads loosely rolled into a tall, breathable mesh wall bag, and lay closed-cell foam pads on a shelf or hook. Many pad makers advise storing self-inflating pads unrolled with the valve open so the foam can recover and moisture can escape, so the goal is airflow and no compression. Mount the bag or hooks on a stud or a proper anchor in a dry room, and check current bag size, hook depth and price on the listing before you buy.
Shop large hanging mesh gear bags on Amazon
Who this is for
- Campers and backpackers who keep air pads and self-inflating pads crammed in their tiny stuff sacks between trips
- Families with a mix of foam, self-inflating and inflatable pads fighting for space in a garage, closet or gear room
- Renters and homeowners comparing mesh wall bags, clamp hangers, wide hooks and shelves under $50
Quick answer
For most gear rooms, the best under-$50 way to store camping sleeping pads is off the floor and out of their stuff sacks: hang a self-inflating pad unrolled from a clamp-style hanger with the valve open, slide air pads loosely rolled into a tall, breathable mesh wall bag, and lay closed-cell foam pads on a shelf or hook. Many pad makers advise storing self-inflating pads unrolled with the valve open so the foam can recover and moisture can escape, so the goal is airflow and no compression. Mount the bag or hooks on a stud or a proper anchor in a dry room, and check current bag size, hook depth and price on the listing before you buy.
Quick comparison
| Format | Best for | Typical price band | Why it wins |
|---|---|---|---|
| Clamp or skirt hanger on a hook | Self-inflating pads stored unrolled | Usually $8–$20 | Full length, valve open, no compression |
| Tall mesh wall bag | Air pads loosely rolled, two or three pads | Usually $12–$30 | Breathable; keeps pads together and dust-free |
| Wide J-hook or bike hook | Rolled closed-cell foam pads | Usually $8–$20 | Foam slides on and off in seconds |
| Wall shelf or wire rack | Folding zigzag foam pads, flat-stored pads | Usually $20–$45 | Lies flat; adds space for pumps and repair kits |
| Over-door hook rack | Renters, one or two light pads | Usually $10–$30 | Zero holes; check door clearance |
What to look for
Uncompressed beats compact
The stuff sack is for the trail, not the closet. Self-inflating pads have open-cell foam inside that loses loft if it stays squashed for months, and air pads can develop creases along the same tight folds. A storage method that lets each pad sit unrolled or loosely rolled is worth more than one that saves a few inches of wall.
Breathable mesh, not a sealed tote
A pad that went back in the car slightly damp or with breath moisture inside will mildew in a closed plastic bin. Mesh or open-weave bags, open hooks and slatted shelves keep air moving. Avoid sealed bags unless the pad is bone-dry and you check it before every season.
Valve open, inside dry
Leave the valve open in storage when your pad’s maker recommends it, so the inside can equalize and dry. Breathing into an air pad leaves moisture inside, so many campers use a pump sack instead; either way, give the pad time to dry fully before storing.
Wall type, load and the right spot
Pads are light but bulky, and a loaded mesh bag or shelf can still pull a weak anchor. Screw hooks and brackets into studs or anchors rated for your wall; use masonry anchors on block or concrete garage walls. Pick an indoor closet or gear room over a hot attic or an uninsulated garage wall where heat and humidity swing.
Mesh bags vs clamp hangers vs hooks vs shelves
When a clamp hanger wins
For self-inflating pads, a simple clamp or skirt hanger on a sturdy wall hook is hard to beat. Clip the pad at one end, let it hang full length with the valve open, and the foam recovers between trips. Use padded or wide clamps so they do not dent the pad shell, and leave clearance below so the pad does not drag on the floor.
When a mesh wall bag earns its space
Air pads pack small but do not like tight folds in storage. A tall, breathable mesh bag hung from one or two hooks holds several loosely rolled pads side by side, keeps them out of dust and pet hair, and lets you grab the right one by color. Size the bag to the pads’ rolled length, not their packed size.
When a wide hook is enough
Closed-cell foam pads are nearly indestructible and do not mind being rolled. A wide J-hook or a rubber-coated bike hook holds one or two rolls with a strap around each, and they come off the wall in one motion on the way to the car.
When a shelf is the smarter setup
Folding zigzag foam pads stack neatly flat, and a shelf above the hooks is also the natural home for the pump sack, patch kit and pillow. A wire rack is better than solid wood for airflow; do not pile heavy gear on top of the pads.
Store pads so they last for seasons
Clean and dry before you hang
Wipe the shell with mild soapy water if it picked up dirt or sunscreen, following the maker’s care notes, then let it dry completely, valve open. Never store a pad that is still damp inside.
Keep the stuff sack and repair kit together
Clip each pad’s stuff sack, pump sack and patch kit to the same hook or drop them in a small bin on the shelf, so nothing goes missing on packing day.
Label pad by person and R-value
In families with several pads, a small tag on each hanger with the owner and season (summer pad vs insulated winter pad) saves guessing and stops someone grabbing a thin pad for a cold trip.
Check for slow leaks before the season
A few days before a trip, inflate each pad and leave it overnight. A pad that is soft by morning needs a patch at home, not at the trailhead.
Treat under-$50 bands as moving targets
Check the current bag size, hook depth, wall-type guidance and price on the listing before you buy.
Installation that holds up
Find studs or use the right anchor
Use a stud finder for shelves and hook rails; where there is no stud, use anchors rated by the maker for the load and wall type. On garage block or concrete, use masonry anchors. Adhesive hooks belong on smooth, cured paint and a single light pad only.
Mount high enough for full-length hanging
A full-size pad hung unrolled needs roughly its own length of clear wall below the hook. Measure your longest pad and add a few inches so the end does not rest on the floor or on bins below.
Dry-fit before drilling
Hold the bag or hanger at the planned height with a pad in it. Check door swing, light switches and the path you walk with gear, and confirm a second pad fits beside the first without crushing it.
Move-out or rehang without scars
Take the pads down first. Release adhesive hooks with the maker’s slow-pull method, or fill screw holes if you used hardware. Never pry a loaded hook off painted drywall.
Mistakes to avoid
- Leaving self-inflating and air pads packed tight in their stuff sacks all off-season.
- Storing a pad with the valve closed and moisture still inside.
- Sealing pads in an airtight plastic tote where mildew can grow.
- Hanging pads on a hot attic or sun-facing garage wall where heat and humidity swing.
- Piling heavy gear on top of pads on a shelf.
- Separating pads from their pump sacks and patch kits so they go missing on packing day.
Related guides
Browse the hub: RV & camping storage under $50 - all guides
- Best Sleeping Bag Wall Stuff-Sack Hooks Under $50 for Camping
- Best Camping Hammock Wall Stuff Bags Under $50
- Best Camping Tarp & Ground Cloth Wall Bags Under $50
- Best Camping Backpack Wall Hooks Under $50 for Cabins
- Best Camping Cot Wall Hangers Under $50 for Garage
FAQ
What is the best way to store a sleeping pad at home?
Store it out of its stuff sack, uncompressed and dry. Hang self-inflating pads unrolled with the valve open when the maker recommends it, keep air pads loosely rolled in a breathable mesh bag, and lay or hang foam pads where nothing heavy sits on them.
Should I store a self-inflating pad inflated or deflated?
Many makers recommend storing self-inflating pads unrolled with the valve open, so the foam stays expanded and moisture can escape. Check your pad’s care instructions, since advice varies by model.
Can I hang a sleeping pad on the wall?
Yes. A clamp or skirt hanger on a sturdy hook lets a self-inflating pad hang full length, a mesh wall bag holds loosely rolled air pads, and a wide J-hook works for rolled foam. Screw hooks into studs or proper anchors.
Is a mesh bag better than a plastic bin for sleeping pads?
Usually, yes. Mesh lets air circulate so trapped moisture can dry, while a sealed bin can hold humidity and encourage mildew. Use a bin only for pads that are completely dry, and leave the lid cracked.
Where should I store camping sleeping pads — garage or closet?
An indoor closet or gear room is best: dry and temperature-stable. A garage can work if it stays cool and dry, but keep pads off hot exterior walls and use masonry anchors on block or concrete.
How do I stop mildew inside an air pad?
Inflate with a pump sack instead of your breath when you can, let the pad air out with the valve open after every trip, and store it open in a breathable spot. If you notice a musty smell, follow the maker’s cleaning guidance.
Bottom line
Camping sleeping pad wall bags under $50 work when pads stay uncompressed, dry and easy to grab: clamp hangers for self-inflating pads, a tall mesh bag for loosely rolled air pads, wide hooks or a shelf for foam. Store valve-open when your maker recommends it, keep pumps and patch kits with each pad, mount on studs or the right anchors in a dry room, and check current size and price on the listing before you buy.