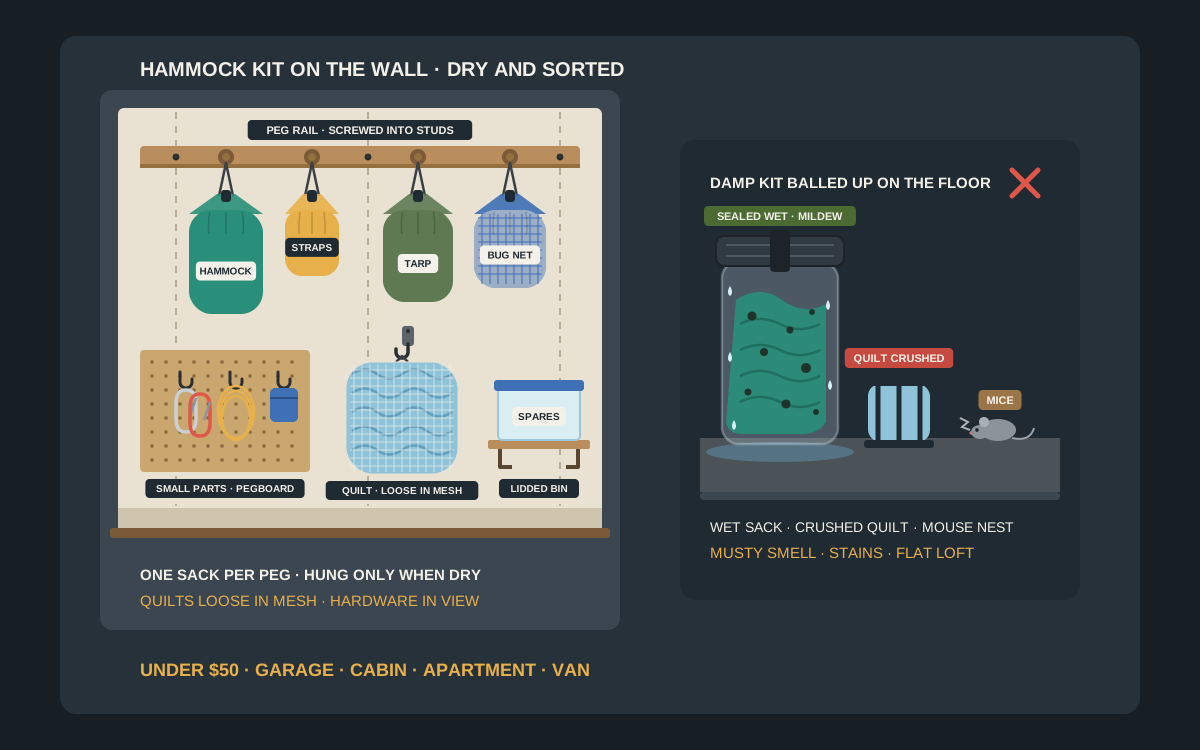
A camping hammock packs down to the size of a grapefruit, which is exactly why the kit goes missing between trips. The hammock ends up in one bin, the tree straps in the car, the rainfly still damp in a duffel and the carabiners in a kitchen drawer, and the first sign of trouble is a musty smell when you unpack at camp. A few under-$50 pieces on the wall fix that: a peg rail or hooks that give each stuff sack its own spot, a breathable bag for quilts, and a small pegboard or bin for the hardware. This guide compares those options, explains what belongs in which sack, and shows how to dry, check and hang a hammock setup so it is ready to grab the next time you head out.
Shop hammock stuff sacks on Amazon
Who this is for
- Hammock campers and backpackers whose setup (hammock, tree straps, tarp or rainfly, bug net) currently lives in a pile in a closet, a bin or the trunk of the car
- Families and groups who keep several hammocks and want each kit complete, labeled and easy to hand out at the door
- Garage, cabin, apartment and van owners who need a dry, shaded, mouse-resistant spot for nylon gear and insulation between trips
Quick answer
For most people, the best under-$50 setup is a peg rail or a row of smooth utility hooks screwed into studs, with one peg per stuff sack or per complete kit: hammock, suspension, tarp or rainfly, and bug net. Hang each sack by a sewn loop or a small carabiner through its grab loop rather than by the drawcord alone, and only once everything is completely dry. Store underquilts and top quilts loose in a large mesh or cotton storage bag instead of their compression sacks, and keep carabiners, ridgelines and repair bits on a small pegboard or in a lidded bin. Keep the whole station off the floor, out of direct sun and away from heaters. Check the listing’s current size, fit and price before you buy.
Quick comparison
| Format | Best for | Mounting | Trade-off |
|---|---|---|---|
| Peg rail or hook rail | Several kits or one sack per peg: hammock, straps, tarp, bug net | Screwed across two or more studs | Everything visible at a glance; needs a clear stretch of wall |
| Single utility hooks | One or two complete kits clipped together with a carabiner | One screw-in hook per stud or solid wood | Cheap and easy to place around windows and panels; sacks can swing and tangle |
| Small pegboard panel | Carabiners, ridgelines, whoopie slings, stakes and a patch kit | Panel on spacers or furring strips, screwed to studs | Small parts stay in view for inspection; loose bits need clip-on bins |
| Wall-hung mesh storage bag | Underquilts, top quilts, bug nets and season-long storage | Its own hook, screwed in or over a door | Insulation stays loose and breathes; takes more wall space than a stuffed sack |
| Shelf with lidded bins | Spare or off-season gear in cabins and garages with mice | Brackets screwed into studs | Keeps rodents and dust out; only for gear that is completely dry |
| Adhesive utility hook | One light packed hammock or bug net in an apartment or rental | Smooth, clean, cured paint indoors | No holes; light loads only and unreliable in cold garages |
Wall peg railsMesh storage bagsCoated utility hooksSmall pegboard kits
What to look for
Room for every sack in the kit
Count the sacks before you count the hooks. A typical hammock setup has three or four: the hammock itself, often packed in a sack sewn to the hammock; tree straps or other suspension; a tarp or rainfly; and a bug net if it is not built in. Add an underquilt and a top quilt for cold-weather trips, and a family of four can easily own a dozen pieces. Choose a rail or hook layout with one spot per sack plus one or two spare, so a guest hammock or a new tarp has somewhere to go, and leave a little air between sacks so nothing has to come off the wall to reach the one behind it.
Smooth hooks that suit soft loops
Stuff sacks hang from a thin grab loop, a sewn hang loop or the drawcord, so the shape of the hook matters more than its weight rating. Rounded wooden pegs and coated or smooth metal hooks are kind to thin nylon; sharp-edged screw hooks, exposed threads and narrow cup hooks can wear through a loop over months. Check that the hook is deep enough to hold a carabiner or a doubled loop without it bouncing off when you brush past. A full hammock kit usually weighs only a few pounds, so you do not need heavy garage storage hooks; you need a smooth, deep hook that is properly screwed in.
Breathable storage for insulation
Underquilts, top quilts and any other down or synthetic insulation should not spend months crushed in a compression sack, because the fill can gradually lose loft. Look for large mesh or cotton storage bags that let a quilt sit loose, or plan shelf space where it can lie flat. Mesh sacks are also the better long-term home for the hammock body and bug net, because any leftover moisture can escape. Save waterproof dry bags for the trail, not for the months in between.
Fixings that match the wall
Most rails and hooks in this price range come with screws, and some use adhesive. In a garage, cabin or shed, screw into studs or solid wood; in drywall where no stud is in the right place, use anchors rated well above the load. Adhesive hooks can hold one light packed hammock on smooth, painted walls indoors, within the maker’s weight rating, but they are a poor choice in unheated garages and on rough wood, block or dusty surfaces. In an RV or van, choose fixings made for thin paneling and moving loads rather than house walls.
Colors and labels you can read at a glance
Many brands sell their stuff sacks in one color, so a wall of identical sacks is no faster than a bin. Pick sacks in different colors or sizes, add a clip-on tag or a strip of tape with the contents and the owner’s name, and you can grab the right kit in seconds, even in a dim garage before dawn.
Peg rail vs single hooks vs pegboard vs mesh bags vs shelf bins
When a peg rail is the best all-rounder
A hardwood Shaker-style peg rail or a metal hook rail screwed across two or three studs is the tidiest way to hang hammock gear. Each peg takes one sack or one complete kit, the rail spreads the load across several screws, and you can see at a glance which kit is missing because someone is out camping. Rails come in many lengths and peg counts, so measure the wall and count your sacks first. Mount the rail at a height where you can lift a sack off without stretching, usually around shoulder height for the adults who use it, and leave enough space below for the longest sack to hang free of shelves, bins and the floor.
When single utility hooks are enough
If you own one or two hammocks, two to four individual hooks may be all you need. Screw each one into a stud or solid wood, choose rounded or coated hooks, and clip each kit together with a small carabiner through the grab loops so the hammock, straps and bug net travel as one bundle. Single hooks are easy to place around obstacles such as a window frame or a breaker panel, and simple to add to as the gear collection grows.
When a small pegboard panel earns its spot
Hammock camping comes with small parts: carabiners, rings, whoopie slings, ridgelines, tarp stakes and guylines, a patch kit and sometimes a spare pair of tree straps. A small pegboard panel with a few hooks and one or two clip-on bins keeps them in view, so you can check carabiner gates and untangle cords before you pack instead of at camp. Mount it on spacers or furring strips so the hooks seat properly, and keep the larger sacks on a rail beside it.
When a wall-hung mesh bag is the answer
A large mesh or cotton storage bag on its own hook is the best wall home for quilts and anything that needs to breathe. The insulation sits loose, air reaches it from all sides, and it still stays off the floor and away from pets and pests. Mesh bags also suit bug nets and hammock bodies stored for a whole season. They take more space than a stuffed sack, so give each one a hook of its own and enough clearance to hang straight.
When a shelf with lidded bins is smarter
In a cabin, shed or garage where mice are a real risk, a short shelf screwed into studs and topped with lidded plastic bins can beat open sacks. Mice nest in soft fabric and insulation, and a closed bin is far harder for them to get into than a nylon sack on a hook. Put only completely dry gear in a bin, and lift the lid every few weeks in humid weather to check for dampness. Many campers combine the two: everyday kits on the rail by the door, and spare or off-season quilts in a bin on the shelf above.
What goes in which sack
The hammock body
Most camping hammocks pack into a small stuff sack, and on many models the sack is sewn to the hammock so it cannot get lost. Stuffing rather than folding is fine for the hammock body: nylon fabric is not harmed by it, and stuffing spreads the creases around instead of wearing the same fold lines. If your hammock has an attached sack, hang it by that sack’s loop. If you use snakeskins, the fabric sleeves that slide over the hammock and stay on the suspension, you can hang the whole sleeved hammock in a loose loop from a single peg.
Tree straps and suspension
Tree straps come back dirty, damp and sometimes sticky with sap, so they deserve their own sack rather than being stuffed in with the hammock. Many parks and land managers ask campers to use wide, tree-friendly straps instead of rope, and wide webbing holds a lot of bark and grit; brush it off, let the straps dry, then coil them loosely into their sack. If you like a grab-and-go kit, clip the strap sack to the hammock sack with a carabiner so the two travel together but can still dry separately.
Tarp or rainfly
The tarp is usually the bulkiest and slowest-drying piece of the kit. Give it its own peg and its own sack, and never put it away wet: polyurethane coatings can break down and turn sticky when they are stored damp and warm, and any fabric can grow mildew where dirt and moisture are trapped. Leave the guylines attached and loosely wrapped so the next pitch is quick, and keep stakes in a separate pouch or on the pegboard so their points do not wear holes in the fabric.
Bug net
A separate bug net is light but snags easily. Stuff it gently into its own sack, keep it away from hook-and-loop closures and zippers on other gear, and hang it where heavier sacks will not crush it. If your hammock has a built-in net, check that the zipper runs smoothly and that the mesh has no holes before the hammock goes back in its sack.
Underquilts and top quilts
Insulation is the one part of a hammock setup that should not live in its stuff sack between trips. Shake the quilt out, make sure it is dry, and store it loose in a large mesh or cotton storage bag on a hook, or flat on a shelf. Compress it only for the trip itself. The same goes for sleeping bags, which our sleeping bag stuff-sack guide covers in more detail.
Carabiners, rings and small hardware
Keep carabiners, rings, buckles and spare cord together where you can see them. Before each season, check that every carabiner gate snaps shut cleanly, that there are no deep grooves or sharp edges, and that whoopie slings, ridgelines and strap stitching show no cuts, heavy fuzzing or broken threads. Retire anything that looks worn instead of hanging it back on the wall, and use only climbing-rated or manufacturer-supplied hardware in your suspension, never clips made for keys.
Dry, clean and check before it goes on the wall
Dry everything completely first
Damp nylon in a closed sack is how a hammock comes out of storage smelling of mildew, with gray or black spots that are hard to remove. After every trip, unpack the whole kit, even if it did not rain, because dew and condensation soak tarps and straps overnight. Hang the hammock, tarp and straps indoors or in the shade with good airflow until they are dry to the touch everywhere, seams and corners included, and only then stuff them back into their sacks.
Clean the hammock and straps when they need it
Follow the care label, which for many parachute-nylon hammocks means hand washing or a gentle cold machine wash with mild soap, carabiners removed, and air drying rather than a hot dryer. Brush mud and sap off tree straps, rinse them in cold water and let them dry fully. Take food residue seriously too: crumbs and spilled drinks attract mice and insects to gear in storage.
Keep it out of the sun and away from heat
Sunlight slowly weakens nylon and polyester webbing, so a wall next to a sunny window, or opposite a garage door that stays open all afternoon, is the wrong place for a hammock station. Heat speeds up the breakdown of coatings, so also keep the station away from water heaters, furnaces, wood stoves and the top of a hot garage wall in summer. A cool, dry, shaded interior wall is ideal.
Watch the humidity
Basements, unheated garages and seasonal cabins can stay damp for months. If the wall you have in mind feels cool and clammy, or shows mildew of its own, choose a different room, or use mesh sacks and check them monthly. Gear hung loose in breathable bags copes with a humid room far better than gear sealed in a waterproof bag.
Installing the station so it stays put
Find the studs and mark a level line
Most US interior walls are framed with studs 16 inches on center, sometimes 24, so a rail at least 24 inches long can usually be placed to catch two studs. Use a stud finder or a small test nail to locate them, mark a level line at the height you want, and pre-drill pilot holes so the wood does not split. In log or plank cabins you can usually screw straight into solid wood; on block or concrete, use masonry anchors and a masonry bit.
Plan spacing and height
Space pegs or hooks at least as far apart as your widest stuffed sack, and give mesh quilt bags more room, so sacks hang straight without pressing on each other. Hang the rail high enough that the longest sack clears anything below it, and low enough that children or shorter adults can return their own kits. If the wall faces a parking space, leave enough room that a car door or mirror cannot catch a hanging sack.
Adhesive only for one light kit indoors
In an apartment or a rental where you cannot drill, a large adhesive utility hook can hold one packed hammock or a bug net on smooth, clean, cured paint, as long as the load stays within the hook’s published rating. 3M, for example, lists an application range of about 50 to 105°F for its Command products and advises waiting about seven days after painting. Skip adhesive for a tarp-and-quilt bundle, on textured or dusty walls and in a garage that freezes in winter. An over-door hook is another no-drill option for a single kit, provided the door still closes fully.
In a van or RV
Moving vehicles shake gear off open pegs. Use closed hooks, carabiners clipped to fixed points or a small cargo net, screw into framing or a solid furring strip rather than thin paneling, and keep hammock gear well away from the heater and the galley stove. Our comparison of adhesive and screw-in hooks for RV walls covers the fixing options in more detail.
Test it, then check it each season
After installing, hang the full kits, give each sack a firm tug and leave everything for a day. A rail that has not shifted and hooks that have not rotated are ready for daily use. Check the screws, the sacks and the gear inside at the start and end of each camping season, when you are emptying and refilling the station anyway.
Mistakes to avoid
- Stuffing a damp hammock, tarp or set of straps into a sack and hanging it up straight after a trip.
- Leaving underquilts and top quilts in their compression sacks for months.
- Hanging sacks only by thin drawcords, or on sharp screw hooks that wear through the loops.
- Keeping the whole kit in a sealed dry bag on a garage floor, where moisture stays in and mice can reach it.
- Putting the station beside a sunny window, a heater or a wood stove.
- Mixing everyone’s straps and carabiners in one bin, so kits leave the house incomplete.
- Trusting adhesive hooks in a cold garage or with a heavy tarp-and-quilt bundle.
- Hanging worn straps or carabiners with sticky gates back on the wall instead of replacing them.
Related guides
Browse the hub: RV & camping storage under $50 - all guides
- Best Sleeping Bag Wall Stuff-Sack Hooks Under $50 for Camping
- Best Camping Tarp & Ground Cloth Wall Bags Under $50
- Best Camping Backpack Wall Hooks Under $50 for Cabins
- Best Camping Gear Wall Hooks Under $50 for Van & Cabin
- Best Cabin Mudroom Hook Rails Under $50
- Best Camping Rope & Paracord Wall Dispensers Under $50
- Adhesive vs Screw-In Hooks for RV Walls Under $50
- Best Camping Sleeping Pad Wall Bags Under $50
FAQ
What is the best way to store a camping hammock between trips?
Make sure the hammock, straps and tarp are completely dry, then stuff each into its own sack and hang the sacks from a peg rail or hooks screwed into a stud wall, out of direct sun and away from heat. Store underquilts and top quilts loose in a large mesh or cotton bag, and keep carabiners and cords on a small pegboard or in a lidded bin.
Is it bad to keep a hammock in its stuff sack?
No, as long as the hammock is dry. A nylon hammock body is not harmed by being stuffed, which is why many hammocks come with an attached sack. Insulation is different: store underquilts, top quilts and sleeping bags loose rather than compressed.
Should I hang my hammock gear or keep it in a bin?
Hanging it in breathable sacks gives better airflow and quicker access. A lidded bin on a shelf is better where mice are a problem, as long as everything inside is completely dry. Many campers hang the kits they use often and keep spare or off-season gear in a bin.
Can adhesive hooks hold a hammock stuff sack?
A large adhesive utility hook can hold one packed hammock or bug net indoors on smooth, cured paint, within the hook’s weight rating. Use screws for full kits with tarps and quilts, in garages that get cold and on rough or dusty walls.
How do I keep mildew off hammock gear in storage?
Dry everything completely after each trip, including straps and tarp corners, clean off mud, sap and food, and store the gear in breathable sacks in a cool, dry, shaded room. Avoid sealed dry bags for long-term storage, and check gear kept in damp basements, garages or cabins every month or so.
Where should I keep hammock straps and carabiners?
Give tree straps their own sack, clipped to the hammock sack if you want a grab-and-go kit, and hang carabiners, rings and cords on a pegboard or in a small bin where you can inspect them. Replace any carabiner whose gate sticks and any strap with cuts, heavy fuzzing or broken stitching.
Bottom line
Camping hammock wall stuff bags under $50 work when every piece of the kit has its own dry, breathable spot: a peg rail or hooks screwed into studs for the hammock, strap, tarp and bug-net sacks, a mesh bag for loose quilts, and a pegboard or lidded bin for carabiners and cords. Dry and clean everything before it goes up, hang sacks by real loops rather than drawcords, keep the station out of sun and heat and off the floor, and check straps and hardware every season. Check the listing’s current size, fit and price before you buy.