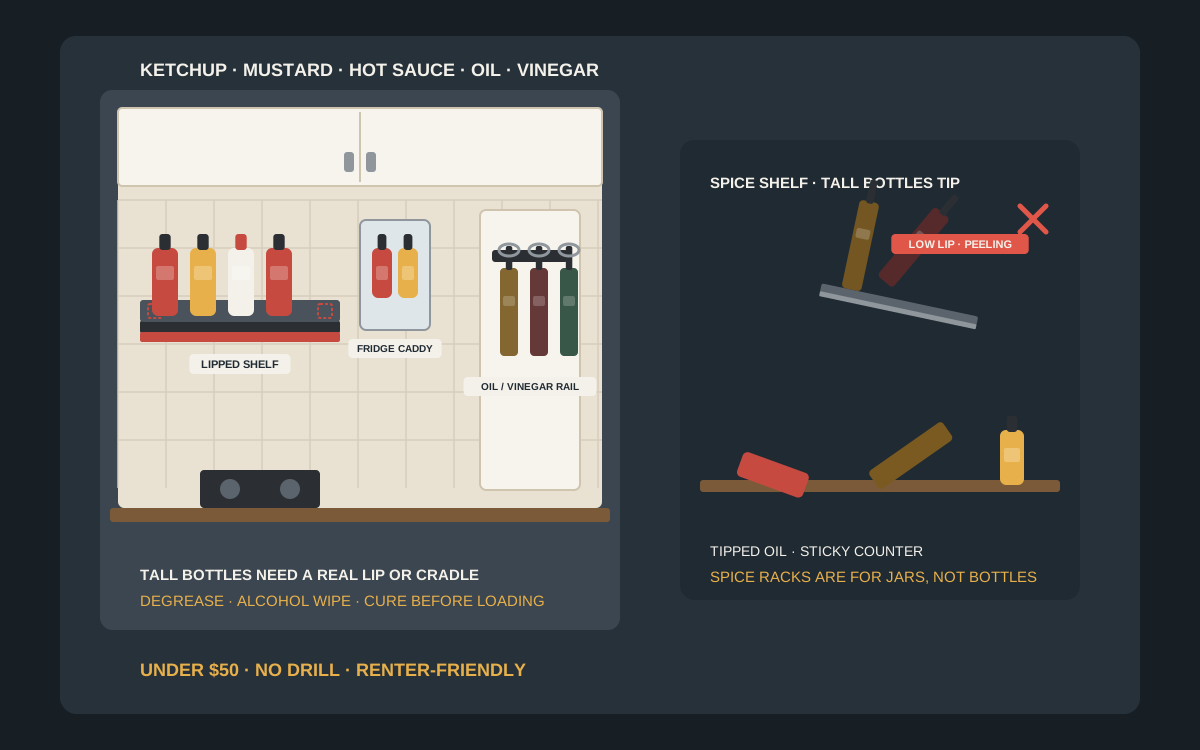
For most rental kitchens, the best under-$50 move is an adhesive lipped shelf or tall-bottle rail sized for real condiment bottles — not a shallow spice rack pressed into service — mounted on smooth tile, a painted cabinet side or the fridge, within arm’s reach of the prep zone and away from the hottest steam. Ketchup, mustard, mayo and hot sauce squeeze bottles are shorter and lighter; glass olive oil and vinegar bottles are taller, denser and tip more easily, so they need a deeper shelf, a higher front lip or a dedicated rail with cradles. Weigh a realistic row of the bottles you actually keep out, check the listing’s weight rating and bottle height clearance, degrease then alcohol-wipe the surface, and let the adhesive cure before you load anything.
Shop adhesive condiment bottle racks on Amazon
Who this is for
- Renters whose ketchup, mustard, hot sauce and cooking oil live in a sticky cluster on the only stretch of counter beside the stove
- Apartment cooks who want everyday squeeze bottles and tall glass oil or vinegar bottles upright and within arm’s reach, without drilling the landlord’s backsplash
- Anyone choosing between a lipped adhesive shelf, a tall-bottle rail, a fridge-side caddy, an under-cabinet rack or an over-door pantry holder for under $50
Quick answer
For most rental kitchens, the best under-$50 move is an adhesive lipped shelf or tall-bottle rail sized for real condiment bottles — not a shallow spice rack pressed into service — mounted on smooth tile, a painted cabinet side or the fridge, within arm’s reach of the prep zone and away from the hottest steam. Ketchup, mustard, mayo and hot sauce squeeze bottles are shorter and lighter; glass olive oil and vinegar bottles are taller, denser and tip more easily, so they need a deeper shelf, a higher front lip or a dedicated rail with cradles. Weigh a realistic row of the bottles you actually keep out, check the listing’s weight rating and bottle height clearance, degrease then alcohol-wipe the surface, and let the adhesive cure before you load anything.
Quick comparison
| Format | Best for | Mounting | Trade-off |
|---|---|---|---|
| Lipped adhesive shelf / tray | Everyday squeeze bottles (ketchup, mustard, mayo, hot sauce) | Adhesive pads on smooth tile, cabinet side or fridge; some include screw holes | Best under-$50 default when the lip is high enough for tall bottles |
| Tall-bottle rail / cradle rack | Olive oil, vinegar, soy and other tall glass bottles | Adhesive or screws on a cabinet side or backsplash | Stops tipping; check each cradle diameter against your bottles |
| Fridge-side or fridge-door caddy | Households that open the fridge more than the spice drawer | Magnetic or adhesive on the fridge; door bins where the fridge allows | Cooler and out of stove steam; magnets need a steel door |
| Under-cabinet or inside-door rack | Renters who want nothing on the backsplash | Adhesive to the cabinet bottom or inside of a door | Hidden and splash-free; measure door clearance and lid swing |
| Over-door pantry holder | When walls are textured or adhesive is banned | Hooks over a pantry or cabinet door | Skips wall adhesion; door must clear shelves when closed |
Adhesive condiment shelvesWall oil and vinegar holdersFridge door condiment organizers
What to look for
Bottle height and lip depth, not spice-jar geometry
Condiment bottles are not spice jars. A typical squeeze ketchup or mustard bottle is taller and wider than a spice tin, and a 500 ml olive oil or vinegar bottle is taller still, with a high center of gravity. A shallow adhesive spice shelf with a low lip will let tall bottles tip forward the first time a cabinet door slams. Look for a shelf depth that takes the bottle footprint with a little spare, a front lip high enough to catch the shoulder of the bottle, or a rail with individual cradles or rings. Measure your tallest everyday bottle — often the oil — before you buy.
Weight honesty for glass and full plastic
A full plastic squeeze bottle is manageable; a row of glass oil, soy and vinegar bottles adds up fast. Weigh the bottles you plan to keep on the wall together, then confirm the listing’s weight rating for the fully loaded rack, not the empty shelf. Prefer stretch-release strips or foam pads sized for that load on an ideal surface, and keep the densest glass off a single small strip. If the honest load exceeds what adhesive can hold on your wall, move the heavy glass into a cabinet and put only the daily squeeze bottles on the wall.
Surface, grease and heat near the stove
The wall beside a stove collects cooking oil mist even when it looks clean, and adhesive will not bond through grease. Degrease with warm water and dish soap, dry, then wipe with isopropyl rubbing alcohol — the prep 3M recommends for Command products. Keep the rack off the hottest splash zone and out of the steam plume from a boiling pot or kettle. Glossy tile, painted cabinet sides, laminate and the painted steel of a fridge are the friendliest surfaces; textured paint, grout lines and thermofoil that lifts on removal are the riskiest.
Renter-safe removal and spill cleanup
Condiment racks live where bottles drip. Choose a material that wipes clean — metal, acrylic or sealed plastic — rather than unfinished wood that soaks up ketchup. Prefer stretch-release strips when the load allows, so move-out is a slow downward pull on the tab rather than a paint-peeling fight. Foam pads hold harder but need warm, careful removal. Read your lease, and test removal on a hidden spot if the cabinet is thermofoil or laminate.
Shelf vs rail vs fridge vs door
When a lipped adhesive shelf wins
A single shallow tray with a real front lip is the workhorse for squeeze bottles. Load ketchup, mustard, mayo and one or two hot sauces in a single honest row, leave breathing room between bottles so you can grab one without dragging the others, and keep glass oil off this shelf unless the listing clearly rates the load. Look for a lip that rises at least to the lower third of a typical squeeze bottle, rounded corners that wipe clean, and a back plate wide enough for two or more adhesive pads so the load spreads. This is the format most renters should start with.
When a tall-bottle rail or cradle rack is the right call
Olive oil, balsamic, soy sauce and similar tall bottles tip on a low-lip spice shelf. A rail with individual cradles, rings or deep U-shaped slots holds each bottle at the neck or mid-body so it cannot walk forward. Confirm the cradle diameter against your bottles before you buy — a rail cut for slim vinegar bottles will not hold a fat oil bottle, and a rail cut for wine will look wrong with squeeze ketchup. Mount the rail on a cabinet side or a cool stretch of tile, not directly above a burner.
When the fridge is the better home
Many apartments already store open condiments in the fridge. A magnetic or adhesive caddy on the fridge side, or a slim door bin if your fridge door has room, keeps the working bottles with the cold ones and away from stove grease. Magnets need a steel door or side panel; stainless look-alikes that are not magnetic will not hold. Adhesive on a painted fridge side works when the surface is smooth and degreased. Keep the caddy out of the hinge swing and off any vent grille.
When under-cabinet or inside-door storage is smarter
If the landlord forbids wall stickers, or the backsplash is textured tile with deep grout, put the rack under an upper cabinet or on the inside of a pantry door. Under-cabinet trays need a flat cabinet bottom and clearance for anything that opens upward on the counter below. Inside-door racks disappear when the door closes; measure from the back of the door to the shelves so the loaded bottles still clear. Both keep adhesive off the most visible wall.
When an over-door pantry holder skips adhesive entirely
Over-door hooks and slim pantry organizers hang from the top of a door and need no adhesive at all. They suit textured walls, fresh paint that is still curing and leases that ban wall products. The trade-off is door clearance: thick bottles on the inside of a door can hit shelves, and an over-door hook can scrape a tight frame. Measure twice, and prefer the pantry door over the bathroom or bedroom door so food stays in the kitchen.
Sizing the rack to real bottles
Measure height, footprint and the row you actually leave out
Stand the bottles you leave on the counter every week — not the entire pantry — and measure the tallest height, the deepest footprint and the total width of that row with a finger of space between bottles. Shop for a shelf or rail that clears those numbers with a little spare. A rack sized to a magazine photo of tiny sample bottles will not hold a family ketchup and a tall oil side by side.
Separate daily squeeze bottles from heavy glass
Put the daily plastic squeeze bottles on the wall rack and keep bulk glass oil, vinegar and specialty sauces in a cabinet or on a sturdier shelf. That split keeps the adhesive load honest and stops one tipped oil bottle from coating everything. If you cook with oil every night, give oil its own cradle rail with a rated load rather than squeezing it onto a ketchup shelf.
Leave wipe space and a drip plan
Condiment necks drip. Choose a rack you can wipe with a damp cloth in one pass, and keep a folded paper towel or a small tray liner on the shelf if the design allows. Do not mount the rack directly above a power outlet, a knife block or an open utensil crock where a drip becomes a mess or a hazard.
Mounting without drilling
Pick a surface adhesive can hold
Best: glossy ceramic tile faces (not grout lines), painted cabinet sides, laminate and painted steel fridge panels. Avoid textured walls, wallpaper, raw wood and crumbly paint. Wait about seven days after painting before sticking anything, as 3M advises for Command products. Thermofoil cabinet wraps can lift when strong foam pads come off — test a hidden spot or prefer the inside of a door.
Degrease, then clean with isopropyl alcohol
Kitchen walls beside the stove wear a thin oil film. Wash with warm water and dish soap, dry fully, then wipe with isopropyl rubbing alcohol. Skip oily spray cleaners for this step; many leave a slippery residue that looks clean and fails under load.
Respect temperature, press time and cure
Command-style strips typically want an application range around 50 to 105°F, a firm 30-second press per strip and about an hour before hanging light items. Many foam mounting tapes need longer — often around 24 to 72 hours — to reach full strength. Mount in the evening, press hard across every pad, and load one light bottle the next day before the full row. Do not park a boiling pot under a fresh rack the same morning.
Load for shear, not peel
Adhesive holds best when the load pulls straight down the wall. Slide bottles up and out rather than yanking them toward you. If the rack has an optional screw hole and your lease allows a tiny hole, one screw at the top can back up the adhesive without becoming a full screw-in install.
Getting it off at move-out
Stretch-release tabs pull slowly straight down along the wall, never out toward you. Foam pads: warm with a hair dryer, saw through the foam with dental floss or fishing line, then roll residue off or use a citrus-based remover tested on a hidden spot. Finish tile with a plastic scraper. Go slowly on thermofoil and laminate.
Building a small condiment station
Keep it one step from the prep board
The point of a wall rack is that you season food without clearing the cutting board. Mount it on the side of the stove you actually cook from, at a height where labels face you, and keep a clear landing zone on the counter below so a bottle that slips does not hit a knife or a glass.
Pair with spice and wrap storage, do not merge them
Spices belong on a shallow spice rack; foil and plastic wrap belong on a dispenser; condiment bottles need their own taller, lipped home. Spreading those three jobs across three small organizers keeps each adhesive pad inside its rating and keeps search intent honest — this page is for bottles, not spice tins or wrap boxes.
Wipe weekly, retire sticky bottles
Sticky necks attract ants and dust. Wipe the rack once a week, wash bottle necks when they crust, and retire bottles that never leave the fridge into the fridge door so the wall rack stays a short, honest working set.
Mistakes to avoid
- Using a shallow spice rack for tall oil and vinegar bottles that tip over the low lip.
- Loading a full row of glass bottles onto a fresh adhesive strip the same hour.
- Sticking the rack in the hottest steam and grease plume above a boiling pot.
- Ignoring the listing weight rating because the shelf looks sturdy in the photo.
- Mounting across grout lines or on textured paint where pads never make full contact.
- Putting strong foam pads on thermofoil without a removal plan for move-out.
- Mixing wine-bottle racks (angled, neck cradles for wine) with everyday ketchup geometry.
- Parking the rack above an outlet or knife block where drips become a problem.
Related guides
Browse the hub: No-drill apartment storage under $50 - all guides
- Best Adhesive Spice Racks for Apartments Under $50 (No Drill)
- Best Adhesive Wine Bottle Racks for Apartments Under $50
- Best Adhesive Utensil Holders for Apartment Kitchens Under $50
- Best Adhesive Coffee Pod Wall Organizers for Apartments Under $50
- Best Adhesive Kitchen Wrap & Foil Dispensers for Apartments Under $50
- Best Over-Cabinet Kitchen Organizers for Apartments Under $50 (No Drill)
- Best Apartment Kitchen Tablet & Recipe Holders Under $50 (No-Drill Wall & Cabinet Mounts)
FAQ
What is the best adhesive condiment bottle rack for an apartment kitchen under $50?
For most rentals, a lipped adhesive shelf or tall-bottle rail on smooth tile, a cabinet side or the fridge, sized for the bottles you actually leave out and loaded within the stated weight rating after a full cure, is the best start. Use a shallow spice rack only for small jars — not for tall oil and vinegar.
Will an adhesive rack hold glass olive oil and vinegar bottles?
Sometimes, on an ideal smooth surface, with a rail or deep-lipped shelf rated for the full load and cured before you fill it. Glass is dense and tips easily. Weigh your bottles, read the listing rating, and keep the heaviest glass in a cabinet if the numbers are tight.
Are condiment bottle racks the same as adhesive spice racks?
No. Spice racks are built for small jars and tins. Condiment racks need more height clearance, a higher lip or cradles, and often a higher weight rating for oil and vinegar. Using a spice shelf for tall bottles is a common reason bottles end up on the floor.
Where should I mount a condiment rack in a small kitchen?
On a smooth cabinet side, a cool stretch of backsplash tile beside the prep zone, or the fridge — within arm’s reach of the cutting board and out of the hottest stove steam. Avoid textured walls, grout lines and the wall directly above a boiling pot.
How do I remove an adhesive condiment rack without damaging paint?
For stretch-release strips, pull the tab slowly straight down along the wall. For foam pads, warm them, saw through the foam with dental floss or fishing line, and roll off the residue or use a citrus-based remover tested on a hidden spot. Go slowly on thermofoil and laminate.
Can I use a wine bottle wall rack for ketchup and hot sauce?
Usually not well. Wine racks cradle bottles at an angle by the neck and are sized for wine, not squat squeeze bottles. Buy a condiment shelf or a tall-bottle rail made for upright kitchen bottles, and keep wine storage on its own rack.
Bottom line
Adhesive condiment bottle wall racks under $50 work in apartment kitchens when the rack matches real bottle height — lipped shelves for squeeze bottles, cradle rails for tall oil and vinegar — and the mounting matches the surface: degreased tile, cabinet side or fridge, cured before loading, kept out of the hottest steam. Weigh an honest row, check the listing’s weight rating and clearance, and keep spice jars and wine bottles on their own dedicated racks. Measure, then confirm the current dimensions and price on the listing before you buy.