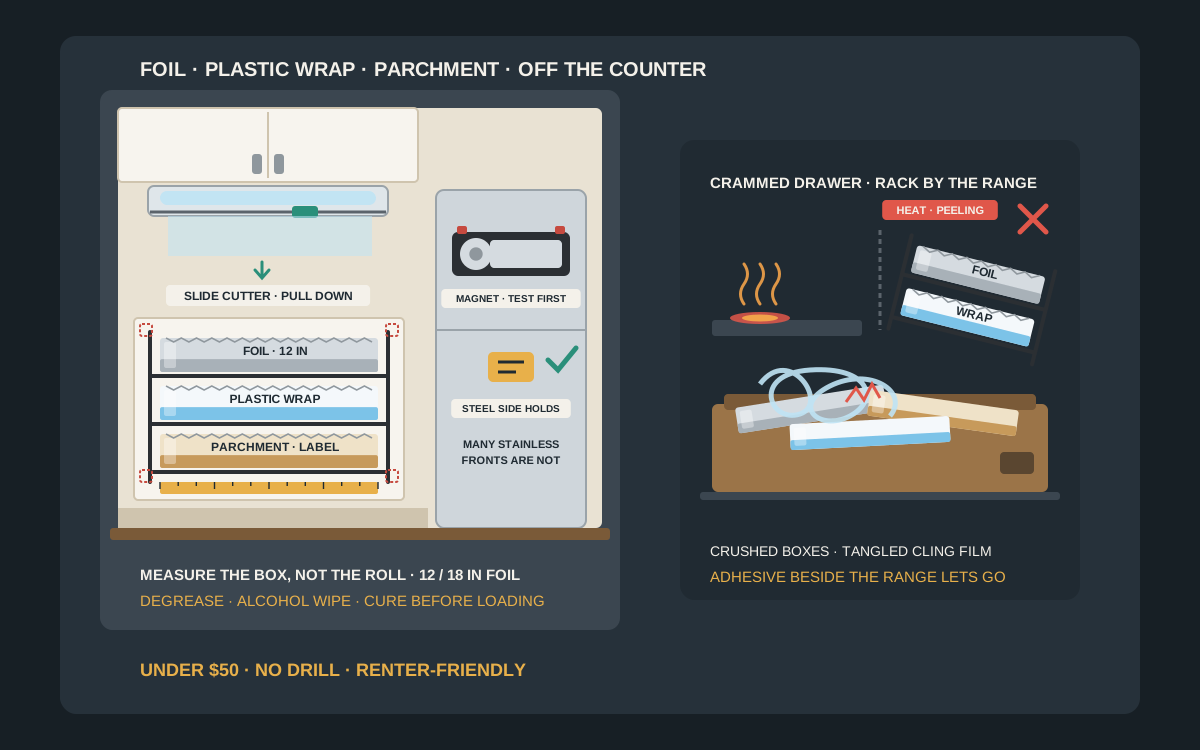
For most rental kitchens, the best under-$50 setup is an adhesive multi-tier wrap rack on the inside of a base or pantry cabinet door, or on the side of a cabinet next to your prep counter, holding foil, plastic wrap and parchment in their original boxes. If your plastic wrap keeps tangling, add a refillable slide-cutter dispenser for that one roll. Measure your boxes before you buy: standard foil and plastic wrap rolls are about 12 inches wide, heavy-duty foil often comes 18 inches wide, parchment is frequently wider than foil, and every box is a little longer than its roll. Clean the surface with isopropyl alcohol, let the adhesive cure before loading, keep the rack away from the range, and check the listing’s current size, weight rating and price before you buy.
Shop adhesive wrap & foil organizers on Amazon
Who this is for
- Renters whose foil, plastic wrap, parchment and wax paper boxes live crammed in one drawer or stacked on top of the fridge, so the roll you need is always at the bottom and the boxes are crushed by the time it is
- Anyone fighting plastic wrap that clings to itself and tears crooked on the box’s serrated edge, who wants a clean, straight cut without drilling the landlord’s cabinets
- Small-kitchen cooks choosing between an adhesive wall rack, a refillable slide-cutter dispenser, an inside-cabinet-door rack, a magnetic fridge holder or a combo wrap-and-bag organizer under $50
Quick answer
For most rental kitchens, the best under-$50 setup is an adhesive multi-tier wrap rack on the inside of a base or pantry cabinet door, or on the side of a cabinet next to your prep counter, holding foil, plastic wrap and parchment in their original boxes. If your plastic wrap keeps tangling, add a refillable slide-cutter dispenser for that one roll. Measure your boxes before you buy: standard foil and plastic wrap rolls are about 12 inches wide, heavy-duty foil often comes 18 inches wide, parchment is frequently wider than foil, and every box is a little longer than its roll. Clean the surface with isopropyl alcohol, let the adhesive cure before loading, keep the rack away from the range, and check the listing’s current size, weight rating and price before you buy.
Quick comparison
| Format | Best for | Mounting | Trade-off |
|---|---|---|---|
| Adhesive multi-tier wrap rack | Foil, plastic wrap, wax paper and parchment kept in their original boxes | Adhesive pads or strips on a smooth cabinet side, door or glossy tile; screw holes as a backup | Cheapest way to see every roll; you still tear on the box edge, and long or 18 in boxes may not fit |
| Refillable slide-cutter dispenser | Plastic wrap that tangles and tears crooked in its box | Adhesive pad or screws under an upper cabinet or on the wall | Clean straight cuts; you transfer rolls, and roll size must match the case |
| Inside-cabinet-door rack | Renters who want nothing visible and boxes hidden behind a door | Adhesive on the inside of the door, or hooks over the door top | Out of sight and splash-free; door must clear the shelves when it closes |
| Magnetic roll holder | Fridge sides and other steel surfaces near the prep counter | Built-in magnets, no adhesive at all | No residue at move-out; steel only, and many stainless fronts are not magnetic |
| Combo wrap & bag organizer | Wraps plus zip-top bag boxes in one pantry or cabinet spot | Adhesive or screws inside a pantry door or cabinet | Everything in one place; bulkiest option, and box fit varies most by brand |
Wall-mount wrap racksSlide-cutter dispensersCabinet-door wrap racks
What to look for
Slots that fit the boxes you actually buy
Wrap organizers are sized around the standard roughly 12-inch roll, and that is where most fit problems start. The box is always longer than the roll inside it, jumbo and warehouse-club boxes are deeper as well as longer, heavy-duty foil is often sold 18 inches wide, and parchment is frequently wider than standard foil. Take every box you use out of the drawer, measure its length, height and depth with the lid closed, and compare those numbers with the inner slot dimensions on the listing, not the outer size of the rack. Open-ended tiers that let a long box overhang slightly fit more brands than closed slots, and one 18-inch roll may be better on a shelf than in a rack bought for 12-inch boxes.
A cutting method you will actually use
Foil tears cleanly on the metal teeth of its own box, so a rack that simply holds boxes is enough for most foil, wax paper and parchment. Plastic wrap is the problem child: it clings, wanders and tears diagonally, and that is where a refillable dispenser with a slide cutter earns its place. The roll drops into the case, you pull the film across a flat bar and run the guarded blade along a track, and you get a straight edge every time. Check two things on any slide-cutter listing: the maximum roll width and length it accepts, and whether the blade is enclosed in the slider so fingers never touch it.
Mounting that suits the surface and the pull
A wrap rack does not carry much weight, but every tear pulls on it, often outward and at an angle. That outward tug is a peel force, the one adhesive handles worst. Stretch-release strips such as Command come off cleanly at move-out but suit lighter racks; foam mounting pads hold harder but can pull paint, laminate edges or thermofoil when removed; suction cups need glass or glossy tile and can lose grip over time; magnets only work on steel; and screws hold best but mean holes. For a rental, adhesive or magnets on the right surface, inside the maker’s weight rating, are the realistic choices, and the mounting is worth more attention than the rack itself.
Built for heat, grease and steam
Kitchens are hard on adhesive. A thin film of cooking grease on a cabinet that looks clean is enough to stop a strip from bonding, steam from a kettle or a dishwasher vent softens weak glue, and the wall beside a range gets hot enough to make adhesive creep. Favor powder-coated or stainless steel and acrylic, which wipe clean; bamboo and wood look warm but can swell near the sink. Mount on a surface away from the cooktop, oven vent and dishwasher steam, and choose a rack you can wipe down when splatter reaches it.
Wall rack vs slide cutter vs cabinet door vs magnetic vs combo
When a multi-tier adhesive wrap rack wins
A two- or three-tier rack that holds the boxes themselves is the default for good reason. You keep using each box’s own cutting edge, you can see at a glance what is running low, and there is nothing to refill or replace. On the inside of a base cabinet door or the side of an upper cabinet next to the prep counter, it takes a mess of crushed boxes out of the drawer and turns it into a row of labeled ends. Look for tiers with a front lip so a box cannot slide out when you yank the sheet, and leave enough space between tiers to lift a box out without unsticking the whole rack. The limit is fit: a rack built for 12-inch boxes will not hold 18-inch heavy-duty foil, and jumbo boxes can be too deep for wire tiers.
When a refillable slide-cutter dispenser is worth it
If plastic wrap is the roll that makes you swear, a slide-cutter dispenser fixes it. You move the roll out of its cardboard box into a rigid case, feed the film over a flat bar, and cut with a slider that runs a guarded blade straight across. Mounted under an upper cabinet or on the wall above the prep counter, it lets you pull and cut a sheet one-handed while the other hand holds the bowl. Many cases also work with foil and parchment, and some come as a two- or three-roll unit. Before you buy, check the maximum roll width and length the case accepts and whether replacement blades or sliders are available. A dispenser stuck under a cabinet takes a sideways pull every time you slide the cutter, so the mounting surface and the adhesive rating matter more here than on any other format.
When an inside-cabinet-door rack is the better rental move
The inside of a cabinet or pantry door is the most forgiving spot in a rental kitchen. Nothing shows when the door is closed, the rack is out of the splash zone, and if the adhesive does leave a mark at move-out, it is on the back of a door rather than the front of a cabinet. Some racks skip adhesive entirely and hang from hooks over the top of the door. The catch is clearance: measure from the back of the door to the front edge of the shelves inside, subtract the depth of the rack with boxes loaded, and make sure the door still closes. Hooks over the door top also need the door to close with a little gap at the top, and a fully loaded rack adds weight to the hinges, so keep it to the rolls you use.
When a magnetic holder makes sense
A magnetic roll holder on the side of the fridge or a steel range hood uses no adhesive at all, so there is nothing to peel off at move-out. Fridge sides are often painted steel that holds a magnet even when the front is stainless, and many stainless fronts do not hold a magnet at all, so test the exact spot with an ordinary fridge magnet before you buy. Choose a holder with a rubber or felt backing so it does not scratch the finish or slide down when you tear a sheet, and keep it clear of the door swing and of the vents some fridges have at the sides or back. Magnetic holders suit one or two rolls; a full set of wraps is better on a rack.
When a combo wrap and bag organizer earns the space
Combo organizers hold foil and wrap boxes alongside zip-top bag boxes in one unit, usually on the inside of a pantry door or a tall cabinet. They suit kitchens where every food-storage supply should live in one place and the drawer that used to hold them can go to something else. They are also the bulkiest format and the one where box fit varies most, because bag box sizes change between brands and pack counts. Measure your bag boxes as carefully as your wraps, and check that a loaded organizer leaves the pantry door able to close.
Measuring and loading
Measure the box, not the roll
The number on the front of the box is the roll width, not the box length. Standard foil and plastic wrap rolls are about 12 inches wide, but the boxes are longer than that, and jumbo boxes are thicker too. Heavy-duty foil is often sold as an 18-inch roll, and parchment is frequently wider than standard foil. Lay each box on the counter, measure length, height and depth with the lid closed, and write the numbers down. Compare them with the inner slot dimensions on the listing, and allow a little extra depth so the box lifts out without catching on the lip.
One slot per roll you actually use
Most kitchens need fewer slots than the rack offers. Count the rolls you reach for every week, usually foil, plastic wrap and either parchment or wax paper, and give those the easy-to-reach tiers. The once-a-year roll of freezer paper or the giant catering roll can live on a shelf. A rack with an empty tier is lighter on the adhesive and easier to load than one crammed with every box in the house.
Label parchment and wax paper
Parchment and wax paper look alike in a rack, and they are not interchangeable. Parchment can go in the oven up to the temperature printed on its box; wax paper should not go in the oven, because the wax can melt and smoke. Put the parchment on its own tier with a label facing out, and if you transfer rolls into a dispenser, label the case too. It takes ten seconds and saves a batch of cookies.
Refilling a slide-cutter dispenser
Transfer the roll on a clean counter, feed the film over the bar in the direction the case shows, and pull a test sheet before you close the lid. Keep the next roll in its original box nearby, on the rack, so the dispenser never runs empty mid-task. If a slide cutter starts dragging or tearing instead of slicing, check the listing or the maker’s site for replacement blades or sliders before you replace the whole unit.
Mounting without drilling
Pick a surface adhesive can hold
The best surfaces are smooth and sealed: painted cabinet sides and doors, laminate and glossy tile. Avoid textured walls, raw or oiled wood, wallpaper and grout lines, and wait about seven days after painting before you stick anything on new paint, as 3M advises for its Command products. Be careful with thermofoil cabinets, the vinyl-wrapped doors common in rentals: strong foam pads can lift the vinyl when they are removed, so test on a hidden spot or use the inside of the door.
Degrease, then clean with isopropyl alcohol
Kitchen cabinets carry a thin grease film even when they look clean, and adhesive will not bond through it. Wash the spot with warm water and dish soap, let it dry, then wipe it with isopropyl rubbing alcohol, which is what 3M recommends for preparing a surface for Command strips. Skip spray cleaners for this step, because many leave a slippery residue. Let the alcohol flash off completely before you stick anything down.
Respect temperature and cure time
3M lists an application range of about 50 to 105°F for Command products and asks you to press each strip firmly for about 30 seconds and wait about an hour before hanging anything. Many foam mounting tapes take longer, often about 72 hours, to reach full bond. In practice, stick the rack up in the evening, press it hard, and load it the next day with one box at a time. Mount it at room temperature, not in a cold kitchen in winter with the window open.
Mount for shear and tear downward
Adhesive is strongest when the load pulls straight down along the wall and weakest when something peels it away from the wall. When you tear foil or wrap, pull the sheet down and toward the cutting edge rather than out toward you, and on a slide cutter, hold the film flat while the slider does the work. Mount the rack so the cutting edge faces down or forward rather than up, and if the rack has a screw hole and your lease allows small holes, one small screw at the top adds insurance while the adhesive does most of the work.
Check the door before you commit
On a cabinet door, tape the rack in place with painter’s tape, load it with your real boxes, and close the door slowly. Check that the boxes clear the shelf edges, the hinges and any pull-out bins inside, and that the door still closes fully. Only then peel the liner and stick it down.
Getting it off at move-out
Stretch-release strips come off by pulling the tab slowly, straight down along the wall, never out toward you. Foam pads are harder: warm them with a hair dryer, saw through the foam behind the rack with dental floss or fishing line, then roll the leftover adhesive off with your thumb or a citrus-based remover tested on a hidden spot first. Go slowly on thermofoil and laminate edges, and read your lease, because some landlords spell out what counts as damage.
Placement and safety in a small kitchen
Near the prep zone, not over the range
The ideal spot is within one step of the counter where you wrap leftovers and line pans: the side of the upper cabinet next to it, the inside of the base cabinet below, or the side of the fridge if the prep counter sits beside it. Keep wraps and adhesive away from the cooktop, the oven vent and the wall right beside the range, where heat softens glue and plastic wrap can melt onto a hot surface. Above the sink is also a poor choice: splash and steam weaken adhesive and wet cardboard boxes fall apart.
Keep cutting edges out of small hands
The serrated metal strip on a foil or wrap box is sharp, and so is the blade in a cheap slide cutter without a guard. In a home with young children, mount racks and dispensers above their reach or behind a cabinet door, choose a slide cutter with an enclosed blade, and fold the box lid closed over the teeth after each use.
Plan for the whole kitchen system
Wraps sit naturally beside the other rental-friendly kitchen fixes: a paper towel holder by the sink, a trash bag roll inside the cabinet under it, and spices and utensils near the stove. Keep each one in its own zone so you are not stacking adhesive racks on the same cabinet side, and spread heavier items across different surfaces so no single panel carries everything.
Mistakes to avoid
- Buying a rack sized for 12-inch boxes and then trying to fit 18-inch heavy-duty foil or a wide parchment box.
- Sticking adhesive onto a cabinet that still has a grease film because it looked clean.
- Mounting the rack beside the range or above the oven vent, where heat softens the adhesive and the wrap.
- Loading a freshly stuck rack straight away instead of letting the adhesive cure.
- Tearing sheets outward toward you, which peels the rack off the wall a little more each time.
- Putting strong foam pads on thermofoil or laminate without testing removal on a hidden spot.
- Storing parchment and wax paper unlabeled, so wax paper ends up in the oven.
- Choosing a magnetic holder without testing the fridge, then finding the stainless front is not magnetic.
Related guides
Browse the hub: No-drill apartment storage under $50 - all guides
- Best Adhesive Paper Towel Holders for Apartment Kitchens Under $50 (No Drill)
- Best Adhesive Trash Bag Dispensers for Apartment Kitchens Under $50
- Best Over-Cabinet Kitchen Organizers for Apartments Under $50 (No Drill)
- Best Adhesive Spice Racks for Apartments Under $50 (No Drill)
- Best Adhesive Utensil Holders for Apartment Kitchens Under $50
- Best Stick-On Pegboard Panels for Apartment Kitchens Under $50
- Best Magnetic Knife & Utility Bars for Apartment Kitchens Under $50
- Best Adhesive Coffee Pod Wall Organizers for Apartments Under $50
FAQ
What is the best way to store foil and plastic wrap in a small apartment kitchen?
For most rentals, an adhesive multi-tier wrap rack on the inside of a cabinet door or the side of a cabinet next to the prep counter is the best start. It holds foil, plastic wrap and parchment in their own boxes, frees the drawer, and leaves nothing visible when the door is closed. Add a slide-cutter dispenser for plastic wrap if it keeps tangling.
Will adhesive wrap racks hold on kitchen cabinets?
Usually, yes, on smooth painted, laminate or glossy surfaces, as long as you stay inside the adhesive maker’s weight rating. Wash off the grease film with dish soap, wipe with isopropyl alcohol, apply within the strip’s temperature range, wait for the adhesive to cure before loading, and tear sheets downward so you are not peeling the rack off the wall.
Do wall-mounted wrap racks fit heavy-duty 18-inch foil?
Many do not. Most wrap racks are sized for boxes holding standard rolls of about 12 inches, and heavy-duty foil is often sold as an 18-inch roll in a longer box. Measure your boxes with the lid closed and compare them with the rack’s inner slot dimensions, or choose an open-ended rack that allows a long box to overhang.
Are plastic wrap dispensers with slide cutters worth it?
If plastic wrap tangles and tears crooked for you, yes. A refillable case with a guarded slide cutter gives a straight cut one-handed and stops the film from sticking to itself. Check the maximum roll width and length the case accepts, whether the blade is enclosed, and whether replacement blades or sliders are sold.
How do I remove an adhesive wrap rack without damaging the cabinet?
For stretch-release strips, pull the tab slowly straight down along the surface. For foam pads, warm them with a hair dryer, saw through the foam with dental floss or fishing line, and roll off the residue or use a citrus-based remover tested on a hidden spot. Go slowly on thermofoil and laminate, which can lift if you pry.
Bottom line
Adhesive kitchen wrap and foil dispensers under $50 work when the format matches the roll and the mounting matches the surface: a multi-tier rack for boxes you tear on their own edge, a slide-cutter dispenser for plastic wrap that tangles, the inside of a cabinet door when you want nothing on show, and a magnetic holder only where a magnet actually sticks. Measure your boxes before you buy, degrease and alcohol-wipe the spot, let the adhesive cure, keep everything away from the range, and tear downward. Check the listing’s current size, weight rating and price before you buy.