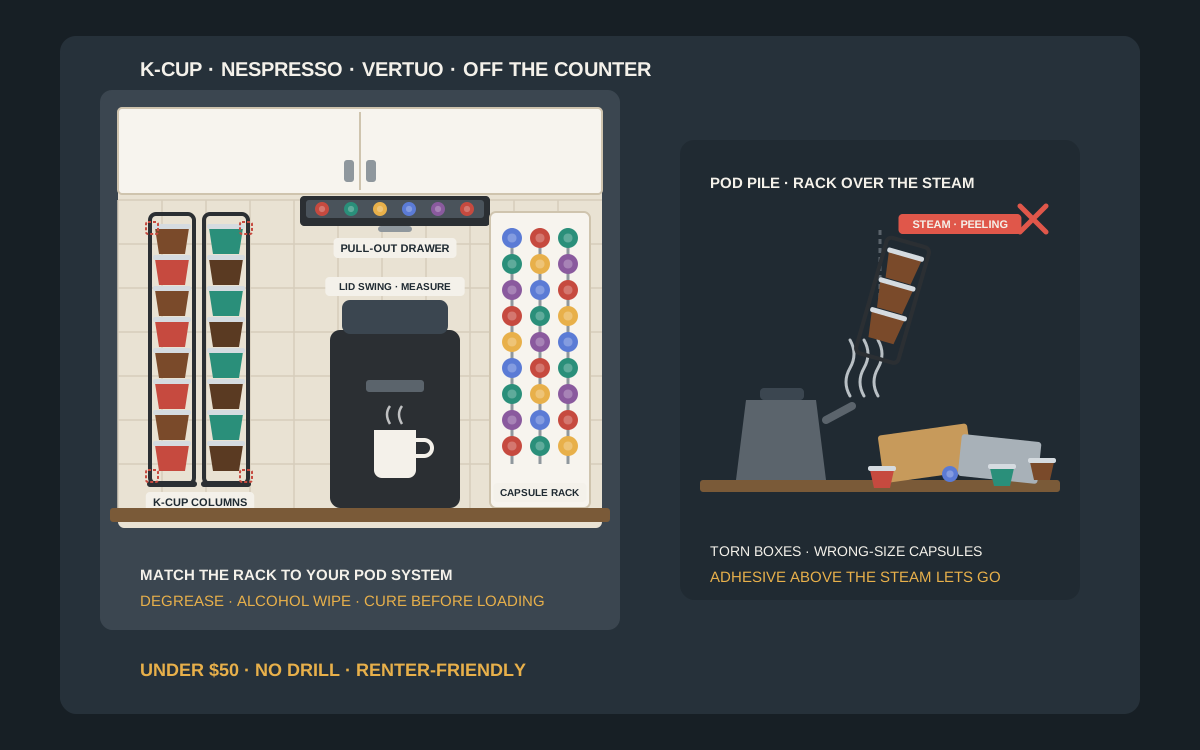
For most rental kitchens, the best under-$50 move is an adhesive pod rack sized to your exact pod system, mounted on a smooth cabinet side or glossy backsplash tile within arm’s reach of the brewer and away from its steam. K-Cup households do well with vertical dispenser columns that feed from the bottom; Nespresso OriginalLine capsules need a slimmer rack built for their smaller size, and Vertuo pods need a rack made for Vertuo, because the three systems are not interchangeable. If you have an upper cabinet above the coffee maker, an under-cabinet pull-out drawer keeps pods hidden and off the wall entirely. Degrease and alcohol-wipe the surface, let the adhesive cure before loading, and check the listing’s pod compatibility, capacity, weight rating and current price before you buy.
Shop adhesive coffee pod organizers on Amazon
Who this is for
- Renters whose coffee pods live in a pile of half-torn variety boxes beside the machine, eating the only stretch of counter in a small kitchen
- Single-serve brewers on a Keurig, Nespresso OriginalLine or Vertuo who want the pods lined up at eye level by flavor, without drilling the landlord’s backsplash
- Anyone choosing between an adhesive dispenser column, a capsule rack, an under-cabinet pull-out drawer, a cabinet-door rack or a simple wall basket for under $50
Quick answer
For most rental kitchens, the best under-$50 move is an adhesive pod rack sized to your exact pod system, mounted on a smooth cabinet side or glossy backsplash tile within arm’s reach of the brewer and away from its steam. K-Cup households do well with vertical dispenser columns that feed from the bottom; Nespresso OriginalLine capsules need a slimmer rack built for their smaller size, and Vertuo pods need a rack made for Vertuo, because the three systems are not interchangeable. If you have an upper cabinet above the coffee maker, an under-cabinet pull-out drawer keeps pods hidden and off the wall entirely. Degrease and alcohol-wipe the surface, let the adhesive cure before loading, and check the listing’s pod compatibility, capacity, weight rating and current price before you buy.
Quick comparison
| Format | Best for | Mounting | Trade-off |
|---|---|---|---|
| Vertical dispenser column | K-Cup households that want first-in, first-out pods by flavor | Adhesive pads on a smooth backsplash, cabinet side or fridge side; some include screw holes | Tidy and cheap; each column holds one stack, and K-Cup only |
| Capsule wall rack | Nespresso OriginalLine or Vertuo users with a dedicated rack | Adhesive strips or pads on tile or a cabinet side | Slim and graphic; must match your exact capsule system |
| Under-cabinet pull-out drawer | Kitchens with an upper cabinet right above the coffee maker | Adhesive pads or screws to the cabinet bottom; check the listing | Pods hidden and dust-free; needs a flat cabinet bottom and clearance for the machine lid |
| Inside-cabinet-door rack | Renters who want nothing visible on the backsplash | Adhesive on the inside of the door | Out of sight and steam-free; the door must still clear the shelves |
| Adhesive wall basket or mini shelf | Mixed pods plus tea, sugar sticks and filters in one spot | Adhesive pads on a smooth wall, tile or cabinet side | Fits any pod system; less tidy, and you dig for flavors |
Wall-mount K-Cup holdersNespresso capsule wall racksUnder-cabinet pod drawers
What to look for
Made for your pod system, not just "pods"
This is the mistake that sends most pod organizers back. K-Cups, Nespresso OriginalLine capsules and Nespresso Vertuo pods are three different shapes and sizes, and a rack built for one rarely holds the others securely. OriginalLine capsules are small and slip through K-Cup slots; Vertuo pods are wider domes that jam in OriginalLine rails; K-Cups do not fit capsule rails at all. Dolce Gusto and other systems have their own sizes again. Read the compatibility line on the listing, check the photos for your pod actually sitting in the rack, and if you run two machines, buy two racks rather than one that claims to fit everything.
Capacity that matches how much coffee you drink
Count how many pods you get through between grocery runs, not how many fit in the biggest variety box. A household drinking two cups a day uses roughly fifteen pods a week, so a rack holding twenty to thirty-six covers a restock cycle with room for a second flavor. Bigger is not better on adhesive: every extra column adds weight and width, and a rack that is always half empty just takes wall space. If you buy in bulk, keep the overflow boxes in a cupboard and treat the wall rack as the working stock.
Mounting that suits the surface and the weight
Coffee pods are light one at a time, but they add up. A filled K-Cup weighs in the region of a dozen grams, so three dozen pods come to roughly half a kilogram, about a pound, before you count the rack itself. That is within reach of good adhesive on the right surface, but not of a single small strip. Stretch-release strips such as Command come off cleanly at move-out and suit lighter racks inside their stated rating; foam mounting pads hold harder but can pull paint or lift thermofoil when removed; screws hold best but mean holes. Check the listing’s weight rating with the rack fully loaded, not empty.
Built to live next to a hot, steaming machine
Single-serve brewers vent steam and heat when they brew, and kettles next to them do the same. Steam rising onto a cabinet bottom or backsplash softens weak adhesive and leaves a film of moisture that stops a strip from ever bonding properly. Mount the rack beside the machine rather than directly above its steam vent, choose metal or acrylic that wipes clean, and avoid unsealed wood right next to the brewer. A rack at eye level to one side of the machine is easier to reach and kinder to the glue than one stuck straight overhead.
Dispenser column vs capsule rack vs drawer vs door vs basket
When a vertical K-Cup dispenser column wins
Dispenser columns are the classic wall-mounted pod organizer for good reason. Each column is a narrow chute that you load from the top and take from the bottom, so the oldest pod comes out first and one flavor stays in one column. Two to four columns side by side on a backsplash or the side of an upper cabinet put a day’s choices at eye level and clear the counter completely. Look for columns with a lip at the bottom that holds the last pod without letting it drop, and for a back plate wide enough to spread the load over more than one adhesive pad. The limit is compatibility: dispenser columns are built around the K-Cup, and capsules from other systems will fall through or jam.
When a capsule rack is the right call
Nespresso owners need racks built for their capsules, and they come in two families. OriginalLine racks use narrow rails or tubes sized for the small capsule; Vertuo racks are wider to take the domed pod and often hold fewer per row. Both look sharp on glossy tile, especially in a run of colored capsules, and they are light enough that good adhesive copes well. Confirm on the listing which system the rack fits, then confirm again in the product photos. A rack that says simply "coffee capsules" without naming your system is a gamble.
When an under-cabinet pull-out drawer earns its place
If the coffee maker sits under an upper cabinet, a shallow pull-out drawer attached to the underside of that cabinet uses space nobody else does. Pods sit flat in a tray, hidden from dust and splash, and you slide the drawer out to choose. Some models attach with adhesive pads, others need screws, so read the listing before you assume it is renter-friendly. Measure the gap between the cabinet bottom and the top of the brewer with the lid fully open, because many single-serve machines open upward to load a pod and a drawer can block that. A flat, clean cabinet bottom also matters: a recessed or framed bottom may leave nowhere for the pads to sit.
When an inside-cabinet-door rack is the better rental move
Stick a pod rack on the inside of the cabinet door nearest the machine and it disappears when the door closes. It is out of the steam, away from splashes, and if the adhesive does leave a mark at move-out, it is on the back of a door. Measure from the back of the door to the front edge of the shelves inside, subtract the depth of the rack with pods loaded, and make sure the door still closes fully before you peel the liner. Door racks suit people who keep their machine on the counter next to a base or upper cabinet rather than under one.
When a simple wall basket or mini shelf makes sense
Households with more than one pod system, or that keep tea bags, sugar sticks, stirrers and paper filters next to the machine, often do better with an adhesive wire basket or a small stick-on shelf than with a dedicated pod rack. It holds anything, works for every brand, and costs little. The trade-off is order: pods jumble together and you dig for the flavor you want. Small open boxes or dividers inside the basket fix most of that.
Sizing and loading
Measure the spot with the machine in place
Before you buy, stand the coffee maker where it actually lives and measure the clear wall or cabinet side beside it, the height from the counter to the bottom of the upper cabinet, and how far the machine’s lid swings when it opens. A dispenser column needs height for a full stack plus the room your hand needs to pull the bottom pod out, so leave space under the bottom lip above the counter. Mark the rack outline with painter’s tape and live with it for a day before you commit.
One column per flavor you actually drink
Most households have two or three everyday pods and a few occasional ones. Give the daily drinks the most reachable columns or rows, keep decaf or guest flavors in their own clearly separate spot, and leave seasonal variety packs in the cupboard. A rack that is sized to what you drink stays tidy; one sized to the biggest box you ever bought ends up half empty and wider than the wall needs.
Rotate stock so nothing goes stale
Coffee pods are sealed but not immortal: the boxes carry a best-by date, and flavor fades past it. Dispenser columns rotate stock automatically if you always load from the top. On racks and baskets, put new pods behind or under the old ones when you restock. Keep a little of the box flap with the date, or note it on a strip of tape on the rack, if you buy in bulk.
Mounting without drilling
Pick a surface adhesive can hold
The best surfaces are smooth and sealed: glossy ceramic tile, painted cabinet sides, laminate and the painted steel side of a fridge. Avoid textured walls, grout lines, raw or oiled wood and wallpaper, and wait about seven days after painting before sticking anything to fresh paint, as 3M advises for its Command products. Thermofoil cabinets, the vinyl-wrapped doors common in rentals, can lift when strong foam pads are removed, so test a hidden spot first or use the inside of a door. On tile, place pads on the face of the tiles, not across grout.
Degrease, then clean with isopropyl alcohol
The area beside a coffee maker collects a thin film of grease, coffee splash and limescale mist even when it looks clean, and adhesive will not bond through it. Wash the spot with warm water and dish soap, let it dry, then wipe it with isopropyl rubbing alcohol, which is what 3M recommends for preparing a surface for Command strips. Skip spray cleaners for this step, because many leave a slippery residue.
Respect temperature and cure time
3M lists an application range of about 50 to 105°F for Command products and asks you to press each strip firmly for about 30 seconds and wait about an hour before hanging anything. Many foam mounting tapes take longer, often around 72 hours, to reach full bond. Mount the rack in the evening, press hard across every pad, and load it the next day a column at a time. Do not brew coffee right under a fresh rack the same morning.
Load for shear, pull downward
Adhesive is strongest when the load pulls straight down along the wall and weakest when something peels it away. Dispenser columns are kind to adhesive because you slide the bottom pod forward and down rather than yanking the rack outward. On capsule rails, slide capsules out along the rail instead of prying them off the front. If the rack has a screw hole and your lease allows small holes, one small screw at the top adds insurance while the adhesive does most of the work.
Getting it off at move-out
Stretch-release strips come off by pulling the tab slowly, straight down along the wall, never out toward you. Foam pads are harder: warm them with a hair dryer, saw through the foam behind the rack with dental floss or fishing line, then roll off the residue with your thumb or a citrus-based remover tested on a hidden spot first. On tile, a plastic scraper finishes the job without scratching the glaze. Read your lease, because some landlords spell out what counts as damage.
Building a small coffee corner
Keep it within one step of the brewer
The whole point of a wall rack is that you can choose a pod, load it and brew without moving. Put the rack on the side of the machine you load from, at a height where you can see every flavor without bending, and keep mugs on hooks or a shelf within the same reach. If the machine sits next to the fridge, the painted steel side panel is often a good home for a magnetic or adhesive rack.
Keep steam, water and heat in mind
Do not mount anything directly above the brewer’s steam vent or the kettle spout, where rising steam softens adhesive and wets the pods. Keep the rack out of the splash zone around the sink, and away from the wall beside the range. Empty used pods into the bin promptly rather than stacking them in the rack, where drips run down onto the counter.
Plan the whole kitchen system
Coffee pods sit naturally beside other rental-friendly kitchen fixes: adhesive mug hooks under the cabinet, a small shelf for sugar and syrups, and a paper towel holder for spills. Spread heavier items across different surfaces so no single cabinet side carries everything, and keep each zone in its own place so you are not stacking adhesive racks on top of each other.
Mistakes to avoid
- Buying a rack that says "coffee pods" without checking whether it fits K-Cup, Nespresso OriginalLine or Vertuo.
- Sticking the rack straight above the brewer, where every cup sends steam onto the adhesive.
- Sizing the rack to the biggest variety box instead of the pods you actually drink in a week.
- Loading a freshly stuck rack the same day instead of letting the adhesive cure.
- Mounting on grout lines or textured paint, where pads never make full contact.
- Ignoring the brewer’s lid swing, so an under-cabinet drawer blocks the machine from opening.
- Putting strong foam pads on thermofoil or laminate without testing removal on a hidden spot.
- Letting new pods sit in front of old ones until the back of the rack is past its best-by date.
Related guides
Browse the hub: No-drill apartment storage under $50 - all guides
- Best Adhesive Mug Hooks for Apartment Kitchens Under $50
- Best Adhesive Kitchen Wrap & Foil Dispensers for Apartments Under $50
- Best Adhesive Paper Towel Holders for Apartment Kitchens Under $50 (No Drill)
- Best Over-Cabinet Kitchen Organizers for Apartments Under $50 (No Drill)
- Best Adhesive Spice Racks for Apartments Under $50 (No Drill)
- Best Adhesive Floating Shelves for Apartments Under $50 (No Drill)
FAQ
What is the best way to store coffee pods in a small apartment kitchen?
For most rentals, an adhesive wall rack sized to your pod system, mounted on a smooth cabinet side or tile beside the brewer, is the best start. It clears the counter, shows every flavor at a glance and comes off at move-out if you choose stretch-release strips or remove foam pads carefully. If there is an upper cabinet right above the machine, an under-cabinet pull-out drawer is a tidy alternative.
Do K-Cup holders fit Nespresso capsules?
Usually not. K-Cups, Nespresso OriginalLine capsules and Nespresso Vertuo pods are different shapes and sizes, and racks are built around one of them. OriginalLine capsules slip through K-Cup slots, and Vertuo pods need a wider rack. Check the compatibility line and product photos on the listing for your exact system.
Will an adhesive coffee pod holder stay up?
Yes, on smooth sealed surfaces like glossy tile, painted cabinets or laminate, as long as the fully loaded rack stays inside the adhesive maker’s weight rating. Degrease the spot, wipe it with isopropyl alcohol, apply within the strip’s temperature range, let the adhesive cure before loading, and keep the rack out of the brewer’s steam.
How many coffee pods should a wall organizer hold?
Enough for one restock cycle plus a second flavor. A household drinking two cups a day goes through roughly fifteen pods a week, so twenty to thirty-six pods suits most people. Larger racks are heavier on the adhesive and tend to sit half empty; keep bulk boxes in a cupboard instead.
How do I remove a coffee pod rack without damaging the wall?
For stretch-release strips, pull the tab slowly straight down along the surface. For foam pads, warm them with a hair dryer, saw through the foam with dental floss or fishing line, and roll off the residue or use a citrus-based remover tested on a hidden spot. On tile, finish with a plastic scraper; go slowly on thermofoil and laminate.
Bottom line
Adhesive coffee pod wall organizers under $50 work when the rack matches your pod system and the mounting matches the surface: dispenser columns for K-Cups, dedicated capsule racks for Nespresso OriginalLine or Vertuo, an under-cabinet drawer where a cabinet hangs over the machine, and a door rack or wall basket when you want flexibility. Measure with the machine in place, degrease and alcohol-wipe the spot, let the adhesive cure, keep the rack out of the steam, and load only what you drink. Check the listing’s compatibility, weight rating and current price before you buy.