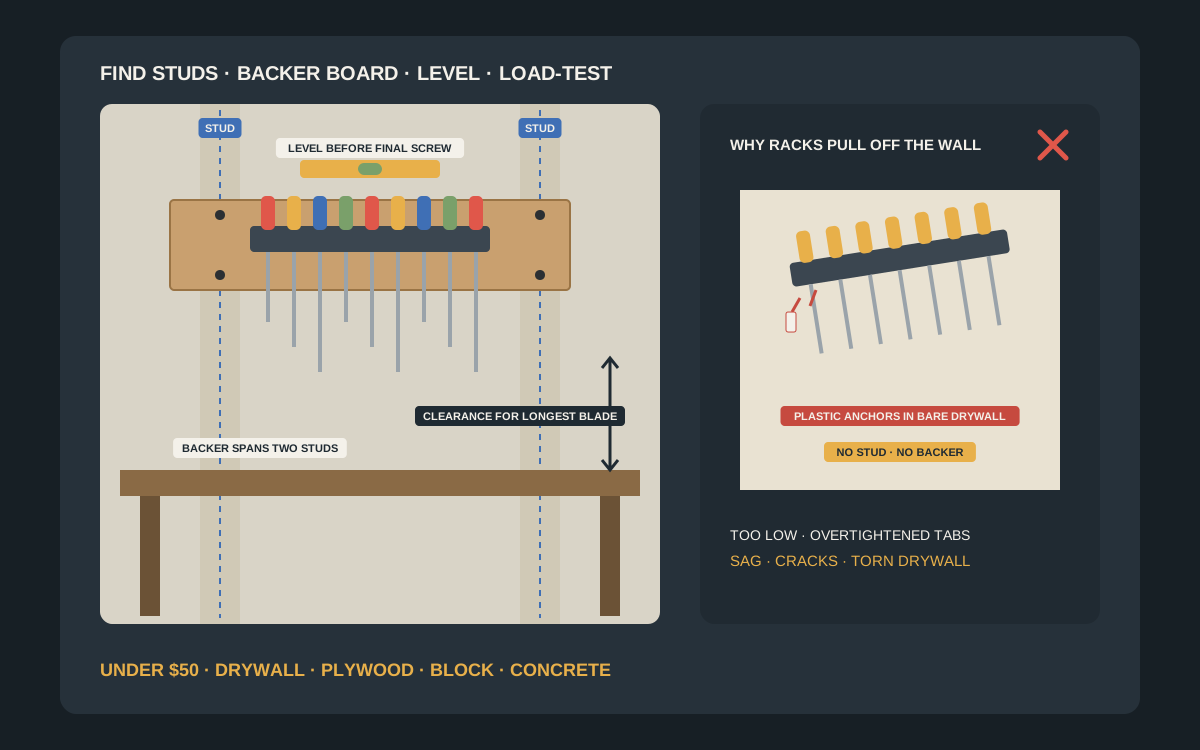
A screwdriver rack is one of the cheapest upgrades a garage bench can get, but it is also one of the easiest to mount badly. A full set of drivers is heavier than it looks, every grab and return pulls the rack outward, and a rack screwed into bare drywall with the plastic anchors from the box tends to loosen within months. This guide covers the install itself, step by step: choosing the height and clearance, finding studs, building a simple backer board, leveling, fastening into drywall, plywood, block or poured concrete, and testing the result. If you have not picked a rack yet, start with our screwdriver wall racks buying guide, then come back here to put it on the wall.
Shop screwdriver wall racks on Amazon
Who this is for
- Garage and shop owners who already have a screwdriver rack and want it mounted solidly the first time
- Anyone whose rack has pulled away from drywall or sags at one end
- DIYers mounting onto concrete block, poured concrete or plywood-lined walls
Quick answer
Mount the rack so the shortest drivers sit about elbow to chest height above the bench, and leave enough clear wall below for your longest blade to lift out. Find two studs, screw a short plywood or 1x4 backer board across them with wood screws that go well into the stud, then fix the rack to the backer with the screws or bolts the rack is designed for. Level it before the final screw. On drywall with no stud where you need it, use rated toggle or metal self-drilling anchors only for light racks; on block or concrete, use masonry screws in pre-drilled holes. Load the rack fully and pull down and outward on it before you trust it. A backer board, screws and anchors usually add only a small amount to the cost; check current prices before you buy.
Quick comparison
| Wall type | Best mounting method | Fastener | Watch out for |
|---|---|---|---|
| Drywall over wood studs | Backer board across two studs, rack on the backer | Wood screws through drywall into studs | Missing the stud; screws too short to bite |
| Drywall between studs | Light racks only | Toggle bolts or metal self-drilling anchors | Plastic expansion anchors pulling out under load |
| Bare studs or framing | Backer board or direct to a stud | Wood screws straight into framing | Rack too narrow to span two studs |
| Plywood or OSB sheathing | Direct to the sheathing, ideally also a stud | Wood screws through the sheathing | Thin OSB crumbling at the screw |
| Concrete block | Direct or on a backer board | Masonry screws into pre-drilled holes | Drilling into hollow cores; hitting mortar joints |
| Poured concrete | Direct or on a backer board | Masonry screws or sleeve anchors | Hammer drill needed; dust and spalling |
Hole-style screwdriver racksElectronic stud findersStructural wood screwsConcrete screw anchors
What to look for
Check the rack’s mounting points first
Before you drill anything, look at how the rack fixes to the wall: pre-drilled holes along the back flange, keyhole slots, a pegboard hook system, or a French cleat profile. The fixing points decide whether you can reach studs directly or need a backer board, and what screw diameter fits. Use the instructions and hardware notes that came with your rack; if the supplied screws look short or thin for your wall, use better ones of the same head size.
Plan height around your longest driver
A rack is only useful if a driver lifts straight out. Measure your longest screwdriver, add a couple of inches, and make sure there is that much clear space below the rack and above the bench, shelf or anything else on the wall. Many people end up with the rack top somewhere around shoulder height, but your own reach and bench height matter more than any fixed number.
Know your wall type
Garage walls are commonly drywall over wood studs, bare studs, plywood or OSB sheathing, concrete block or poured concrete. Each needs a different fastener. Knock and drill a tiny test hole in a hidden spot if you are not sure; drywall dust is white and chalky, block and concrete are gritty and hard.
Think about what else is in the wall
Stay clear of the area directly above and below outlets and switches, where cables usually run vertically, and of any plumbing on the other side of a shared wall. A stud finder with AC detection helps, but treat it as a warning rather than a guarantee. Turn off the circuit if you need to drill close to wiring.
Step by step: mounting the rack
1. Gather tools and hardware
You will typically need a drill/driver, a level, a tape measure, a pencil, a stud finder or strong magnet, drill bits sized for your screws, and the right fasteners for your wall. For a backer board, a short length of 3/4 inch plywood or a 1x4 or 1x6 board cut long enough to span two studs, usually about 16 or 24 inches apart, works well.
2. Mark the height and test the clearance
Hold the rack where you think it should go with one or two drivers in it, and check that the longest one lifts out without hitting the bench or shelf below. Mark the top edge of the rack lightly in pencil. If several racks are going up, such as screwdrivers, pliers and wrenches, mark them all now so the row lines up.
3. Find and mark the studs
Run a stud finder along the wall at rack height and mark both edges of each stud, then confirm the center with a small finish nail or a thin pilot hole that will be hidden behind the rack or board. A magnet that sticks to drywall screws is a quick double-check: drywall is usually screwed to each stud in a vertical line.
4. Fit a backer board
Cut the board so it overlaps both studs, sand the edges, and paint it if you like. Hold it level on your marks, pre-drill, and drive at least two wood screws into each stud, long enough to pass through the board and drywall and bite solidly into the wood. The board spreads the load and lets you put the rack anywhere along it, not only where the studs happen to be.
5. Level and fasten the rack
Set the rack on the backer, check it with a level, and mark the holes. Pre-drill small pilot holes so the board does not split, then drive the first screw only snug, re-check level, and drive the rest. Do not overtighten screws in plastic racks; cracked mounting tabs are a common failure.
6. Load-test before you trust it
Fill the rack with your full set, then pull down and slightly outward on it with more force than a normal grab. Nothing should creak, shift or gap away from the wall. Recheck the screws after a week of use, when wood fibers and anchors have had time to settle.
Other wall types
Drywall with no stud where you need it
If the rack must sit between studs, use anchors rated well above what a full rack weighs, such as toggle bolts or metal self-drilling anchors, and spread the load over as many holes as the rack allows. Skip plastic expansion anchors for anything that gets pulled on every day. For heavier sets, a backer board is still the better answer.
Concrete block
Drill into the solid face of the block rather than the mortar joint or a hollow core, using a masonry bit of the size the screw maker specifies, then drive masonry screws such as Tapcon-style screws. Blow the dust out of each hole first so the screw threads bite cleanly.
Poured concrete
Use a hammer drill and a masonry bit, keep the bit square to the wall, and use masonry screws or sleeve anchors. Wear eye protection and a dust mask, because concrete dust is unpleasant and silica is a health hazard. A backer board screwed to the concrete lets you add or move racks later without drilling more concrete.
Magnetic bars and pegboard racks
A magnetic tool bar mounts like a rack: into studs or a backer, kept level, with enough clearance for long drivers. A pegboard screwdriver holder simply hooks into the board, but the pegboard itself must be mounted on furring strips or spacers so the hooks can seat; our pegboard mounting guides cover that step.
Mistakes to avoid
- Relying only on the small plastic anchors included in some rack boxes on a drywall wall.
- Mounting so low over the bench that long drivers cannot lift out.
- Screwing into the drywall edge next to a stud instead of the stud itself.
- Drilling directly above or below an outlet or switch, where cables usually run.
- Overtightening screws in plastic racks and cracking the mounting tabs.
- Drilling concrete block in the hollow core or the mortar joint.
- Skipping the level check, so drivers lean and the row of racks looks crooked.
- Never re-checking screws after the first week of daily use.
Related guides
Browse the hub: Garage wall storage under $50 - all guides
- Best Screwdriver Wall Racks Under $50 for Garage Workshops
- How to Mount a Cordless Drill Organizer on a Garage Wall Under $50
- Best Wall-Mount Pliers Organizers Under $50
- Best Magnetic Tool Bars Under $40 for Garage Walls
- How to Mount Pegboard on a Concrete Garage Wall Under $50
- How to Mount a French Cleat Kit on a Garage Wall Under $50
FAQ
How high should I mount a screwdriver rack?
High enough that your longest driver lifts straight out without hitting the bench or anything below, and low enough that you can reach the handles without stretching. For many people that puts the rack top somewhere around shoulder height above a standard bench, but measure your own tools and reach.
Can I mount a screwdriver rack on drywall without studs?
Yes for light racks, using toggle bolts or metal self-drilling anchors rated well above the loaded weight. For a full set or daily heavy use, screw a backer board into studs and mount the rack on that.
What screws should I use for a screwdriver rack?
Use the screw head size your rack’s holes are designed for, long enough to pass through any backer and drywall and bite well into a stud. On block or concrete, use masonry screws in pre-drilled holes of the size the manufacturer specifies.
Do I need a backer board?
Not always, but it is the most reliable approach on drywall. It lets you place the rack anywhere along the board, spreads the load across two studs, and makes adding pliers or wrench racks next to it easy.
How do I mount a screwdriver rack on a concrete garage wall?
Drill with a hammer drill and masonry bit, clear the dust, and drive masonry screws or sleeve anchors. On block, drill into the solid face rather than the mortar joint or hollow core.
Should I mount a screwdriver rack above a pegboard instead?
If you already have pegboard, a pegboard screwdriver holder is the easiest option. For a large set, a dedicated rack on a backer board is usually more solid, because pegboard hooks can lift out when you pull a driver.
Bottom line
Mounting a screwdriver rack well takes a few minutes of planning: set the height around your longest driver, find two studs, screw a backer board across them, level the rack and fasten it with proper screws. Use rated toggles or metal anchors only for light racks on bare drywall, and masonry screws on block or concrete. Load it fully, give it a firm pull, and recheck after a week. Check the listing’s current size, mounting hardware and price before you buy.