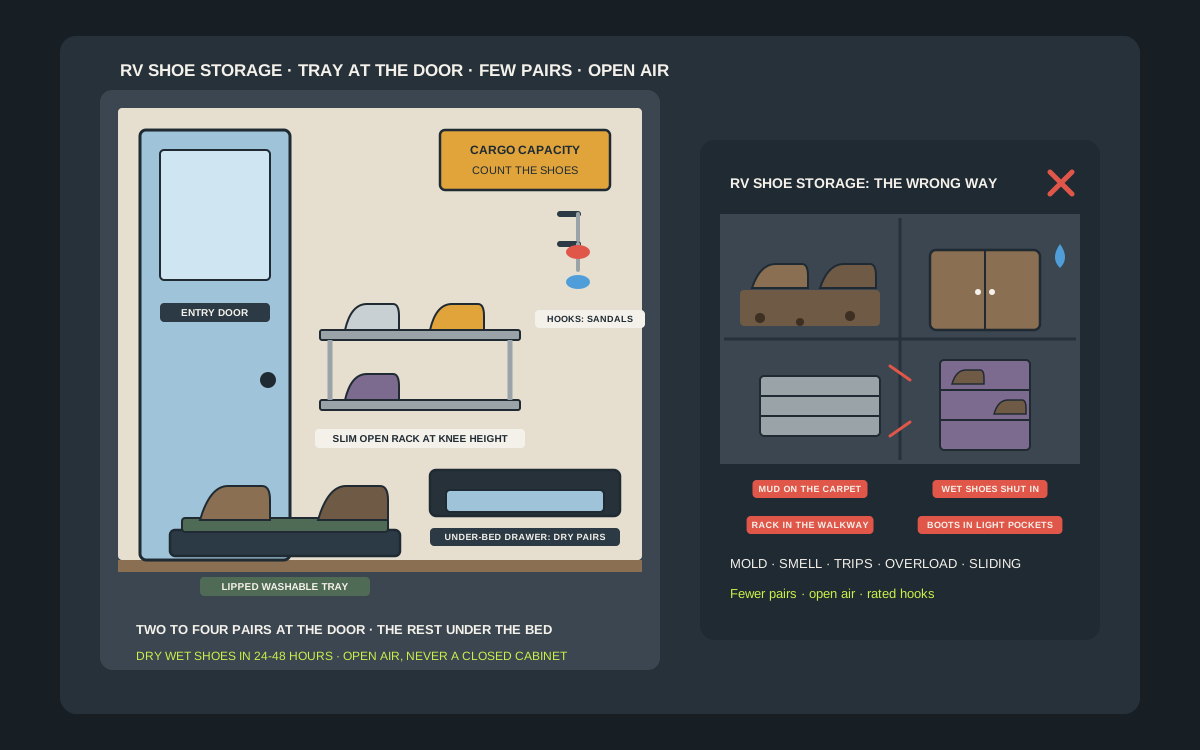
Every RV owner has a shoe story. A pair of muddy sneakers on the carpet at 10 p.m., a stack of sandals that slides across the floor on the first turn out of the campground, a pair of hiking boots that nobody wants to touch because they have been wet since Tuesday. The entry of a camper or travel trailer is the smallest, busiest and dirtiest few square feet of the whole rig, and it is also where shoes pile up first. Good RV shoe storage is less about buying a rack and more about deciding which shoes live at the door, which live somewhere else, and what happens to a wet pair at the end of the day. This guide covers the four things people actually buy under $50: entry-step trays and mats, wall cubbies and slim racks, over-door pocket organizers, and under-bed drawers. It shows which suits which rig, how weight and moisture change the answer, and how to set the whole thing up in one evening.
Shop RV entry shoe racks and boot trays on Amazon
Who this is for
- Travel trailer, fifth-wheel and camper-van owners whose shoes are currently on the floor by the door
- Families with kids who each own three pairs of shoes and no place to put them
- Weekend campers who want mud and sand to stay near the door and out of the bedroom
- Full-time RVers trying to cut down the number of shoes in a very small home without losing the ones they use
Quick answer
For most rigs, the best setup under $50 is a washable boot tray or low mat just inside the door for the pairs you wore today, one slim wall-hung rack or an over-door pocket organizer for the daily pairs, and an under-bed drawer or bin for everything else. Keep the number of shoes small, because every pair adds weight against your cargo carrying capacity. Keep wet shoes in open air, never shut in a cabinet, dry them within a day or two, and mount any rack to the load rating on the package, not to what looks sturdy.
Quick picks
- Best overall: a washable boot tray or low mat right inside the door, plus one slim wall-hung or over-door rack for the pairs you wear every day. The tray catches the mud and water; the rack keeps everything else off the floor.
- Best for wet or muddy shoes: an open, drip-friendly tray with a raised lip, set where the water can run off the walking path and dry in moving air. EPA’s guidance is to dry wet items within 24–48 hours to prevent mold, so open beats closed.
- Best for tiny travel trailers: a hanging pocket organizer on the back of a door. It uses wall you already have, folds flat for travel and adds very little weight.
- Best for families: a low, wall-hung cubby or hook-and-shelf set at kid height, one slot per person, so the shoes have a home that is easy to reach.
- Best for full-timers with a bedroom: an under-bed drawer or low bench for the off-duty pairs, so only the shoes you are really wearing live at the door.
- Best budget add-on: a small stack of heavy-duty adhesive hooks for sandals and flip-flops by the entry. Fit the hooks to the package rating and the wall material, and keep the loads light.
Quick comparison
| Option | Best for | How it holds the shoes | Trade-off |
|---|---|---|---|
| Boot tray or low mat | Wet and muddy shoes just inside the door | Catches water, mud and sand on a lipped, washable surface | Takes floor space and can slide in transit |
| Slim wall-hung rack or cubby | Two to four daily pairs at the entry | Lifts shoes off the floor on rails or shelves, kept open for airflow | Needs a solid mounting point and a rated fixing |
| Over-door pocket organizer | Travel trailers with a spare door | Holds a pair in each pocket on the back of a door | Heavy boots overload it and the door must close |
| Under-bed drawer or bin | Off-duty pairs and seasonal shoes | Stores out of sight, low and central, near the axle line | Out of sight means out of mind for damp pairs |
| Hook strip or rail | Sandals, flip-flops and kids’ shoes | Hangs by the heel strap, nothing on the floor | Adhesive hooks have a rating and fail under heavy loads |
| Collapsible fabric bin | Seasonal rotation, kids’ shoes | Soft sides, folds flat when empty | Holds moisture if shoes go in wet |
| Mesh hanging bag | Wet shoes on a hook or ladder | Airflow on all sides, wipes clean | Looks cluttered, swings in transit |
| Closed shoe cabinet | Dry-weather shoes only | Hides everything behind a door | Traps moisture and weight, and is rarely worth the floor space |
RV boot trays and entry matsOver-the-door shoe organizersSlim wall-mounted shoe racks
What to look for
Size and walkway clearance
Measure the clear floor at the entry door before you buy anything. A step, a door swing and a narrow aisle leave very little room, and a rack that sticks out four inches too far becomes the thing everyone trips on. Favor slim, low or wall-mounted designs. Check the footprint on the product page, subtract it from the aisle width and make sure the door still opens fully.
Weight against cargo capacity
Shoes are heavier than they look. A boot tray with water in it, a rack with six pairs and a pocket organizer with boots all add up. RV.com explains that the yellow cargo carrying capacity sticker tells you how much weight is left for you and your stuff, and RV TowCalc notes that CCC covers everything added after the factory: gear, food, clothing, water and accessories. Treat shoes as part of that budget.
Easy to rinse and dry
Entry storage meets mud, sand, rain and pet hair. Plastic or rubber trays, mesh pockets and metal racks wipe or rinse clean; fabric cubbies and felt organizers hold moisture and smell. Prefer something you can take outside, hose off and leave in the sun.
Open airflow
Wet shoes need air. EPA’s guide to mold and moisture says the key to mold control is moisture control and that wet items should be dried within 24 to 48 hours. A slatted rack, an open tray or a mesh pocket helps. A closed cabinet or a zipped bag does the opposite.
Mounting that suits the wall
RV walls are thin, often with a decorative skin over a light frame, and drilling can hit wiring or plumbing. Adhesive hooks and over-door designs avoid holes but come with a rating; screw-in hooks hold more but need the right spot. Match the load to the product’s rating, with margin, and test with light loads first.
Moves without making noise or mess
Anything on a shelf at the entry has to survive a drive. Look for a lip, a strap, a bungee or a closed pocket, and plan to take loose shoes off a rack before towing. A rack that rattles for 300 miles will be loose by the second day.
How many shoes an RV really needs
Fewer than you think
Stress Less Camping, a long-running RV travel site, advises against filling every square inch and says it keeps its own shoe selection small enough to fit one under-the-bed drawer. Its host travels with three or four pairs of flip-flops and one pair of solid shoes. That is a good starting point for many couples: one sturdy pair for each person, one casual pair, one water or camp pair and a pair of slippers. The rest of the closet can wait at home.
Count by activity, not by season
List what you really do on the road: walking the dog in the rain, hiking, working at a laptop on a picnic table, going to the pool, going out to dinner. Then give each activity one pair and assign it a home. If two pairs do the same job, one of them stays behind. A single pair of closed shoes that handles walking, a short hike and a restaurant is better than three pairs of specialized shoes, none of which will ever dry in time.
Match the rack to the pairs
The number of pairs decides the storage. Two to four pairs per person at the door is enough for a wall rack, a tray and a couple of hooks. More than that and you are asking a small entry to be a closet, which it is not. If a pair has not left the bin in three trips, that pair does not need to be on the trailer.
Plan for souvenirs
The same travel writers point out that you will probably buy something along the way, so leave a little room and a little capacity. A new pair of boots from a regional outfitter is a classic. Keep one slot empty by design.
Where RV shoe storage works, and where it does not
Just inside the entry door
This is where shoes land whether you plan it or not, so plan for it. A lipped tray on the floor, a slim rack on the wall above it and a couple of hooks make a small, organised drop zone. The goal is simple: dirty shoes stay at the door, clean shoes go on to the bedroom. Everything about the zone should be easy to rinse and easy to lift out for towing.
Outside the door, under the awning
Many campers keep a mat and a small open rack outside the door in good weather. It keeps mud, sand and pine needles outside, and it gives wet shoes air. The trade-off is theft, rain and wind, so it is a daytime solution, and the rack has to be stowed before you tow. Treat it as a bonus, not as the storage plan.
Behind the bedroom door
An over-door pocket organizer is easy to hang and easy to remove. It works best on an interior door with a clear swing and no heavy use. Lightweight shoes, slippers and sandals do well; boots do not, because they stretch the pockets and push the door out of true.
Under the bed and in low lockers
Low, central storage is better for weight and balance than high shelves. A shoe drawer under the bed, a bin in an under-seat locker or a bag in the pass-through holds the off-duty pairs. The catch is moisture: only store clean, dry shoes there, with a desiccant packet or a sheet of newspaper for company.
Not in a closed cabinet by the door
A cupboard looks tidy, and then the first wet pair goes in. Closed, warm and damp is exactly where mold and smell begin. Use the cupboard for clean, dry shoes only, or skip it.
Entry-step trays and mats
Why a tray comes first
A tray does the most important job in the whole system: it gives wet, muddy shoes a place to drip that is not your floor. A lipped, washable tray in rubber or plastic holds melt water, sand and gravel. Pick one that fits the entry without crowding the door swing and that you can lift out, tip over the steps and rinse in under a minute.
Non-slip and weight
A tray slides on vinyl, and a heavy one with water in it can slide a long way on a turn. Look for a textured base or add a strip of non-slip liner under it. Weigh the tray empty if the listing gives the weight, and remember it holds more than its own weight once it is wet.
Mat or tray?
A mat is lighter and rolls up, a tray holds liquid. For dry-weather weekends a mat is enough. For rain, snow, beach or trail use, choose a tray, or put a mat inside a tray. In either case, take it outside to shake and rinse at the end of every stay.
Keep it open
Do not put a lid, a bag or a closed cabinet over it. Wet shoes need moving air to dry, and the tray is there to give them that air at the point where the water leaves them.
Wall cubbies, slim racks and hook rails
The advantage of the wall
A wall-hung rack takes no floor space, keeps shoes off the tray and fits a narrow RV aisle. A two-tier slim rack or a row of angled slots at knee height is enough for three or four pairs. Keep it open and slatted rather than boxed so air can move.
Hooks for sandals and kid shoes
A hook rail or a few adhesive hooks at the entry hold flip-flops, slides and kids’ shoes by the heel strap or the loop. They also dry faster than a pair in a pocket. Check the rating on the hook package, keep the load well under it, and follow the surface preparation on the instructions.
Adhesive or screw-in
Adhesive hooks and strips leave no hole in a thin wall but depend on a clean, compatible surface and a stated weight limit, and they let go when wet. Screw-in rails hold more but need the right location, away from wiring and plumbing. Our guides on adhesive versus screw-in hooks for RV walls and on mounting hooks in an RV without damaging the walls explain how to choose and test.
Height and reach
Mount a rack at knee height so you can put shoes on while sitting on the step or bench. Mount a kids’ hook rail low enough for a child to reach. A rack that nobody can reach comfortably is a rack that will be ignored.
Secure for towing
A rack with open shelves is fine in a campground and a hazard on the road. Take the shoes off before you move, or choose a design with a rail, a bungee or a closed pocket for each pair.
Over-door pocket organizers
Why they suit RVs
An over-door organizer uses space that is already there, needs no tools and comes off in seconds. In a small travel trailer or camper it is often the least invasive way to get a dozen pocket-sized spots at once. Choose one with mesh or clear pockets, so you can see what is inside and let air in.
Which door to use
Pick an interior door that you do not open all day and that has the clearance for a thin organizer on the back. Check how the door closes with the organizer on, how the hooks sit on the top edge and whether they scratch the finish. Over-door hooks vary in how much they need the door to flex; a very thin RV door may not fit a thick hook.
What it can carry
Light shoes, slippers, sandals and kids’ shoes are a good fit. Heavy boots stretch the pockets, pull on the hooks and make the door hard to close. If you have boots, store them on the floor or in a tray and keep the pocket organizer for the lighter pairs. Our guide to travel trailer over-door organizers covers the hardware and the door-fit questions in more detail.
Keeping it clean
Mesh pockets can be wiped, shaken out and rinsed. Fabric ones need washing. Do not put wet shoes in a pocket, because there is nowhere for the water to go and the pocket holds it against the door.
Under-bed drawers and low bins
The most weight-friendly space
Low storage is kinder to your trailer than a high shelf. A drawer or bin under the bed holds the off-duty pairs without making the rig feel top-heavy. It is also the one place where shoes are out of sight and out of the way.
Clean and dry only
Treat an under-bed drawer as the clean, dry-shoe zone. Wipe soles before they go in, add a sheet of newspaper or a desiccant pack, and open it from time to time. If the rig sits in a damp climate, check it at every stop.
Fabric bins and collapsible boxes
A collapsible bin works for seasonal swaps and folds flat when empty. Choose one with a stiff base, so it does not sag, and a handle you can use through a low locker door. Keep soft bins to dry shoes.
Weight, the yellow sticker and why shoes count
What cargo carrying capacity means
RV.com’s guide to weighing your RV explains that the yellow sticker, usually showing cargo carrying capacity, tells you how much weight is left over for you and your gear after the manufacturer has weighed the rig. It also notes that the number must take into account water and propane and any accessories added by the dealer. RV TowCalc adds that CCC is the weight of everything added after the trailer left the factory, from clothing and food to water and aftermarket accessories.
Shoes are not the biggest weight problem, but they add up
A pair of sandals weighs very little. A pair of work boots, a rack, a tray, a pocket organizer, a bin of spare shoes and the mud and water that go with them can be a few pounds more than you think, and you are carrying them on top of everything else. The point is not to panic about shoes, it is to include them when you decide what comes along.
Weigh the loaded rig
RV TowCalc recommends weighing a representative load-out once at a certified scale, and Stress Less Camping suggests packing what you think you will need and then going to a weigh center. If you are over, or close to the limit, rethink what to take. A shoe rack and a second pair of everything are among the easiest things to cut.
Check axle ratings too
A trailer can be under its overall rating and still overload one axle or one side. Heavy items stored all on one side, including a tray full of wet boots, can add to that. Spread storage across both sides and keep it low where you can.
Wet shoes, mud and mold
Moisture is the real enemy
EPA’s Brief Guide to Mold, Moisture and Your Home says the key to mold control is moisture control, that molds need water to grow, and that wet or damp areas and items should be dried within 24 to 48 hours. In an RV, with small volume and often limited ventilation, a few wet pairs of shoes are one of the easiest ways to raise the humidity.
Dry them before you store them
At the end of the day, knock off the mud, pull out the insoles and put the shoes in the open tray or on a rack near moving air. A fan, a vent or an open window helps. Do not put them in a cabinet, a bag or a pocket until they are dry.
Use the tray as a drip zone
Set the tray where it will not wet the floor covering and where air can move across the shoes. Empty and rinse it every few days. A tray that is full of dirty water is a smell problem, not a solution.
Keep a small kit nearby
A small brush, a rag and a roll of paper towels hung beside the tray make it easy to deal with the mess at the moment it arrives. A hook for the rag and a hook for the brush cost almost nothing and do a lot of work.
Mind the closets and lockers
Check low lockers and the bed storage every few trips for any musty smell. If you find one, take everything out, wash and dry the surface and fix the moisture source before the shoes go back in.
How to set up an RV shoe station in one evening
- Measure the clear floor at the entry, the door swing and the aisle width, and write the numbers down before you shop.
- Decide how many pairs live at the door. Two to four per person is a good maximum for a small rig. Everything else goes under the bed or stays at home.
- Choose a lipped, washable tray or mat for the floor. Make sure it fits without crowding the door and add a non-slip layer underneath if it slides.
- Pick one wall solution: a slim rack, a short hook rail or an over-door organizer. Confirm the rating on the package and match it to the heaviest pair you plan to hang.
- Choose the mounting spot away from wiring, plumbing and the door swing. For adhesive hooks, clean the surface as the instructions say, press for the stated time and wait before loading.
- Test with light loads first. Hang a pair of sandals for a day, then add weight a little at a time, and check the surface for any sign of lifting.
- Set up the drying routine: shoes come off on the mat, mud is knocked off, the pair goes on the rack in open air and wet pairs never go into a closed space.
- Pack the under-bed drawer with the off-duty pairs, clean and dry, with a sheet of newspaper or a desiccant pack.
- Write a short pre-travel check on a card: shoes off the rack and into the drawer, tray rinsed and secured, hooks and organizers checked, door closes fully.
- After the first trip, move anything that rattled, slid or never got used, and cut any pair you did not wear.
Mistakes to avoid
Buying storage for shoes you do not need
A bigger rack is not a plan. The best storage is the one that holds fewer shoes. Cut the number first, then choose the rack.
Hanging boots on a light organizer
Boots are the heaviest and wettest shoes you own. They belong on the tray or in a rated, open hook, not in thin pockets on a door.
Shutting wet shoes in a cabinet
This is the fast route to a musty rig. Dry first, store second.
Blocking the walkway
A rack in the aisle works on the first night and is the first thing that gets knocked over in the dark. Keep the entry clear for the people who live there.
Ignoring the rating on adhesive hooks
The package states how much each hook holds and on which surfaces. Heat, humidity and a rough wall can reduce that. Stay well under it and re-check after a long, hot drive.
Forgetting to secure things for travel
Everything that is loose at the entry becomes a missile at the first brake. Empty the rack, secure the tray and close every pocket.
Never cleaning the tray
A tray that holds a week of mud is a hazard. Rinse it at every stop and let it dry in the sun.
Quick buying guide by rig type
Small travel trailer or teardrop
A mat, one or two adhesive hooks, a small over-door organizer and a bin under the seat. Keep it to a handful of pairs.
Mid-size travel trailer or camper van
A tray at the entry, a slim wall rack at knee height and an under-bed drawer for off-duty pairs. Add a hook rail for kids’ shoes.
Fifth-wheel or large travel trailer
A bench with a tray beneath it, a wall rack by the door and a pocket organizer in the bedroom. You have more room, but you also have more weight to count.
Family rig with bunks
One cubby or hook position per person, labelled, at the height of the person who will use it. Keep the kids’ shoes by the door and the rest in the bunk locker.
Seasonal or storage-lot rig
Before you lay the rig up, take every shoe out, clean the tray, empty the pockets and leave the doors and drawers cracked for air. Our winterizing and storage guides cover the rest of the checklist.
Related guides
Browse the hub: RV & camping storage under $50 - all guides
- Best Travel Trailer Over-Door Organizers Under $50
- Best RV Outdoor Rug & Patio Mat Wall Storage Under $50
- Adhesive vs Screw-In Hooks for RV Walls Under $50
- How to Mount Hooks in an RV Without Damaging Walls Under $50
- Best Cabin Mudroom Hook Rails Under $50
- Best Over-Door Shoe Organizers for Apartments Under $50
- Best Winter Boot & Glove Drying Racks Under $50 for Garage Walls
- Best Collapsible Laundry Hampers for RV Walls Under $50
FAQ
How do I store shoes in a small RV?
Keep only the pairs you really wear, usually two to four per person. Put a washable tray or mat at the door for wet and muddy pairs, one slim wall rack or an over-door pocket organizer for the daily pairs and an under-bed drawer or bin for the rest. Keep everything open and airy so wet shoes can dry.
What is the best RV shoe storage under $50?
A lipped boot tray or low mat plus a slim wall-hung rack or an over-door pocket organizer is the best all-round setup for most rigs. It keeps mud at the door, keeps shoes off the floor and adds very little weight.
Are over-the-door shoe organizers OK in an RV?
Yes, on an interior door with enough clearance, as long as the door still closes fully and the hooks fit the door thickness. Use them for light shoes, sandals and slippers, not for heavy boots, and do not put wet shoes in the pockets.
Should I drill into the RV wall for a shoe rack?
Not unless you know what is behind the wall. RV walls are thin and can hide wiring and plumbing. Over-door organizers, adhesive hooks used within their rating, and screw-in hooks at known framing points are safer options.
How much weight do shoes add to an RV?
Not much per pair, but together with racks, trays, bins and the water and mud they carry, they count toward your cargo carrying capacity. RV.com and RV TowCalc both explain that the yellow sticker shows the capacity left for everything you add, so include shoes when you weigh and pack.
How do I keep wet shoes from making the RV smell?
Knock off the mud, take out the insoles and put the shoes on an open rack or tray in moving air. EPA advises drying wet items within 24 to 48 hours to prevent mold. Never put wet shoes in a closed cabinet, bag or pocket.
Where should I keep shoes while towing?
Low, central and secured: an under-bed drawer, a closed locker or a bin. Take shoes off wall racks, secure the tray and close every pocket before you move.
Is it better to keep shoes inside or outside the RV?
Keep dirty and wet pairs near the door and, in good weather, on an open mat or rack outside under the awning. Bring them in at night, store them in a tray, and never leave a good pair outside overnight or on the road.
Bottom line
The best RV shoe storage is small on purpose: a washable tray at the door for whatever is wet, one slim rack or door organizer for the pairs you wear every day, an under-bed drawer for the rest, and a rule that wet shoes always dry in open air. Count the weight against your cargo capacity, stay inside the rating on every hook, and take the shoes off the rack before you tow. Do that, and the first thing you notice when you step into your RV is the floor.