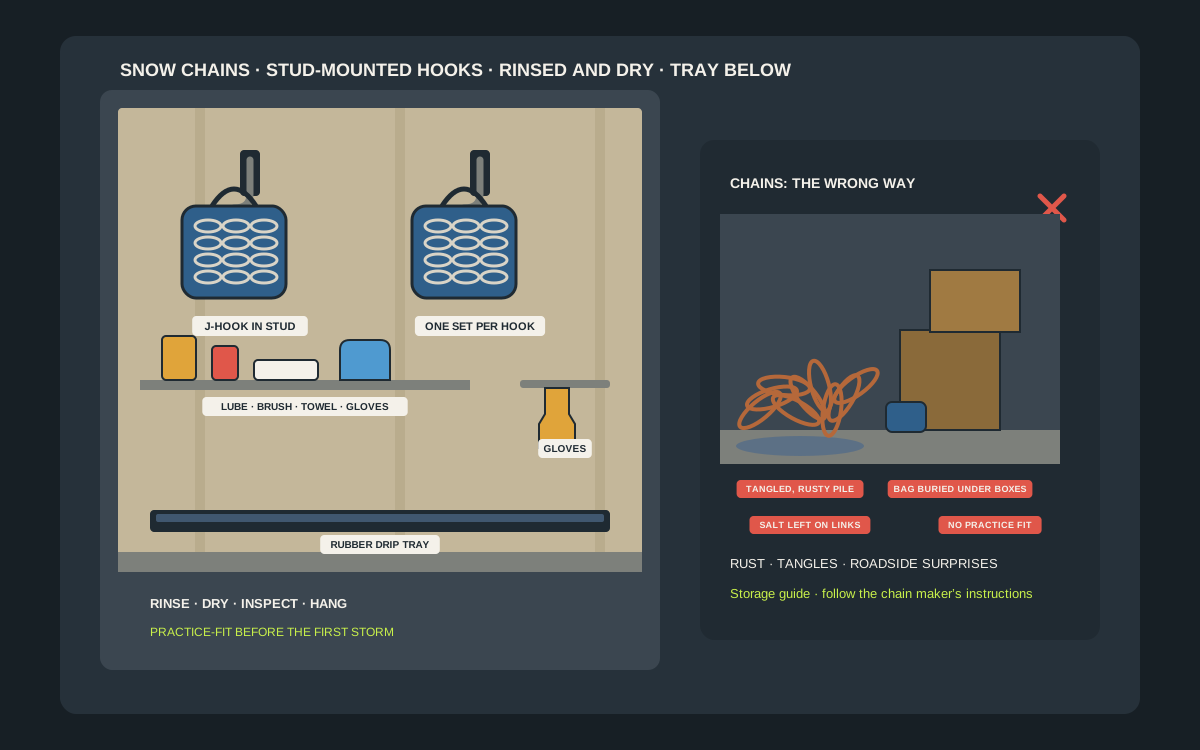
The first snow warning of the season is a bad time to find your tire chains. They are in the trunk, still crusted with last winter’s road salt, or in a cardboard box on the garage floor under a leaf blower, or in a bag so tangled that nobody wants to touch it. A set of tire chains is one of the few pieces of winter gear you may need on a bad day in a hurry, in the cold, with cold hands, so it deserves a proper spot on the wall. A pair of sturdy hooks into studs does the job for well under $50, and a short rinse-and-dry routine keeps the steel from rusting in its case. This guide covers how heavy chains should hang, what the chain makers say about rinsing, drying and lubricating them, why a practice fit in the driveway matters more than any hook, how to build a small kit station around the hooks, and how to avoid the mistakes that turn a ten-minute install into a roadside struggle.
Shop heavy-duty garage wall hooks on Amazon
Who this is for
- Drivers in snow country who keep chains for mountain passes, rural roads or the occasional storm and want them ready, not buried
- Anyone whose chains currently live in a tangled, rusty pile on the garage floor or in the trunk all year
- Households with two vehicles or two chain sets who want each set labeled, dry and easy to grab
- Homeowners deciding between a simple hook, a track-wall hook and a small shelf kit for chains and the gear that goes with them
Quick answer
For most garages, the best under-$50 setup is two heavy-duty steel J-hooks screwed into studs at shoulder height, with each chain set rolled in its own case or bag and hung by the carry handle, plus a rubber tray on the floor below. After every use, rinse off the salt, let the chains dry completely, check for broken or worn links, spray them with a light lubricant if the maker suggests it, and hang them back up. Test-fit the chains on your drive wheels in the driveway before winter, and keep the owner’s manual clearance rating in mind when you buy.
Quick picks
- Best overall: a pair of heavy-duty steel J-hooks screwed into two studs at about shoulder height, one for each chain set or axle pair, with a rubber tray on the slab below to catch the last drips.
- Best for a small garage: a single deep-throat double hook on a stud, with both chain bags hung from the same arm so the set that goes on the front axle and the spare set stay together.
- Best for track or slatwall garages: a heavy-duty hook made for your existing track or slatwall, so nothing new goes into the drywall. Check the rated load against the weight printed on the chain box.
- Best for drying after a storm: a short bar with two or three hooks over a plastic tray, so chains can hang open for a day after rinsing and before they go back in their case.
- Best for a full winter kit: a vertical hook strip above a small shelf holding a rinse bucket, old towel, lubricant spray, gloves and a kneeling mat, so the whole roadside kit lives together.
- Best add-on: a laminated tag zip-tied to each chain bag with the tire size, axle and date of the last practice fit, because the worst time to learn the set is the wrong size is on a snowy shoulder.
Quick comparison
| Setup | Best for | How it holds chains | Trade-off |
|---|---|---|---|
| Heavy-duty steel J-hook, stud mounted | Most garages | Case handle or bag loops over a deep arm, full weight on the stud | Needs a stud; hook rating must clear the chain weight |
| Double hook on one backplate | A tight wall with two chain sets | Two arms side by side, each holding a case | Both arms share a backplate; check the combined rating |
| Track or slatwall utility hook | Garages with a track system | Hooks onto the existing rail, no new screws | Brand-specific; some heavy-duty hooks price above $50 |
| Short hook bar with drip tray | Drying after a rinse | Two or three hooks hold chains open over a tray | Takes wall and floor space for a day or two |
| Vertical hook strip with a shelf | A full winter kit | Hooks for chains, shelf for lubricant, gloves and mat | Needs a longer stretch of stud wall |
| Ceiling or rafter hook | Off-season storage in a crowded garage | Chains hang overhead, out of the way | Harder to reach in an emergency; needs rafters |
| Rubber tray under the hooks | Every setup | Catches drips and salt below the chains | Must be emptied and wiped now and then |
| Labeled tag on each bag | Two vehicles or two sets | Tire size and last practice fit on a tag | Needs a quick update when tires change |
Heavy-duty J-hooks and garage hooksRubber boot and utility traysTire chain lubricant and rinse supplies
What to look for
Hook strength that matches a real load
Tire chains are heavier than they look, and a set in a case swings like a small anvil when you take it down. Read the weight on the chain package, then buy hooks whose printed rating clears it with a comfortable margin. Prefer steel with a welded or one-piece arm over a thin stamped hook, and avoid adhesive hooks entirely for this job.
Studs, not drywall
Screw the hooks into wood studs with the screws that come in the box, or lag screws sized to the hook’s holes. Bare drywall will not carry a heavy, repeatedly yanked load. If your garage walls are block, concrete or metal-stud, use anchors and fasteners rated for that wall type and follow the hook maker’s instructions.
A deep, rounded arm
Chains come in cases with handles, in mesh bags and sometimes just tied with a strap. A deep throat with a rounded or coated tip lets the handle seat firmly and keeps a bag from sliding off when a door slams or the car brushes the wall. A sharp, short hook is the wrong shape for this.
Room for the whole set
Many sets are sold as two pieces, one per drive tire. Plan for both to hang together on the same hook or on side-by-side hooks, so a matched set never gets split between the garage and the trunk. Leave a few inches between bags so each one can air out and dry.
A drip zone underneath
Chains that have been rinsed still drip. A rubber boot tray or a utility mat directly below catches water and leftover salt instead of letting it pool on the slab or trickle toward a floor drain. A tray also tells you at a glance that the chains came back wet and need another hour to dry.
A height you can actually lift to
Hang the hooks at about shoulder height so you can lift the case straight off with a straight back, not twist under an awkward overhead rack. Keep the lower hook’s tip clear of car doors and bumpers, and give the chain bag a clear path down to the floor when you set it by the tire.
Why chains need a proper home
The floor pile problem
Chains tossed on the garage floor are tangled by spring and rusted by fall. Road salt dries into the links, moisture sits in the lowest points of the pile, and a set that was fine last February becomes stiff, orange and awkward by the time you need it again. A pair of hooks costs less than one new set of chains and protects the one you already own.
Trunk storage is not a plan
Many drivers keep chains in the car all winter, which is sensible during the storm season. The trouble starts when they never come out. A damp, salty set stays in the trunk all year, chewing on the case, rusting the cross links and adding weight. Hooks in the garage give you a place to unload the set after the last snow, clean it, and load it again when the forecast turns.
What the wall changes
A wall hook lifts the chains off the slab, keeps the set together and lets you see it every time you park. Seeing it matters, because a set you look at every day is a set you remember to rinse, check and test. That sounds trivial, but it is the difference between a ten-minute install in the driveway and an hour of cold hands and tangled links on the shoulder.
Where this fits next to other winter gear
This guide is about the chains themselves. Winter tires, snow shovels, ice melt, jump starters and jumper cables all have their own wall homes, covered in separate guides. Keep them near each other if you can, but give the chains their own hooks, because they are the heaviest and dirtiest item in the group.
What chain makers say about care and use
Rinse off the salt, then dry
Peerless, one of the best-known chain makers, tells owners to remove the chains after use, examine them for damaged or worn parts and dry them off. Retailer guidance that follows the same advice says to rinse off salt and road grime first and make sure the chains are completely dry before storing, to prevent rust. A hook with a tray below is the easiest place to do that.
A light spray of lubricant
Peerless instructions for its cable and radial chains say to spray with an all-purpose lubricant after use, then roll the chains up and put them back in the package. Check the paperwork for your own set, because some makers recommend a specific product or none at all. Keep a small can on the shelf beside the hooks so the step does not get skipped.
Inspect before you put them away
The same instructions say to look for damaged or worn parts, and that broken cross members should be removed or replaced immediately rather than driven on. A winter-end inspection is the right time to catch a bent link or a cracked tensioner, long before the next storm. Replace anything that looks doubtful.
Respect the speed and surface limits
The Peerless instructions for its cable chains say to avoid speeds over 30 mph and to avoid use on bare pavement, because traction coils on the cross members wear and break. Other makers publish their own limits, so read the sheet in your box. If your chains are only ever used in a hurry, it helps to tape or tag the key limits to the case.
Chain tensioners and wheel covers
Some chains use rubber tensioners that can mark wheel covers or protruding alloy wheels, and Peerless cautions against those types for wheels that stick out beyond the tire sidewall. That is a purchase-time issue, not a storage issue, but it is a good reason to keep the original instructions with the set rather than in a kitchen drawer.
Fit, clearance and the practice run
Why you test-fit in the driveway
Peerless and other makers recommend fitting chains to the tire before you need them, because tire sizes vary with age, brand and tread, and the only way to be sure is to try. A dry run in the driveway on a nice afternoon tells you whether the set fits, whether you remember how it goes on and whether anything is missing from the bag.
Clearance classes in plain language
The Society of Automotive Engineers defines clearance classes for traction devices. Class S is for vehicles with restricted clearance around the wheels and calls for low-profile cable or link chains, while Class U is for regular chains where there is more room. Many modern cars need Class S, so check the owner’s manual before you buy and look for the class on the package.
Listen for contact
Peerless advises driving a short distance after installing chains, and removing them right away if you hear contact between the chain and any part of the vehicle. If the practice run shows a clearance problem, it is much better to find out now and swap the set than to discover it halfway up a pass.
Both drive wheels, every time
Chains go on the drive wheels, which are the front tires on a front-wheel-drive car and the rear tires on a rear-wheel-drive car, and installers recommend chaining both wheels on the axle. For all-wheel-drive and four-wheel-drive vehicles, follow the owner’s manual. Store the matched pair together, with a note on the tag of which axle it belongs to.
Write the details on a tag
A zip-tied tag with the tire size, axle, the date of your last practice fit and the maker’s speed limit costs nothing and removes guesswork. When you change tires, change the tag. It also helps whoever borrows your car in a snow emergency when you are not around to explain.
Choosing hooks for the weight
Read the box first
Chain makers print the weight and the tire sizes on the package or in the instructions. Add up the weight of a pair, plus the case or bag, and compare it to the hook’s rated capacity. If the listing does not state a rating, pick a different hook. A hook you cannot rate is not a hook for a hanging weight you will yank on.
Steel arm, not plastic
Heavy-duty steel with a powder-coat or vinyl tip is the right material. Plastic hooks that are great for garden hoses or bike helmets can snap or bend under chains, especially in a cold garage where plastic gets brittle. A coated tip also keeps the case handle from sliding and protects a bag from abrasion.
One hook per set, or a double
Hanging both chains from the same arm works if the rating allows it, but it is easier on the hardware to give each piece its own arm. A double hook on a single backplate keeps the pair tidy, saves wall space and lets you grab one set at a time. Check the plate’s combined rating, not just one arm.
Screws and spacing
Use the screws that come with the hook or longer wood screws that bite deep into the stud. Mount the hooks at stud centers, usually 16 inches apart, and keep a few inches between sets so bags do not squash each other. Predrill a pilot hole in dense studs so the screws go in straight and the wood does not split.
Hooks for track or slatwall systems
If your garage already has a track or slatwall system, use a heavy-duty hook made for it, and confirm its rated load before hanging chains. Some branded track hooks list above $50 in a set, so watch for a single-hook price and keep your budget in view.
Setting up the rinse-and-dry corner
Where to rinse
Rinse chains outside, on a driveway or gravel, rather than on a garage floor drain that leads to a sump. A bucket of plain water and a stiff brush will carry off salt and grit. Skip harsh cleaners unless the chain maker recommends one, and keep leftover salty water away from plants and the foundation.
Where to dry
Hang rinsed chains on the hook bar over a tray for a day or two, spread open so air can reach the links. A rubber tray below catches drips, and a cheap fan can speed things up in a damp garage. When the metal is bone dry, roll the chains up and slide them back in the case.
Where to keep the kit
A small shelf next to the hooks keeps a can of all-purpose lubricant, an old towel, work gloves, a flashlight and a mat to kneel on all within reach. Add a reflective vest if you drive remote roads. The kit is not about emergencies only, it is about making the practice run and the end-of-season cleanup quick enough that you actually do them.
Keep the instructions
Slip the maker’s instruction sheet into a zip-top bag and tape it to the wall beside the hooks, or fold it inside the case. A laminated card with the first three steps of the install, especially which side faces the tire, saves time when your hands are numb.
Three sample layouts under $50
The single-wall starter
Two heavy-duty J-hooks screwed into adjacent studs at shoulder height, one rubber boot tray below and a zip-tied tag on each case. It takes about twenty minutes to install and is enough for one vehicle with a matched pair of chains.
The two-vehicle wall
A double hook on a long backplate or four separate hooks across two studs, with colored tags to separate the sedan set from the truck set. Add a small shelf above the hooks for the lubricant and the instruction sheets, and a tray below that spans the whole width.
The compact one-car garage
A single deep-throat double hook on a stud near the door, with the second chain set hung behind the first. Keep the tray small, and rinse chains outside, where there is room to spread them. If wall space is tight, move the kit shelf to the end of the hook run.
A simple yearly routine
Before the first storm
Pull the chains down, unroll them on a clean surface, check for rust, broken links or bent tensioners, and do a practice fit on the drive wheels. Confirm the maker’s speed limit, and drive a short distance slowly, listening for contact.
After each use
Remove the chains once you reach clear pavement, rinse off salt and road grime, let them dry on the hooks, spray with lubricant if the maker advises it, then roll them up and put them back in the case.
End of winter
Do a final inspection, replace worn parts, wipe the case dry and hang it back up. If the set was used a lot, note it on the tag so you can plan a replacement before next season.
When tires change
New tires or a different wheel size mean the old chains may no longer fit. Check the size on the package against the new tire, redo the practice fit and update the tag.
Setting up in an afternoon
- Choose a wall near the garage door or a side door, where you can reach it without moving other gear.
- Find the studs with a stud finder and mark their centers at about shoulder height.
- Hold each hook against the mark, level it and drill pilot holes for the screws.
- Screw the hooks into the studs with the supplied screws, tightening until the plate sits flat without crushing the paint.
- Hang an empty case first and tug it to confirm the hook holds before you load a heavy set.
- Place the rubber tray on the floor directly below the hooks, centered under the bags.
- Add a shelf or a second hook for lubricant, gloves, towel and the instruction sheet.
- Zip-tie a tag to each case with tire size, axle and the date of your last practice fit.
Mistakes to avoid
- Using adhesive or lightweight hooks for chains that weigh more than their rating.
- Mounting hooks into bare drywall instead of studs or proper anchors.
- Hanging chains while still wet, then sealing them in a plastic bag.
- Skipping the practice fit and learning about clearance problems on the road.
- Splitting a matched pair between the trunk and the garage.
- Driving over the maker’s speed limit or on long stretches of bare pavement.
- Forgetting to update the tag after changing tires or vehicles.
- Hanging the hook so low that it catches a car door, or so high that you strain lifting the case.
Why a wall beats a bin
Everything stays visible
A bin full of winter gear hides the chains at the bottom, under hats and scrapers. A hook shows what you have. If you can see the set, you remember to check it.
Chains dry in the open
A closed bin traps moisture and salt, which speeds up rust. A hook lets air reach the links and lets the tray catch what drips off.
It is faster in the cold
On a snowy morning you want to lift a case from a hook, not dig through a pile. A good setup takes the guesswork out of the first thirty seconds of a bad day.
It keeps the floor clear
Chains left on the floor trip people, scratch car paint and collect debris. A wall frees up the floor for the car, the ice melt and the snow shovel.
Chain types and what they mean for storage
Cable chains
Cable chains use steel cables with cross members and are usually lighter and lower profile, which is why they are common for Class S clearance. They are also the type Peerless warns against using at high speed or on bare pavement. Cable sets tend to be packed in a compact case with a carry handle, which hangs neatly on a single hook.
Link and ladder chains
Traditional link chains with ladder-style cross members are heavier and bulkier, and they need more wheel-well clearance. They are the sets most likely to be tangled in a pile, so hang them by the case or a strap and keep them rolled, not coiled. Give them the most generous hook rating and the sturdiest stud mount.
Textile traction covers
Fabric traction covers and other non-metal devices exist as an alternative in some places and some vehicles. They are lighter and need less hook strength, but they also have their own care and drying instructions. Follow the maker’s sheet, hang them in the open to dry, and do not assume the metal-chain routine applies.
Bags, cases and straps
Most sets ship in a case or bag with a handle. Keep it, because it is the best thing to hang from a hook. If the original is gone, a sturdy tote with a strong handle or a heavy-duty strap through the chain keeps the set together. Avoid thin shopping bags that tear under the weight.
Rules, signs and common sense on the road
Know your local rules
Rules about when chains are required, allowed or banned vary by state, region and road. Mountain passes often post chain-control signs, and some places restrict studded or chain use at certain times. Check the transportation department’s current guidance for the routes you drive, and keep a note of it on the kit shelf.
Carrying chains is not the same as using them
A set in the trunk helps only if you can put it on. Practice once so you know the steps by heart, keep gloves with the set, and use a flat, safe pull-out to install, away from traffic with the hazard lights on, the parking brake set and the engine off.
Remove them when the road clears
Chain makers say chains wear and can break on bare pavement. Take them off when you reach a clear road, then rinse, dry and hang them up. The best chain storage routine is a short one you will actually repeat, so keep the hooks and the tray near the place you park.
What to put on the shelf beside the hooks
Cleaning and care
A small bucket, a stiff brush, an old towel and an all-purpose lubricant spray cover most of the maker advice. Keep them on one shelf next to the hooks so the rinse and dry routine is a five-minute job.
Hands and knees
Chains go on in the cold and often in the dark. Keep a pair of waterproof work gloves, a kneeling mat or old piece of foam and a headlamp or flashlight beside the set. Check batteries each fall.
Spare parts and spares
Many sets ship with spare fasteners or tensioners. Keep them in a zip-top bag with the instruction sheet so a missing hook or loose connector is a thirty-second fix, not a trip to the store.
A winter-trip checklist
Tape a short checklist inside the case: chains for the right axle, gloves, mat, flashlight, tow strap, jump starter, ice scraper and a warm layer. Our winter tire, jump starter and jumper cable guides cover the other items in more detail.
Mounting hooks on different wall types
Wood studs in drywall
The easiest case. Find the stud centers, predrill, and drive the screws that come with the hook straight in. Hang an empty case first and tug it sideways and down before you load the full weight. If the hook plate wobbles, the screws have not bitten enough wood.
Exposed studs or plywood
Many garages have bare studs or plywood sheathing. Plywood is fine if the screws reach a stud behind it, but thin panels alone are not a safe anchor for a heavy hanging load. When in doubt, screw into the framing.
Concrete block or poured concrete
Use masonry anchors or sleeve anchors sized for the hook’s holes and rated for the load, drilling with a masonry bit as the anchor maker directs. Wear eye protection and a dust mask. Never rely on a plastic expansion plug that is meant for picture frames.
Metal studs
Thin metal studs need the right fasteners. Toggle bolts or self-drilling screws rated for metal studs, installed per the maker’s instructions, are the usual route. If the wall is metal framing behind drywall and you are not sure what you have, add a wood backer board across two studs and mount the hooks on that.
How many hooks and where
One vehicle, one set
Two hooks are plenty: one for each half of the pair if the chains come in two bags, or one double hook if they share a case. Keep them near the door you use most so you can grab them without moving a car.
Two or more vehicles
Give each vehicle its own hooks and its own tag. A pickup with larger tires and a sedan with low clearance need different chains, and mixing them up is how the wrong set ends up in the wrong trunk.
Seasonal swap
If you only use chains a few times a year, a ceiling or rafter hook can hold them in summer, with the wall hooks reserved for the winter months. Hang the set at shoulder height again before the first cold snap so the practice fit happens at a comfortable height.
Keeping it honest
Storage is not a substitute for fit
A neat set of hooks does not make a chain fit your tires or satisfy your vehicle’s clearance rating. Check the owner’s manual and the chain package, and follow local rules on when and where chains are allowed or required.
Follow the maker’s instructions
Every chain design installs a little differently, and the maker’s instruction sheet outranks any general advice here. If a hook or storage tip ever conflicts with the manual, the manual wins.
Safety on the roadside
Install chains on level ground, away from traffic, with the parking brake set and the engine off, as the maker instructions say. If conditions are unsafe, wait for help rather than rushing the job.
Related guides
Browse the hub: Garage wall storage under $50 - all guides
- Best Winter Tire & Seasonal Gear Wall Storage Under $50
- Best Jumper Cable Wall Hooks Under $50 for Garage
- Best Snow Shovel Wall Hangers & Ice Scraper Holders Under $50
- Best Jump Starter Wall Mounts Under $50 for Garage
- Best Ice Melt and Rock Salt Storage Shelves Under $50 for Garage Walls
- Best Winter Boot and Glove Drying Racks for Garage Walls Under $50
FAQ
How should I store tire chains in the garage?
Rinse off road salt, let the chains dry completely, check for damaged or worn parts, then roll them up in their case and hang the case from a heavy-duty steel hook screwed into a wall stud. Put a rubber tray under the hook to catch drips. Chain makers such as Peerless also suggest a light spray of all-purpose lubricant after use.
What hooks are best for snow chains?
Heavy-duty steel J-hooks or double hooks with a deep, rounded arm and a printed weight rating that clears the weight of your chains with margin. Mount them into wood studs with the supplied screws, and avoid adhesive or plastic hooks for this job.
How heavy are tire chains, and does it matter for hooks?
Weight varies by size and type, so read the figure on the package or in the instructions and add the case. Choose hooks rated above that total with comfortable margin. If a hook listing does not state a rating, choose another one.
Should I practice installing chains before winter?
Yes. Makers such as Peerless recommend fitting chains to the tire before you need them, then driving a short distance and stopping to remove them if you hear contact with any part of the vehicle. A dry run in the driveway shows whether the set fits and whether you remember how it goes on.
What speed can I drive with tire chains?
It depends on the product, but Peerless instructions for its cable chains say to avoid speeds over 30 mph. Read the limit printed in your own chain instructions and follow it, and avoid long stretches of bare pavement.
Do I need Class S chains?
Many modern cars have limited clearance around the wheels. SAE Class S covers low-profile chains for restricted clearance, while Class U covers regular chains. Check your owner’s manual for the clearance class, buy chains that state they meet it and always test-fit them before use.
Bottom line
The best under-$50 chain storage is two heavy-duty steel hooks in studs at shoulder height, a rubber tray below and a tag on each case. Rinse the salt off, dry the chains, check them for wear, spray them if the maker advises it and hang them up. Test-fit the set on your drive wheels before the first storm and keep to the maker’s speed limit. Do that, and the first snow warning becomes a quick check, not a scavenger hunt.