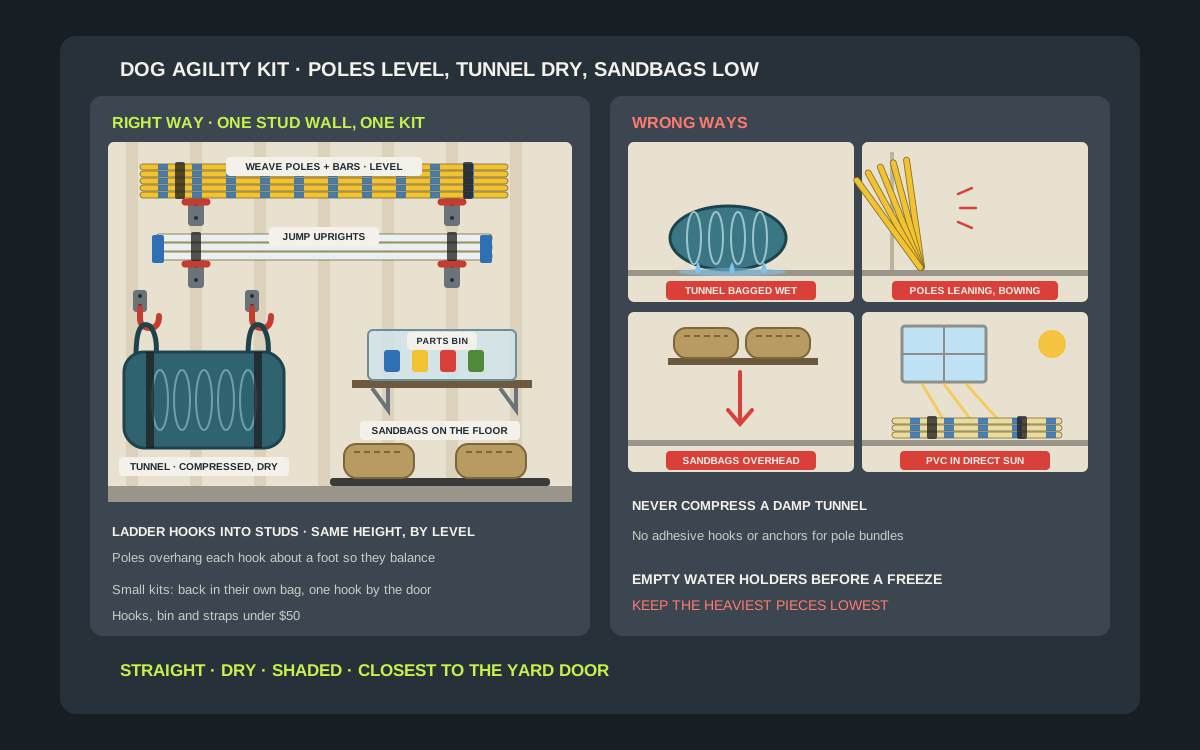
A home agility setup grows fast. It starts with a few weave poles and a jump, then a tunnel arrives, then sandbags to hold the tunnel still, then a tire jump or a pause box, and suddenly a third of the garage floor is a pile of PVC, nylon and plastic bases that takes ten minutes to untangle before every session. The good news is that agility gear is mostly long, light and stackable, which is exactly the kind of thing a garage wall handles well for a few dollars in hooks. The catch is that each piece wants something different: poles and bars want to lie level so they stay straight, a tunnel wants to stay compressed and dry, and sandbags want to stay low. This guide covers how to put a backyard or indoor agility kit on a garage wall for well under $50 in hardware, which hook fits which piece, where in the garage the kit should live, and the cleaning and drying habits that keep tunnels and poles in good shape. It uses the published dimensions in the AKC agility regulations and the NADAC equipment specifications as a reference for full-size gear, and the Outward Hound Zip & Zoom Indoor Agility Kit as an example of a compact starter kit.
Shop garage wall hooks and racks for agility gear on Amazon
Who this is for
- Dog owners practicing agility in the backyard who want the poles, jumps and tunnel off the garage floor between sessions
- Handlers training for AKC or NADAC trials who own near full-size gear and need a tidy, fast-to-load setup for the car
- Families with a compact indoor agility kit who want it in one place instead of spread across closets and the toy bin
Quick answer
For most garages, the best setup is two pairs of stud-mounted ladder or lumber hooks for the long pieces, two heavy-duty utility hooks for a bagged tunnel, and one shelf bin for the bases, cups, stakes and clips. Lay weave poles and jump bars level across one pair of hooks so they stay straight, put jump uprights or the jump wings on the second pair, compress the tunnel, strap it, and hang it in a duffel or its own carry bag. Keep the tunnel sandbags on the floor or the lowest shelf, because NADAC’s specification suggests about twenty pounds of sand or three gallons of water in each bag, which is too heavy to lift over your head. Make sure the tunnel and any nylon pieces are completely dry before they go into a bag, and keep PVC out of direct sun. A small kit like the Outward Hound Zip & Zoom already ships with its own storage bag, so one hook is enough. Hooks, a shelf bin and a couple of straps stay under $50; check ratings and current prices on the listing.
Quick comparison
| Option | Best for | How it holds | Trade-off |
|---|---|---|---|
| Pair of ladder or lumber hooks | Weave poles and jump bars | Poles lie level across two stud-mounted hooks | Needs a long stretch of clear wall for full-size bars |
| Second pair of ladder hooks | Jump uprights, wings or a tire jump frame | Uprights lie flat or hang by their crossbar | Bulky wings need deeper hooks than poles |
| Two heavy-duty utility hooks | A compressed tunnel strapped inside a duffel or carry bag | Bag hangs by its handles from two coated hooks | Tunnel must be fully dry first; straps sold separately |
| Wall shelf with one labeled bin | Bases, jump cups, stakes, clips and spare parts | Brackets screwed into studs; bin sits on the shelf | Rate the shelf for the bin, not for sandbags |
| Floor-level spot or bottom shelf | Tunnel sandbags or water-filled holders | Bags sit flat on a mat or a shelf just off the floor | Uses a little floor; never store heavy bags overhead |
| Bungee sports rack or corral | A loose mix of poles, bars and a folded pause box | Pieces stand upright behind elastic cords | Long poles can still lean; check the rack height |
Ladder and lumber hooksSports equipment wall racksLabeled wall shelf bins
What to look for
Hooks long enough for the stack
Long agility pieces are light but bulky. A set of six or twelve weave poles plus a few jump bars makes a bundle several inches thick, so pick ladder or lumber hooks with arms long enough to hold the whole stack with room to spare, and a raised tip or lip so nothing rolls off when you pull one pole out. Shallow utility hooks are fine for one or two bars, not for a full set.
Spacing that matches the length
Full-size gear is long. The AKC regulations call for weave poles 40 inches tall and bar-jump bars 4 to 5 feet long, and NADAC allows weave poles from 41 to 48 inches. Put the two hooks of each pair on studs far enough apart that the poles overhang each hook by roughly a foot on both sides, so they balance and do not tip. On a standard wall with studs 16 inches apart, that usually means hooks on studs two or three bays apart for full-size bars.
Fasteners that go into studs
A rack of PVC poles is not heavy, but a bagged tunnel, a wall shelf full of bases and the force of pulling a bundle off its hooks every session all add up. Use wood screws into studs or solid blocking for every hook and shelf bracket. Keep plastic drywall anchors and adhesive hooks for the training pouch and the clicker, not for the equipment.
Coatings that protect fabric and finishes
Tunnel fabric and jump wing paint scuff on bare steel. Vinyl- or rubber-coated hooks are kinder to everything that touches them, and they keep PVC from sliding as easily. Check that the coating covers the full arm where the gear rests, not just the tip.
A home for the small parts
The pieces that go missing are the small ones: jump cups, weave pole bases or feet, tent stakes, clips and spare connectors. A single labeled bin on a wall shelf or a hanging bag with clear pockets keeps them in one place. Pick a bin size from the parts you actually own, and keep it next to the long pieces so the whole kit goes out the door together.
What a home agility kit actually includes
Weave poles
Weave poles are the piece most home kits start with. Competition poles are tall and thin: the AKC regulations describe them as 40 inches high and about 1 inch in outside diameter, spaced 24 inches apart on a fixed base, and NADAC’s specification sets them at 41 to 48 inches with the same 24-inch center-to-center spacing. Backyard sets are often stick-in-the-ground poles or poles that slot into separate bases. Either way, what you store is a bundle of straight poles plus bases or stakes, and the poles stay straight only if they are stored straight.
Jumps and bars
A bar jump is two uprights or wings with a removable bar. The AKC regulations call for bars 4 to 5 feet long, set on supports so a dog can knock them off easily. At home, that usually means a pair of PVC uprights with plastic jump cups and one or two bars. The uprights are often the most awkward pieces in the kit, because they have feet or wings that stick out at an angle.
Tunnels and tunnel holders
An open tunnel is a flexible tube on a spiral wire frame. Full-size tunnels are long: the AKC regulations specify 10 to 20 feet with round openings of about 25 inches, and NADAC uses about 24 inches across and 10 to 20 feet long. The upside is that a tunnel compresses along its frame into a short, wide bundle. The downside is the holders that keep it from rolling: NADAC’s specification says twenty pounds of sand or three gallons of water in each saddle-bag holder has proven sufficient. Those bags are the heaviest thing in the kit by far.
Starter and indoor kits
Compact kits are a different storage problem. Outward Hound describes its Zip & Zoom Indoor Agility Kit as one square collapsible tunnel, four weave poles and an adjustable jump that can be taken apart and used as two more weave poles, packaged in a storage bag, and retailers list the whole kit at only around two pounds. A kit like that needs one hook and a habit, not a rack.
Pause boxes, tables and extras
Some home setups add a pause box made of PVC, a small table, a tire jump or a set of cones and target plates. Flat or frame pieces like these usually store best standing against the wall behind a strap or lying on a high shelf, while cones nest into a stack that fits in the parts bin.
Storing each piece
Weave poles and jump bars: level and supported
Long PVC poles bend if they spend months leaning in a corner with weight against them, and a bent pole looks wrong to a dog and wobbles in its base. Store them level, across two hooks at the same height, so their own weight is split evenly. Bundle each set with two hook-and-loop straps so you can lift the whole set off the hooks in one move, and keep the weave poles and the jump bars in separate bundles so you can grab only what you need.
Uprights and wings: flat or by the crossbar
Simple PVC uprights can lie across the second pair of ladder hooks under the poles. Wings with feet or decorative panels are bulkier, so either hang them by a crossbar on a deep utility hook or stand them on edge against the wall with a strap between two screw eyes. Keep the jump cups on the uprights if they clip on securely, and in the parts bin if they slide off.
The tunnel: compressed, strapped and bagged
A tunnel stores well once it is compressed along its wire spiral and held that way. Fold it the way the maker’s instructions describe, wrap two or three straps around the bundle, and put it in its carry bag or a large duffel. Hang the bag by its handles from two coated utility hooks on neighboring studs. A full-size tunnel bundle is wide and bulky, so give it its own stretch of wall rather than crowding it behind the poles. Small collapsible indoor tunnels usually twist down into a flat disc and slip back into the kit’s own bag.
Sandbags and water holders: low and dry
Tunnel holders filled with sand are heavy and dense, and NADAC’s twenty-pound guideline per bag is a good reason to keep them on the floor or the lowest shelf, never on a hook or a high shelf. Set them on a rubber mat or a pallet strip so they do not wick up moisture from a concrete floor. If you use water-filled holders, empty them before storage, especially in a garage that can freeze. NADAC also suggests putting sand in individual zip bags inside the holder, which makes the bags easier to empty, lighter to carry in pieces and less messy if a seam fails.
Bases, stakes, cups and clips: one bin
Give the small parts one container with a label on the front. Weave pole bases, ground stakes, jump cups, spare connectors and a couple of spare straps all go in together. A clear bin makes it easy to see when something is missing before you head out to the yard. Keep the treat pouch and clicker on a separate hook by the door; our dog training tool station guide covers that wall.
Choosing between the six options
When ladder hooks win
For weave poles and jump bars, two pairs of stud-mounted ladder hooks are the simplest and cheapest answer. Poles stay straight, you can see at a glance what is there, and loading the car takes one lift per bundle. The only requirement is a clear stretch of wall a little longer than your longest pole or bar.
When a bungee sports rack is better
If wall length is short but floor space in one corner is free, a freestanding or wall-mounted bungee sports rack holds poles upright behind elastic cords. It works best for shorter backyard poles and indoor kits. Very long bars and tall competition poles can still lean and bow in a short rack, so check the rack height against your longest pole.
When a track rail makes sense
A garage track rail lets you slide ladder hooks, utility hooks and a basket to exactly the spacing each piece needs, and move them when the kit changes. It is useful when agility gear shares a wall with bikes or yard tools. A rail plus several specialty hooks can pass $50, so price the whole set before you start, and check both the rail rating and each hook rating.
When the kit fits in one bag
If your kit is a compact indoor or starter set, skip the rack entirely. Pack it back into its own bag after each session and hang that bag from one coated utility hook near the house door. The habit matters more than the hardware: a small kit spread across a closet loses its poles; a small kit that always goes back in the bag does not.
Why adhesive hooks are the wrong tool here
Adhesive hooks are fine for a lanyard or a clicker on a smooth indoor wall, but a garage wall with wide temperature swings, unpainted drywall or OSB, and a bundle of poles pulled off every session is outside what they are built for. Use screws into studs for anything that holds equipment.
Where the kit should live in the garage
Closest to the yard door
Agility gear goes out to the yard or the car and comes back, often several times a week. Store it on the wall nearest the door you actually use, so carrying the poles out does not mean threading them past the car and the bikes.
Out of the sun
Sunlight fades nylon tunnel fabric and can make plastic and PVC parts stiffen and fade over time. Pick a stretch of wall that does not get direct sun through a window. A shaded interior wall is the right spot for every part of the kit.
Away from damp and heat
Keep the tunnel bag away from the water heater, a dryer vent, a leaky door seal or any corner where water pools after rain. Damp air is what turns a tunnel into a mildew problem, and heat near an appliance is hard on plastic bases and cups.
Clear of the car door and walkway
Long poles that stick out past the end of their hooks are easy to walk into. Mount the ladder hooks along a wall where nobody walks right next to the ends, keep them outside the swing of the car door, and set the hooks high enough that the poles sit above head height for children but low enough that you can lift them down without a step stool.
Setups for different garages
One-car garage, backyard kit
On the back wall of a single garage, put one pair of ladder hooks at about head height for the poles and bars and a second pair just below for the uprights. Hang the bagged tunnel on two utility hooks at one end, put the parts bin on a small shelf beside it, and set the sandbags on a mat underneath. That layout keeps the whole kit within one stretch of wall.
Two-car garage, trial-level gear
Handlers with near full-size gear usually need the long side wall. Run the ladder hooks along the wall above the car’s hood line, keep the tunnel bags together at one end, and add a second shelf for a pause box and cones. Label each bundle and bin with what is inside, so you can load exactly what a training session or a trial needs without opening everything.
Shared garage with sports gear
Agility poles look a lot like garden stakes, pickleball nets and PVC from other projects. Keep the agility bundles on their own hooks, wrap them with a colored strap, and keep the kit away from the ball and bat racks so pieces do not migrate. A track rail with separate zones works well here.
Rented garage or storage room
If you cannot drill, use a freestanding shelving unit for the bins and the tunnel bag and a freestanding bungee rack for the poles. If you can drill, small screw holes in studs are easy to fill and paint when you move out.
Installing the hooks
Find the studs and plan the span
Use a stud finder and confirm each stud with a small finish nail. Lay your longest pole on the floor along the wall and mark where each hook should go so the pole overhangs each hook by roughly a foot. Mark the heights with painter’s tape and hold a pole up against the marks before you drill.
Pilot holes and full-depth screws
Drill pilot holes sized to the screws the hook maker supplies and drive them until the hook sits flat and tight. A hook that rocks on its base will loosen as bundles go on and off. Mount both hooks of a pair at exactly the same height with a level, or the poles will roll toward the low end.
Height you can reach
Set the pole hooks at a height where you can lift a bundle off with your arms bent, not fully stretched. Heavier items, the tunnel bag and the parts bin, should sit between waist and shoulder height. Sandbags go at the bottom.
Test before you load everything
Hang one bundle, pull down firmly on each hook and check that nothing moves. Then add the rest of the kit over a day or two. If a screw is going to pull out, it usually shows up early.
Clean, dry and inspect before it goes up
Dry the tunnel completely
After a wet session or a dewy morning, open the tunnel out flat in a shaded, airy spot and let it dry inside and out before you compress it. Brush or rinse off mud and grass first. A tunnel bagged damp is the most common way to end up with mildew and a smell your dog will notice before you do.
Rinse grit off poles and bases
Dirt in the sockets of weave pole bases and jump cups makes the pieces stick and wear. A quick rinse with a hose and a towel dry before storage keeps them sliding together cleanly. Follow the maker’s cleaning instructions for any painted wings or printed fabric.
Check the wear parts
Before the gear goes on the wall for a long stretch, look for cracked bases, split jump cups, frayed tunnel fabric, a bent pole or a tunnel spiral that has poked through its sleeve. NADAC’s specification says tunnels with holes, loose threads or openings that collapse easily should not be used because they pose a safety hazard to dogs. Mark anything that needs replacing so it does not end up back in the yard.
Empty treats and pouches
Treat crumbs in a bag pocket attract mice in a winter garage. Empty the treat pouch and any pocket in the tunnel bag before long storage, and keep food in a sealed container indoors.
Winter and off-season storage
Pack it as one kit
At the end of the season, put everything away together: poles and bars bundled on their hooks, uprights below, tunnel dry and bagged, parts bin full and labeled, sandbags emptied or set on their mat. In spring, the first session starts with the kit in one place.
Empty water holders before freezing weather
Water expands as it freezes and can split a holder or burst a seam. Empty water-filled tunnel holders and let them dry before they go away for the winter.
Keep pests out
Hang the tunnel bag off the floor, keep the bin lid closed, and check the bags once or twice over the winter. Gear that hangs on the wall is much less attractive to mice than a pile on the floor.
Mistakes to avoid
- Leaning weave poles and jump bars in a corner where they bow and slide over.
- Compressing and bagging a tunnel that is still damp from the grass.
- Storing heavy sandbags on a high shelf or a hook instead of on the floor or the lowest shelf.
- Leaving PVC poles and nylon tunnels under a sunny garage window.
- Using adhesive hooks or plastic drywall anchors for a bundle of poles or a tunnel bag.
- Mounting a pair of ladder hooks at slightly different heights so the poles roll off.
- Letting bases, stakes and jump cups scatter into the general toolbox.
- Leaving water in tunnel holders in a garage that freezes.
Related guides
Browse the hub: Pet gear wall mounts under $50 - all guides
- Best Dog Frisbee & Fetch Toy Wall Hooks Under $50
- Dog Training Tool Station vs Pegboard for Pet Walls Under $50
- Best Dog Toy Bin Wall Mounts Under $50
- Best Pet Playpen Wall Storage Bags Under $50
- Best Dog Bike Trailer Wall Hooks Under $50 for Garage
- Best Garage Track Rail Hooks Under $50
- Best Bungee Cord Wall Organizers Under $50 for Garage
FAQ
How do you store dog agility equipment in a garage?
Lay weave poles and jump bars level across a pair of stud-mounted ladder hooks, put uprights on a second pair, compress and strap the tunnel and hang it in a bag from two coated utility hooks, keep small parts in one labeled bin, and keep sandbags on the floor or the lowest shelf.
How long are agility weave poles and jump bars?
The AKC regulations call for weave poles 40 inches tall and bar-jump bars 4 to 5 feet long, and NADAC allows weave poles from 41 to 48 inches. Backyard and indoor kits are often shorter, so measure your own longest piece before spacing the hooks.
Can I hang an agility tunnel on the wall?
Yes, once it is completely dry. Compress the tunnel along its wire frame, strap it so it stays compressed, put it in a carry bag or duffel and hang the bag by its handles from two coated hooks screwed into studs.
How heavy are agility tunnel sandbags?
NADAC’s equipment specification says about twenty pounds of sand or three gallons of water in each tunnel holder bag has proven sufficient. That is why the bags belong on the floor or the bottom shelf rather than on a hook or a high shelf.
Can I store agility gear in a hot or cold garage?
Most gear handles a garage well if it is dry and out of direct sun. Empty water-filled holders before freezing weather, keep the tunnel away from damp corners, and keep plastic parts away from heaters and vents.
What is the cheapest way to store a small indoor agility kit?
Keep it in its own bag and hang the bag from one coated utility hook near the door. Compact kits like the Outward Hound Zip & Zoom Indoor Agility Kit ship with a storage bag, so no rack is needed.
Bottom line
The best dog agility equipment wall storage is a few well-placed hooks and one good habit. Lay weave poles and jump bars level on a pair of stud-mounted ladder hooks, put the uprights on a second pair, and hang the tunnel compressed, strapped and completely dry in a bag on two coated utility hooks. Keep the bases, cups and stakes in one labeled bin, keep heavy sandbags on the floor, and choose a shaded, dry wall closest to the yard door. The whole setup costs well under $50, and the next session starts in minutes. Check hook ratings, what is included and current prices on the listing before you buy.