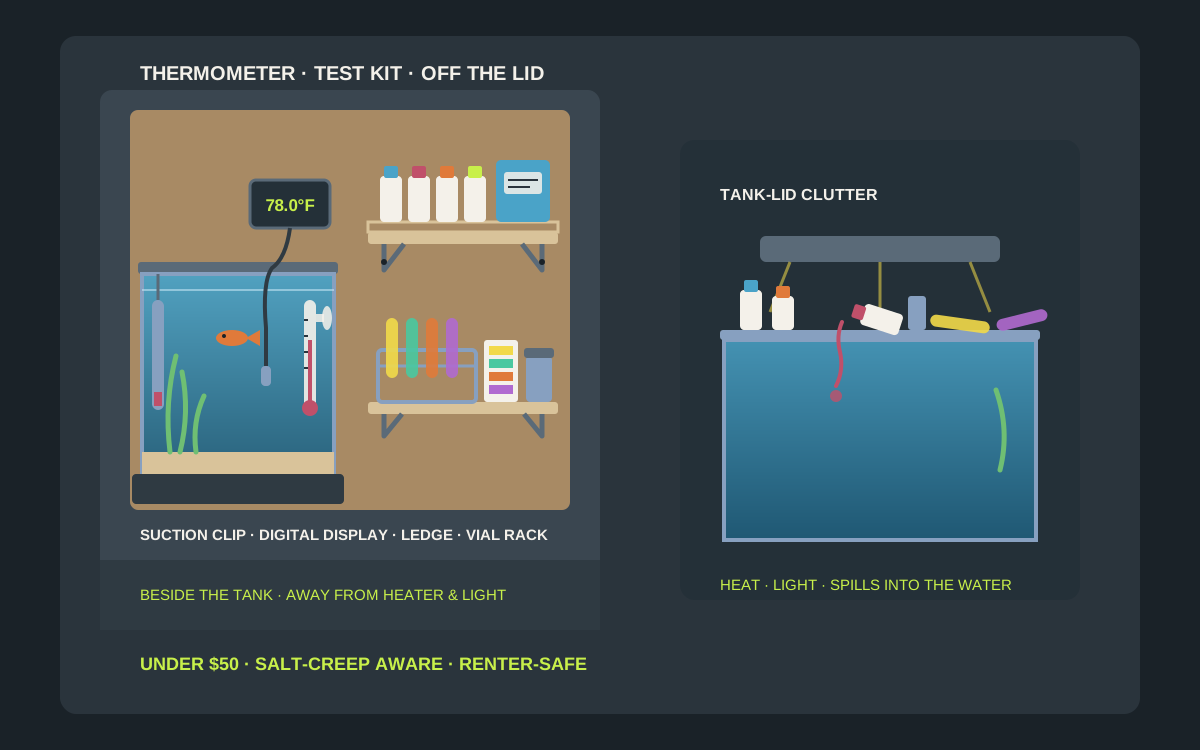
For most tanks, the best under-$50 setup is a suction-cup thermometer clip on the inside glass at the end away from the heater, plus one small screw-mounted wall ledge beside (never above) the tank that holds the test kit, a test-tube rack for drying vials and the strips jar with its lid closed. If you run a digital thermometer, mount its display outside the tank on the stand or wall with an adhesive clip and route the probe cable so it cannot pull the display down. Renters can swap the screwed ledge for an adhesive caddy on smooth paint, but only for a light kit, and should keep it out of the splash zone. Check the current dimensions and price on the listing before you buy.
Shop aquarium test kit organizers on Amazon
Who this is for
- Freshwater and reef keepers whose master test kit, strips and thermometer live on the tank lid or in a kitchen drawer
- Renters who want a tidy tank-side testing station without drilling the wall behind the stand
- Anyone who tests weekly and wants the thermometer readable at a glance and the reagents kept cool, dark, dry and out of small hands
Quick answer
For most tanks, the best under-$50 setup is a suction-cup thermometer clip on the inside glass at the end away from the heater, plus one small screw-mounted wall ledge beside (never above) the tank that holds the test kit, a test-tube rack for drying vials and the strips jar with its lid closed. If you run a digital thermometer, mount its display outside the tank on the stand or wall with an adhesive clip and route the probe cable so it cannot pull the display down. Renters can swap the screwed ledge for an adhesive caddy on smooth paint, but only for a light kit, and should keep it out of the splash zone. Check the current dimensions and price on the listing before you buy.
Quick comparison
| Format | Best for | Typical price band | Why it wins |
|---|---|---|---|
| Suction-cup thermometer clip | Glass and digital-probe thermometers inside the tank | Usually under $15 | Holds the reading where you can see it; moves in seconds |
| Adhesive display mount/clip | Digital thermometer displays, timers, light-duty caddies | Usually $5–$20 | No holes; keeps the display dry outside the tank |
| Screw-mounted wall ledge | Master test kits, reagent bottles, conditioner | Usually $12–$35 | Most secure; keeps bottles off the lid and out of splash |
| Test-tube rack or acrylic organizer | Vials, color cards, strips jar, syringes | Usually $10–$30 | Lets vials dry upside down; keeps the kit in order |
| Pegboard with small bins | Fish rooms with several tanks and growing kits | Usually $15–$40 | Reconfigurable; combines tools, kits and nets |
Compare aquarium thermometer suction holders on Amazon
What to look for
Accurate thermometer placement first
A thermometer is only useful where it reads the tank, not the heater. Clip glass or digital probes mid-depth at the opposite end from the heater and out of the direct filter outflow, where you can read it at eye level without bending. Stick-on LCD strips read the glass, so room air, a nearby window or the tank light can skew them; treat them as a backup, and never mount any thermometer where sunlight hits the glass.
Reagent storage: cool, dark, dry and capped
Follow the storage line printed on your kit — most liquid kits ask for room temperature, out of direct sunlight, with caps tightened after every test. That rules out the tank hood, the top of a warm light fixture and a sunny windowsill. Test strips are even fussier: humidity ruins the pads, so keep the jar closed and grab strips with dry fingers. Check expiry dates on the bottles when you restock; an out-of-date reagent gives confident, wrong numbers.
Moisture and salt creep near the tank
Evaporation, drips from maintenance and, on saltwater systems, crusty salt creep all reach the wall beside a tank. Choose plastic, acrylic or coated hardware, avoid bare steel screws and wire baskets that rust, and wipe nearby mounts during water changes. Keep every shelf out of the splash zone and well away from outlets and power strips, and leave drip loops in power cords below the socket.
Suction vs adhesive vs screw-mounted
Suction cups belong on clean, smooth glass or acrylic — inside the tank for thermometers or on the outside of a cabinet door — and they lose grip as they age or get coated in algae. Adhesive clips suit light digital displays and slim caddies on smooth, fully cured paint, but humid fish rooms test them; follow the maker’s cure time and wall-type guidance. Anything holding a full master kit or several bottles belongs on screws into studs or proper anchors. Never add up clip ratings into an imagined total.
Clips, mounts, ledges and racks compared
When a suction-cup clip is enough
If all you need is a readable temperature, a suction-cup thermometer clip on the inside glass is the cheapest, cleanest answer. Clean the glass with an algae pad first, soften a stiff cup in warm water before pressing it on, and replace cups that no longer hold. A thermometer that keeps floating loose ends up behind the rockwork, where nobody reads it.
When to mount a digital display outside the tank
Digital thermometers put the probe in the water and the display outside, which means the display needs a dry, visible home. A small adhesive clip on the stand side or wall, just above the water line and out of the splash zone, keeps it readable. Leave a little slack in the probe cable so a bumped cable tugs the probe rather than ripping the display off its clip.
When a screw-mounted ledge earns its place
A full master test kit is a box of bottles, vials and a color chart, and it is heavier than it looks once bottles are full. A shallow wall ledge screwed into studs or proper anchors beside the tank gives it a level, secure home at eye height, so tests happen at the tank instead of on the kitchen counter. Pick a lip or rail along the front so a bottle does not roll off when the stand gets bumped.
When a vial rack or organizer is the missing piece
Most testing mess is wet vials lying on a towel. A test-tube rack or small acrylic organizer holds rinsed vials upside down to dry, keeps the color card flat and clean, and gives the strips jar and dosing syringes a fixed spot. Fish rooms with several tanks can graduate to a pegboard with small bins, one zone per system.
Build a tank-side testing station
Beside the stand, never over open water
Put the station to one side of the tank, at or just above stand height, so a dropped cap, a tipped reagent or a dribbling vial lands on the floor rather than in the water column. Nothing that holds chemicals should hang over an open-top tank or sit on the lid.
Keep reagents away from heat and light
Do not mount the ledge directly above the tank light, beside a heater cord bundle or in a sunny window. A shaded wall a little away from the fixture keeps bottles at room temperature and helps them last to their expiry date.
Zone wet and dry
Wet tools and drying vials go low and closest to the tank; the reagent box, strips jar and logbook stay dry and higher up. That keeps drips off labels and pads, and stops strips from absorbing moisture from damp vials beside them.
Child and pet safety
Liquid test kits carry safety warnings on the bottles; read them and keep the kit out of reach of children. Mount the ledge high enough that toddlers cannot reach it and a cat leaping onto the stand cannot sweep bottles off. A lidded box or a small latching cabinet is worth it in busy homes.
Treat under-$50 bands as moving targets
Check the current dimensions, mounting method, wall-type guidance and price on the listing before you buy.
Installation that respects water and power
Find studs or use the right anchor
Use a stud finder for the ledge; where there is no stud, use anchors the maker rates for the load and wall type. On a basement block or concrete wall, use masonry anchors. Adhesive caddies are for light kits on smooth, fully cured paint only.
Keep clear of outlets and cords
Never put a shelf of liquids above a power strip. Leave drip loops in the heater, filter and light cords, and keep the station on the opposite side from the outlet if you can.
Dry-fit the routine before drilling
Hold the kit at the planned height and run a mock test: can you open bottles, fill vials and read the color card in good light without reaching over the tank? Check that the hood still opens fully and that the display is readable from where you stand.
Move-out or rehang without wall scars
Empty clips and ledges first. Warm-strip adhesive mounts following the maker’s slow-pull method, or fill screw holes if you used hardware. Never pry a loaded mount off painted drywall.
Mistakes to avoid
- Storing the test kit on the tank lid or hood, where the light and heat cook the reagents.
- Placing the thermometer right next to the heater, so it reads warmer than the rest of the tank.
- Trusting a stick-on strip thermometer on glass that gets direct sun.
- Leaving the strips jar open in a humid fish room.
- Using bare steel screws or wire baskets beside a saltwater tank, then fighting rust stains.
- Mounting a shelf of liquids directly above the power strip.
Related guides
Browse the hub: pet gear wall mounts under $50 - all guides
- Best Aquarium Supply Wall Racks Under $50
- Best Aquarium Net & Tool Wall Holders Under $50
- Best Aquarium Airline Tube Wall Clips Under $50
- Best Pet Medication Wall Cabinets Under $50
FAQ
What is the best way to store an aquarium test kit on the wall?
A shallow, screw-mounted wall ledge or small organizer beside the tank, not over it, out of direct light and away from the tank hood. Keep caps tight, add a test-tube rack so vials can dry upside down, and keep the strips jar closed. Renters can use an adhesive caddy on smooth paint for a light kit.
Where should an aquarium thermometer be placed?
Mid-depth at the opposite end from the heater and out of the direct filter outflow, where you can read it at eye level. Avoid spots where sunlight or the tank light shines on the glass, especially for stick-on strip thermometers.
Do suction cups hold aquarium thermometers reliably?
Usually, on clean, smooth glass or acrylic. Wipe off algae first, soften a stiff cup in warm water before pressing it on, and replace cups that have hardened or keep letting go.
Can I store aquarium test reagents near the tank light?
No. Heat and light shorten reagent life. Follow the storage instructions on your kit — most say room temperature and out of direct sunlight — and keep bottles capped and away from the hood and fixture.
Are adhesive clips safe near a saltwater tank?
For light items such as a digital display, often yes on smooth, cured paint outside the splash zone. Humidity and salt creep can weaken adhesive and corrode metal hardware, so check mounts during water changes and move heavier kits to a screw-mounted ledge.
Bottom line
Aquarium thermometer and test kit wall clips under $50 work when the thermometer reads the tank and the kit lives somewhere sensible: a suction-cup clip away from the heater, a dry display mount for digital models, a screw-mounted ledge beside the stand for the reagents, and a vial rack so testing gear dries in order. Keep chemicals off the lid, out of heat, light and small hands, choose hardware that tolerates moisture and salt, and check the current specs and price on the listing before you buy.