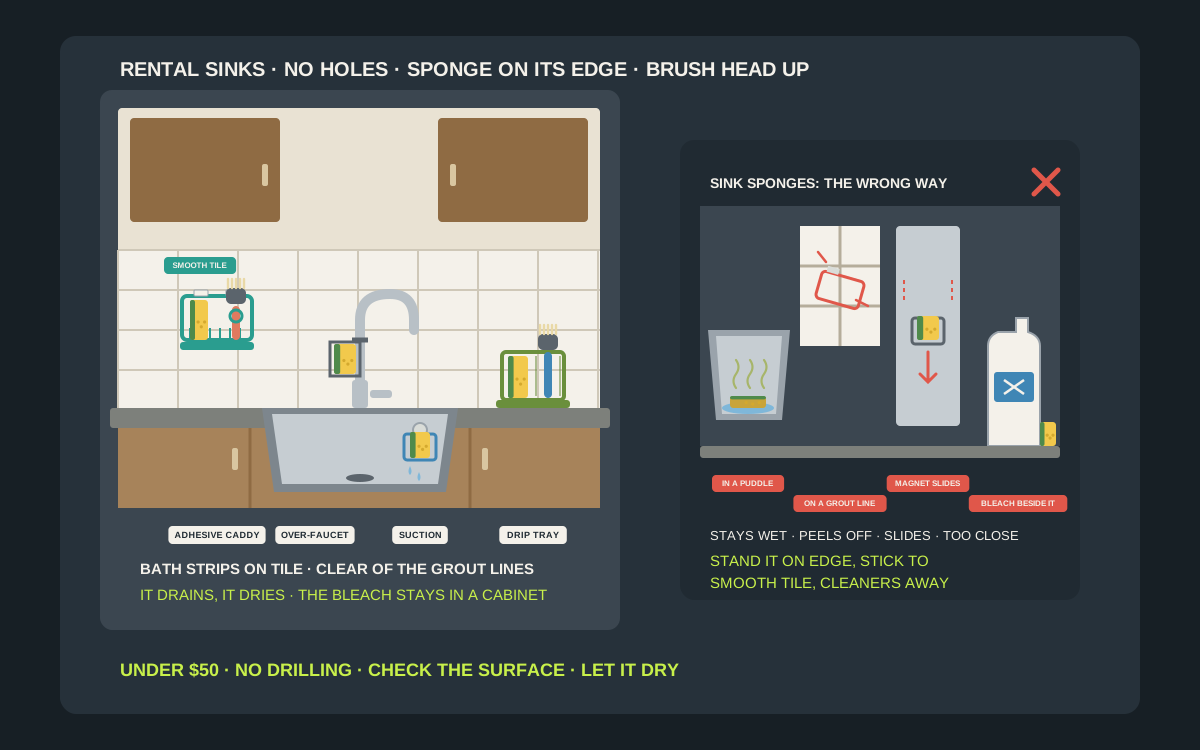
Every rental kitchen has the same small mess. The sponge lives in the corner of the sink, half in a puddle. The dish brush lies on its side on the counter, dripping onto the laminate. The scrubber, the soap and the steel wool pad fight for the same few inches behind the faucet, and by Thursday the whole corner smells faintly sour. It is a tiny problem, but it is one you touch three times a day, and it is one of the few spots in an apartment where hygiene and storage are the same question. A sponge that dries between uses is a fresher sponge. A brush that stands upright drains instead of rotting at the base. You do not need a drill for any of it. Adhesive caddies stick to a smooth tile backsplash, suction holders press onto the sink wall, over-faucet caddies hang from the faucet neck and countertop caddies sit on a drip tray, and every one of them comes off on move-out day. This guide covers which no-drill holder fits which sink, how to stick it so it stays up in a wet spot, what the research says about sponges and drying, and how to keep the corner of your kitchen clean without leaving a mark behind.
Shop adhesive sponge and dish brush holders on Amazon
Who this is for
- Renters who cannot drill into a tile backsplash or the wall behind the sink
- Anyone whose sponge lives in a puddle and whose dish brush lies on the counter
- Small kitchens with a single-basin sink and almost no counter beside it
- Roommates who want one tidy, shared spot for sponges, brushes and scrubbers
Quick answer
For most apartment sinks, the best under-$50 option is an adhesive or suction caddy that holds the sponge on its edge and the dish brush upright above a drain or drip tray, because airflow and drainage matter more than looks. If you have a smooth tile backsplash, an adhesive caddy with water-resistant strips and a removable drip tray is the most stable choice. If you have no backsplash, a suction holder on the sink wall or an over-faucet caddy uses space you already have, and a countertop caddy with a drip tray works anywhere. Magnetic holders only make sense on steel that a fridge magnet grips firmly, which rules out many stainless sinks. Whatever you choose, keep bleach and drain cleaner somewhere else, and check the surface, the strip type and the current price on the listing before you buy.
Quick comparison
| Setup | Best for | How it holds | Trade-off |
|---|---|---|---|
| Adhesive backsplash caddy | Smooth tile behind the sink | Strips on tile; sponge and brush over a drip tray | Needs a smooth spot clear of grout lines; bath-type strips |
| Adhesive under-cabinet caddy | Spare sponges and brushes out of sight | Strips inside the sink cabinet | Out of the airflow of the open kitchen; dries slower |
| Suction sponge holder | One sponge on the sink wall | Suction cup on the inside of the basin | Holds a sponge, rarely a brush; reseat it now and then |
| Suction sink caddy with brush hook | Sponge plus a hanging brush | Lever suction cup and lift-off basket | Needs a smooth, flat patch of sink or tile |
| Over-faucet caddy | Tiny sinks with no backsplash | Hangs on the faucet neck | Only fits some faucet shapes; can sway when you turn the tap |
| Saddle caddy | Double-basin sinks | Straddles the center divider | Needs a divider of the right width |
| Countertop caddy with drip tray | Any sink, no sticking at all | Sits on the counter over a tray | Uses counter space; empty the tray often |
| Magnetic holder | Steel surfaces a magnet grips | Magnet on steel | Many stainless sinks are not magnetic enough |
Adhesive sink caddies with drip traysSuction sponge holdersOver-faucet sponge and brush caddies
What to look for
It drains and lets air in
This is the whole point of a sponge holder. Look for an open grid, slots or drain holes under the sponge, and an open back or sides so air can move around it. A solid cup that holds water is just a smaller puddle. For brushes, look for a hole, ring or hook that keeps the head up and the bristles in the air, rather than a cup where the bristles sit in the runoff.
It catches the drip
Water has to go somewhere. Over the sink, a caddy can drain straight into the basin. Over a counter or a backsplash ledge, it needs a drip tray you can lift out and empty, ideally with a spout. The Command Under-Sink Sponge Caddy has drain holes and a removable drip tray. OXO’s Stainless Steel Sinkware Caddy has a drip tray with a pour spout. Without one, a counter caddy just moves the puddle a few inches.
It suits your surface
Adhesive strips need a smooth, sound, clean surface such as glazed tile or a well-painted wall, and Command tells you not to stick across grout lines or on wallpaper. Suction cups need a smooth, non-porous surface such as tile or glass and do not hold on stone, textured or porous surfaces. Magnets need steel that a magnet actually grips. Look at what is behind your sink first, then pick the holder.
It is made for a wet spot
Sinks are humid, splashy places. Choose rustproof materials such as anodized aluminum, 304 stainless steel, silicone or plastic, and choose strips made for wet areas. Command’s under-sink sponge caddy ships with medium strips and its instructions say to use Command Bath refill strips in a bath or humid environment. Command’s own FAQ notes that regular strips may not perform as well in humid areas.
It is easy to clean
A sponge holder gets slimy. The best ones come apart: a basket that lifts off a suction base, a tray that slides out, a divider you can pull. Command says its sponge caddy and drip tray are top-rack dishwasher safe, and OXO lists its StrongHold suction sink caddy as dishwasher safe. If you cannot get a brush into every corner, you will not keep it clean.
It comes off cleanly on move-out day
Adhesive strips should release with a pull tab, suction cups with a release tab or lever, and over-faucet and countertop caddies simply lift away. Avoid permanent mounting tape and anything that tells you to glue or screw it to the backsplash. A holder that leaves a rectangle of torn paint or adhesive residue costs more than it saved.
Why the sponge spot matters
The sponge is the germiest thing in most kitchens
In NSF International’s 2011 household germ study, 22 families swabbed 30 everyday items. Dish sponges and rags came out as the germiest items in the home: coliform bacteria, the family that includes Salmonella and E. coli, turned up on 77 percent of them, compared with 45 percent of kitchen sinks and 32 percent of countertops. Yeast and mold were found on the sponge or rag in 86 percent of the homes. NSF’s explanation is simple: sponges pick up bacteria while cleaning and are seldom left to dry properly.
Drying is the cheap part of the fix
Bacteria, yeast and mold all like a warm, wet sponge. A holder does not sanitize anything, but it changes the conditions between uses: a sponge standing on its edge on an open grid dries far faster than one lying flat in a wet corner. That is why the shape of the holder, the drain holes and the airflow matter more than the color or the brand.
Sanitizing helps, and replacing helps more
The USDA’s Agricultural Research Service tested sponge-cleaning methods on sponges soaked in a ground beef and bacteria mixture. Microwaving a damp sponge for one minute at full power killed 99.99999 percent of the bacteria, and a dishwasher cycle with a drying cycle killed 99.9998 percent, while soaking in a 10 percent bleach solution, lemon juice or plain water for three minutes left far more alive. A 2017 study in Scientific Reports that sequenced bacteria in 14 used kitchen sponges found very dense bacterial communities, found that sponges their owners regularly cleaned were not clearly cleaner, and suggested replacing sponges regularly, for example on a weekly basis. NSF’s own advice is to microwave wet sponges for two minutes once a day and replace them often, every two weeks or sooner.
A word of caution about the microwave
Only microwave a sponge that is thoroughly wet, never a dry one, and never a sponge with metal in it such as a steel scrubber layer. Let it cool before you touch it, because it comes out very hot. If that feels like a chore, the dishwasher with a drying cycle is the easier habit, and a pack of sponges is cheap enough to swap often.
Look at your sink before you shop
What is behind the sink
This decides almost everything. Glazed ceramic tile with a smooth face is the best surface for adhesive and suction. A painted wall works for adhesive if the paint is sound and has cured. Natural stone, textured tile, brick-look panels and peeling paint are poor surfaces for both, and wallpaper is out for adhesive. If there is no backsplash at all and the counter meets bare wall, plan on a suction, over-faucet or countertop holder instead.
Where the grout lines fall
Command’s water-resistant instructions say to avoid grout lines, and suction cups will not seal over them either. Measure the face of a single tile. A small sponge holder often fits on one tile; a wider caddy may need a big-format tile or a spot where you can center the strips on tile faces and keep the joints between them.
Faucet shape and the tap swing
Over-faucet caddies hang from the neck of the faucet, so look at the shape of yours. A plain round neck with a little straight section above the deck is ideal. A pull-down sprayer with a hose that slides through the neck, a curved gooseneck with nothing straight to grip or a faucet set very close to the backsplash can all make one awkward. Turn the handle through its full range and make sure a caddy would not block it.
Sink walls and dividers
Suction holders go on the inside wall of the basin, usually the back or the side nearest the faucet. Check that the wall is flat, smooth and high enough above the water line to keep the sponge out of standing water. For a double-basin sink, measure the width of the center divider before you look at saddle caddies, because they are made to straddle a ledge of a certain thickness.
The counter beside the sink
Even a small countertop caddy needs a patch of counter roughly the size of a paperback. If the only free counter is the strip where you set the drying rack, put the sponge somewhere else. If counter space is tight, the wall, the sink wall or the faucet is the better address.
Eight no-drill setups that work
An adhesive caddy on a tile backsplash
This is the most stable no-drill option if you have smooth tile behind the sink. A plastic or stainless caddy sticks on with adhesive strips and holds a sponge on its edge, sometimes a brush in a ring and a scrubber in a side pocket, over a slotted floor or a lift-out drip tray. The Command Under-Sink Sponge Caddy is a typical design: drain holes, a removable drip tray, a caddy and tray that are top-rack dishwasher safe, and instructions that allow it under the sink cabinet or on a tile backsplash. Command ships it with medium strips and recommends its Bath refill strips for a humid spot; over a sink, follow that advice.
An adhesive caddy inside the sink cabinet
The same Command caddy can go inside the cabinet under the sink, which is a good home for the backup sponges, the steel wool pads and the spare brush. It is not the best home for the sponge you use every day, because a closed cabinet dries things slowly. Keep the wet one out in the air and the dry spares inside. If your under-sink cabinet is crowded with pipes, a tension rod can hold spray bottles and leave room for a caddy on the door or side wall.
A small suction sponge holder on the sink wall
A suction holder presses onto the inside wall of the sink and holds one sponge on its edge, where it drips straight into the basin. OXO’s Steel Suction Sponge Holder is a good example: rustproof anodized aluminum, drain holes, a release tab to pop it off and a footprint of about 3 1/4 by 2 by 2 1/2 inches. It is about the simplest fix there is. The limit is that most small holders take a sponge and maybe a scrubber, not a long-handled brush.
A suction sink caddy with a brush hook
A slightly bigger suction caddy holds a sponge and gives the brush a place too. OXO’s StrongHold Suction Sink Caddy uses a lever-locking suction cup, has a removable basket and a stainless steel hook on the front for a dish brush, and is listed as dishwasher safe. simplehuman’s sink caddy takes a similar idea further, with three compartments, a pop-out silicone brush holder and the choice of four suction cups or a hanger that hooks over the sink ledge. On a front hook, the brush hangs head down, which sounds wrong but works: the water runs off the bristles and drips into the sink instead of pooling at the base of the head.
An over-faucet caddy
An over-faucet caddy wraps around the faucet neck and hangs a small basket behind or beside it, with a slot for the sponge, sometimes a hole for the brush handle and sometimes a short bar for a dishcloth. Generic versions in 304 stainless steel are common and well under $50. They use space that is otherwise wasted and need no sticking at all, which makes them ideal for a tiny sink with no backsplash. Check the faucet shape first, and make sure the caddy does not knock the handle or the sprayer.
A saddle caddy on a double-basin divider
If your sink has two basins, a saddle caddy sits on the center divider with a pocket hanging into each side. The sponge drains into one basin and the brush into the other, and nothing touches the counter. Silicone and stainless versions are both common. Measure the divider and check the range on the listing, because a caddy that is too wide wobbles and one that is too narrow will not sit down.
A countertop caddy with a drip tray
If you cannot or do not want to stick anything, a countertop caddy is the fallback that works with every sink. OXO’s Stainless Steel Sinkware Caddy is a good reference design: a compact ventilated body, a removable divider for a sponge and a brush, and a drip tray with a pour spout so you can tip the water into the sink. Look for the same three things in any budget caddy, and empty the tray every day or two.
A magnetic holder, on the right steel
Magnetic sponge holders, such as the small steel ones in Yamazaki’s tower range, are tidy and leave no residue at all. But a magnet needs steel it can grip. Many stainless steel sinks are made from grades a magnet barely holds, and most backsplashes are tile or paint. Test the exact spot with a fridge magnet first. If it slides or falls off, so will the sponge holder, usually at the moment it is wet and heaviest.
Sticking it to a backsplash so it stays up
Clean with rubbing alcohol, then dry
Kitchen tile carries a film of cooking grease and soap that no adhesive will hold through. Command’s instructions for its sponge caddy say to clean the surface with rubbing alcohol, not household cleaners, which can leave a slippery residue. Wipe the spot, let it dry completely and do not touch it with your fingers again before you stick.
Use strips made for wet places
Regular indoor strips are fine for a dry pantry, not for a splash zone. Command’s instructions tell you to use its Bath refill strips in a bath or humid environment, and its FAQ says regular strips may not perform as well in humid areas. Buy the water-resistant refills when you buy the caddy, so you are not tempted to use the strips in the box behind a sink.
Press hard, then wait before loading
Command’s caddy instructions say to press each base firmly for 30 seconds and wait one hour before loading. For a caddy that will live in a splash zone, waiting longer does no harm: Command’s shower caddy instructions ask you to use the shower once and then wait overnight before loading. Setting it up in the evening and loading it the next morning is a good habit for any wet spot.
Keep it out of the basin and above the splash
Command says its under-sink sponge caddy is not recommended for mounting inside the sink, and that it should be used indoors between 50 and 105 degrees Fahrenheit. Put the caddy above the counter or the sink rim on the backsplash, not where it sits under the tap or gets sprayed every time you rinse a pan. A few inches above the counter, to the side of the faucet, is usually right.
Leave room to remove it
Command strips come off by pulling the tab slowly straight down along the wall, stretching it rather than pulling it out toward you, and the instructions say to stretch it at least 15 inches. That needs space below the strip. Do not tuck a caddy so close to the counter that you cannot pull the tab down later, and never pull a strip toward you or twist it off.
Respect the load
Sponges and brushes are light, but a wet sponge, a full brush, a steel scrubber and a bottle of dish soap add up quickly. Command rates its medium strips at 3 pounds and large strips at 5 pounds, and lists its clear medium caddy at 2 pounds and large caddy at 4 pounds. Check the rating for the caddy you buy, keep heavy soap bottles on the counter or in a dedicated dispenser, and treat the sponge caddy as a sponge caddy, not a shelf.
Suction cups: what actually makes them hold
Smooth, non-porous and flat
Suction works by sealing against a surface, so the surface has to be smooth, non-porous and flat. OXO’s StrongHold instructions call for tile or glass, warn against grout lines and cracks, and say not to use them on porous or uneven surfaces such as marble or granite. The inside of a smooth stainless or enamel sink basin is usually fine. A textured composite sink or a natural stone backsplash usually is not.
Clean and dry before you press
Wash the spot with warm water, dry it completely and make sure the suction cup itself is clean. Grease or a film of soap on either side breaks the seal. Then press the cup firmly from the center outward, or flip the lever down on a lever-lock design such as the StrongHold.
Test it, and reseat it now and then
Suction cups slowly lose their grip, especially in places that warm up and cool down, such as a sink full of hot water. OXO’s instructions for its suction line warn that a product left a long time without checking can detach. Give the holder a gentle tug once a week when you change the sponge, and if it moves, take it off, wash both surfaces and press it on again.
Keep the brush, sponge and cleaners in their lanes
Brush head up, or hanging down
A dish brush should either stand with the head up and the bristles in the air or hang head down from a hook over the sink. Never leave it lying on its side in a cup of water, where the base of the head stays wet. Rinse it hot after use and flick out the water. Many dish brushes go in the dishwasher; follow the maker’s label, and replace the brush or its head when the bristles splay or the base stays dark.
One sponge for dishes, not the counter after raw meat
A sponge that wipes up raw meat juice and then washes a glass is spreading whatever it picked up. Michigan State University Extension advises using a paper towel or a sanitizing wipe for meat juices rather than the dish sponge. The USDA’s Food Safety and Inspection Service suggests paper towels for kitchen surfaces and, if you use cloth towels, washing them often in the hot cycle. Give the dish sponge one job.
Bleach and drain cleaner live somewhere else
The handy ledge behind the sink is exactly where the strong stuff tends to end up, right next to the sponge and within reach of children. Keep only the dish soap at the sink. Bleach, drain cleaner, oven cleaner and dishwasher pods belong in a cabinet, ideally high up or behind a child-safety latch, in their original containers with the labels intact.
Give the soap its own mount
Dish soap is the item most likely to overload a sponge caddy. A full bottle is heavy, and a caddy that holds a bottle plus a wet sponge plus a brush is asking a lot of two strips. A soap pump on the counter or a dedicated adhesive soap dispenser mount on the backsplash keeps the sponge caddy light.
Three apartment sinks, three setups
Single basin with a tile backsplash
This is the easiest case. Clean a smooth tile beside the faucet with rubbing alcohol, stick an adhesive caddy with water-resistant strips a few inches above the counter, keep the drip tray in, and stand the sponge on its edge in the main pocket and the brush in the ring. Put the backup sponges in a second caddy inside the sink cabinet door.
Single basin, no backsplash, almost no counter
Common in studios and older buildings, where a laminate counter meets bare painted wall. Skip the wall. Put a small suction holder on the inside back wall of the basin for the sponge and hang the brush from a suction caddy with a hook, or use an over-faucet caddy if the faucet neck is a simple round shape. Nothing touches the counter.
Double basin with a center divider
Use a saddle caddy on the divider, with the sponge over one basin and the brush over the other. If the divider is too thin or too wide, a suction caddy in the smaller basin does the same job. The counter stays free for the drying rack.
Set it up in twenty minutes
- Decide where the wet sponge will live: on the backsplash, the sink wall, the faucet, the divider or the counter.
- Check the surface: smooth tile or sound paint for strips, smooth non-porous sink or tile for suction, a fridge magnet test for magnets.
- Pick a holder that drains: open grid or drain holes under the sponge, a brush ring or hook, and a drip tray if it sits over the counter.
- Clean the spot with rubbing alcohol for adhesive or warm water for suction, and let it dry completely.
- Stick or press the holder, a few inches above the counter or the sink rim, clear of grout lines and out of the direct spray of the tap.
- Wait at least an hour, or overnight in a splash zone, before loading it.
- Load only the sponge, the brush and a scrubber. Keep the soap on its own pump or mount and the cleaners in a cabinet.
- Once a week, change or sanitize the sponge, wash the holder and give suction cups a gentle tug.
Clean the holder, not just the sponge
Weekly is enough for most kitchens
A sponge holder collects soap film and a slimy layer where the sponge sits. Once a week, take it apart and wash it in hot soapy water with a small brush, or put it in the dishwasher if the maker says it is dishwasher safe. Command says its sponge caddy and tray are top-rack dishwasher safe, and OXO lists its StrongHold suction caddy as dishwasher safe.
Do not clean adhesive caddies in place with strong sprays
Spraying bathroom or kitchen cleaner onto a caddy stuck to the wall soaks the strips too. If the caddy does not lift off, wipe it with a damp cloth and a little dish soap, and rinse the drip tray in the sink.
Watch for rust and cracks
Cheap chrome-plated wire can rust where the plating chips, leaving orange marks on the tile and the counter. Rustproof aluminum, 304 stainless steel, silicone and plastic hold up better in a constantly wet spot. Replace any holder that starts to rust, crack or stay slimy after washing.
Your lease and the deposit
Most leases care about holes, not caddies
A sponge caddy on adhesive strips, a suction holder or an over-faucet caddy normally leaves nothing behind, which is why these are the renter’s choice. If your lease says anything about adhesives or fixtures on tile, read it, and if you are unsure, a short message to the property manager is cheaper than an argument at move-out.
Photograph the backsplash before you stick
Take a quick photo of the tile and the wall behind the sink on move-in day. If there are already chips, stains or adhesive residue from a previous tenant, you have a record.
Remove things the right way on move-out day
Pull adhesive strip tabs straight down along the wall, slowly. Pop suction cups with their release tab or lever rather than prying them with a knife. Wipe off any soap film or water marks the holder left, and check the caulk line between the counter and the backsplash for mildew, which a damp sponge corner tends to encourage.
Mistakes to avoid
- Leaving the sponge lying flat in the corner of the sink, where it never dries.
- Storing the dish brush on its side in a cup that holds water.
- Sticking a caddy across grout lines, on wallpaper, on peeling paint or on natural stone.
- Using regular indoor strips in a splash zone instead of water-resistant strips.
- Mounting an adhesive caddy inside the sink basin or right under the tap.
- Loading the sponge caddy with a full bottle of dish soap and every brush in the kitchen.
- Buying a magnetic holder without testing the sink with a fridge magnet.
- Keeping bleach or drain cleaner on the ledge next to the sponge.
- Microwaving a dry sponge, or one with metal in it.
- Pulling an adhesive strip toward you instead of straight down along the wall.
Related guides
Browse the hub: No-drill apartment storage under $50 - all guides
- Best Adhesive Soap Dispenser Wall Mounts for Apartments Under $50
- Best Tension Rod Under-Sink Organizers for Apartments Under $50
- Best Adhesive Paper Towel Holders for Apartment Kitchens Under $50 (No Drill)
- Best Adhesive Utensil Holders for Apartment Kitchens Under $50
- Best Over-Cabinet Kitchen Organizers for Apartments Under $50 (No Drill)
- Best Collapsible Sink Organizers for RVs Under $50
- Best Collapsible Dish Drying Racks for RVs Under $50
- Best Command Hooks for Apartment Storage Under $50 (No Drill)
FAQ
What is the best way to store a kitchen sponge in an apartment?
Stand it on its edge in a holder with drain holes or an open grid, somewhere air can reach it and the water can drain into the sink or a drip tray. In a rental, that usually means an adhesive caddy on a smooth tile backsplash, a suction holder on the sink wall, an over-faucet caddy or a countertop caddy with a tray. Do not leave it lying flat in a wet sink corner.
Will adhesive sponge holders stay up next to a sink?
Yes, if the surface and the strips are right. Stick it to smooth tile or sound paint, clear of grout lines, after cleaning with rubbing alcohol. Use water-resistant strips, since Command recommends its Bath refill strips for humid spots, press for 30 seconds and wait before loading. Keep the load light and the caddy out of the sink basin.
Do suction sponge holders work on stainless steel sinks?
Usually, yes. A smooth stainless or enamel basin is a good suction surface if it is clean and dry. Suction does not hold over grout lines or on porous, textured or uneven surfaces such as natural stone. Check the grip once a week and reseat the cup if it moves.
Do magnetic sponge holders stick to stainless steel sinks?
Often not. Many stainless steel sinks are made from grades a magnet barely grips. Test the exact spot with a fridge magnet first; if it slides off, choose a suction or adhesive holder instead.
How often should I replace or sanitize a kitchen sponge?
NSF suggests microwaving a wet sponge for two minutes once a day and replacing it every two weeks or sooner, and the authors of a 2017 Scientific Reports sponge study suggested replacing it regularly, for example weekly. USDA research found microwaving a damp sponge or running it through a dishwasher with a drying cycle killed far more bacteria than a short bleach or lemon juice soak.
Where should I keep a dish brush so it dries?
Upright with the head up and the bristles in the air, or hanging head down from a hook over the sink so water drips into the basin. Avoid cups that collect water at the base. Rinse it hot after use and replace it when the bristles splay or stay discolored.
Bottom line
The best sponge and dish brush holder for an apartment sink is the one that fits your surface and lets things dry: an adhesive caddy with water-resistant strips on smooth tile, a suction holder or caddy on the sink wall, an over-faucet or saddle caddy where there is no backsplash, or a countertop caddy with a drip tray anywhere. Stand the sponge on its edge, keep the brush head up or hanging, change or sanitize the sponge often and keep the bleach in a cabinet. Look at what is behind your sink, then check the surface, the strip type and the current price on the listing before you buy.